User Guide About Converting Blu-ray Disc to MOV File


My old machine crashed and I can't access to iTunes library. So I bought a new Mac from local retail store. Thankfully most of my music (over 1000 songs) are on my iPhone. Is there a program or method out there that I can use to backup all my iPhone music and playlists (if possible) on my new Mac?
Lets face it, even though Apple's iTunes makes it easy and intuitive to sync songs from your Mac with your iPhone, when it comes to the reverse direction—transferring music from your iPhone back to the Mac computer, things can be challenging and frustrating. You can't pull music off iPhone directly, nor via iTunes program. The reason for Apple to have taken such a restrictive approach, according to sources, is simply to dampen the threat of piracy.
If you're a music fan, it shouldn't be a surprise that you have a huge number of hot songs and albums on your iPhone that you like to listen to at home or on the go. But there will come a time for every iPhone user (especially those who own a 16GB device) when the device is running out of space to add tracks or download new music. Before you start regretting why you didn't get a 128 GB device and being forced to delete your favorite songs, in this article we're going to walk you through on how to liberate songs from an iPhone and move to Mac (iMac, Macbook, etc) for backup or sharing later.
iTransfer—One-stop Solution to Manage Your Mobile Library
Before we jump right into the tutorial, let's take a brief look at the tool we'll introduce to transfer songs from an iPhone to a Mac.
iPhone Data Transfer is all-in-one media management tool that works on both Windows and Mac. It treats an iPhone, iPad, iPod a bit like a removable hard drive and offers bidirectional synchronization, letting your move music, videos, TV shows, podcast, photos and really just about anything from iOS device to your Mac/ PC computer and vice versa. You can also use it move content amongst iOS, iTunes and computer without a hitch. Regarding to music, you can
This guide will suit the vast majority of iOS (iPhone, iPad, iPod) devices. In the following guide, we'll take the process of copying music from an iPhone 6s to your Mac for example. To do the same on a PC machine, check out our how to transfer music from iPhone to a Windows PC guide.
Step 1: Run iTransfer and connect iPhone to Mac
Open up the program on your Mac (iMac, MacBook, Mac Mini, etc), you will see a sleek and streamlined interface which you can easily access all features.
Plug your iPhone that you want to make music transferring into your Mac, the program will detect it immediately and present you with a iPhone icon on the left side of the screen, as you can see in the following screenshot.
Note, if you have more than one devices connected, you're required to head to the upper left corner of the interface and select the one you want to move files from.
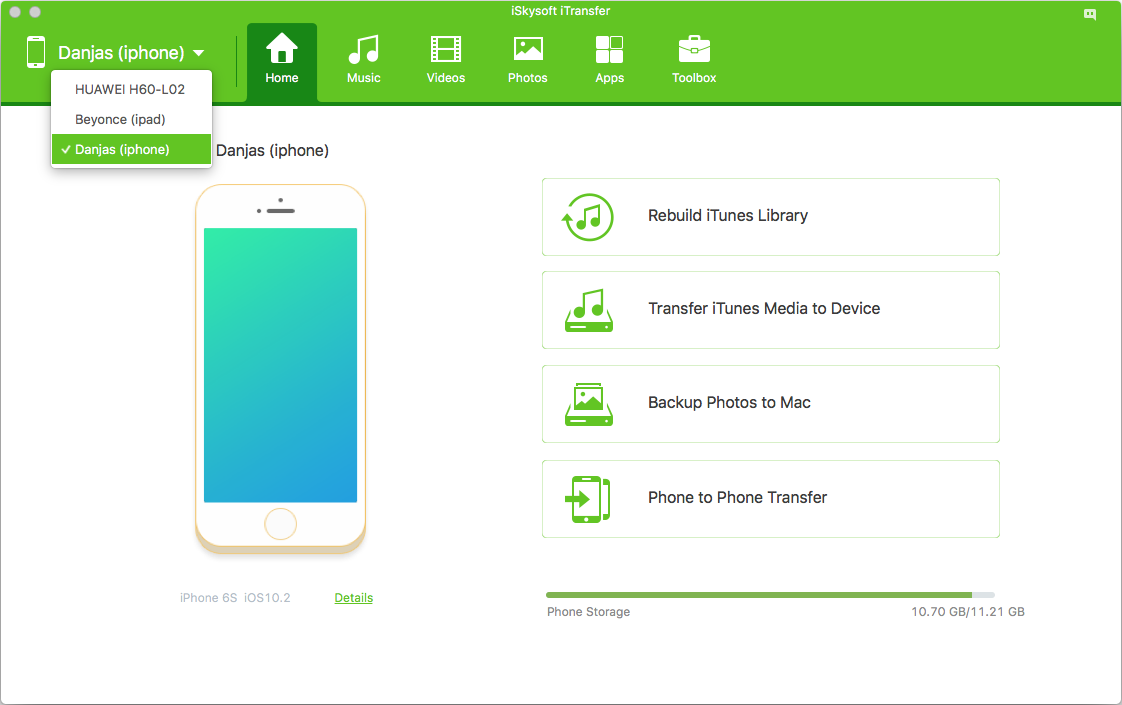
There are four shortcuts located on the interface which allow you to access the feature and accomplish the task quickly.
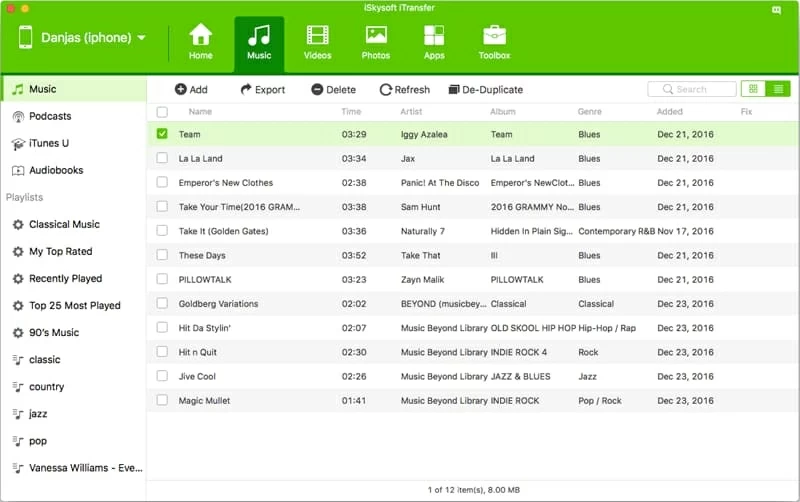
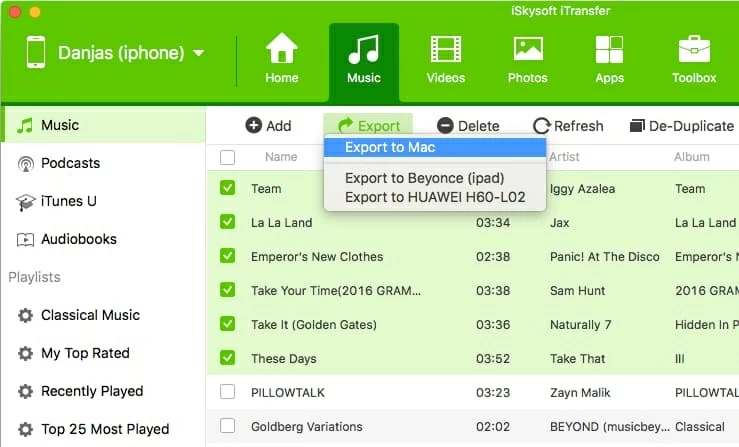
Step 2: Select music and playlists from "Music" window and export to Mac
On the top menu of the program click on the Music button, this will get you into the iPhone music library window. You can see all iPhone tracks are sorted in playlists on the left navigation column. Clicking any of the them (Music, Podcasts, iTunes U, Audiobooks, Playlists) will load its tracks on the right pane.
[Related: how to Transfer Data from an iPhone to a Samsung Galaxy Phone]
There are two ways available for you to get iPhone tracks transferred to Mac.
1) If you want to move the entire iPhone music library to save on Mac hard drive, or a favorite playlist on the iPhone and want to export it in full onto your Mac:
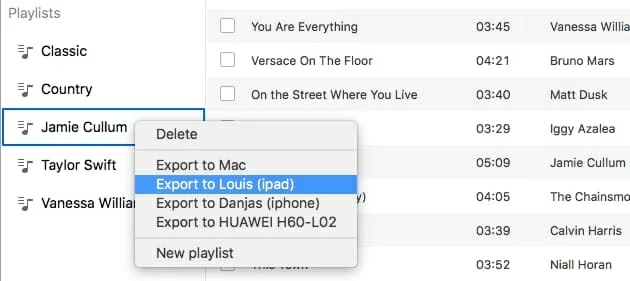
2) Alternatively you just want to copy a selection of the tunes from the iPhone media library to your Apple computer, please follow:
That's it!
Without Internet or wireless connection, no tedious operations involved, iTransfer breaks down the barrier between iPhone and your computer, making it incredible easy, quick and efficient to get tunes off iPhone and move to a Mac/ PC, particularly when you want to back up a large substantial number of music, movies, TV shows, photos and other media files.
[Related Article: How Can You Transfer SMS from an iPhone to Your New Samsung Handset]
How to Manage Tunes and Playlists on iPhone before Moving to Mac (Optional)
This step is optional.
One of the outstanding features of this piece of software is it gives you power to organize media library on your iPhone (or iPad) before your make a decision of copying it to your computer & iTunes library, or to another iOS. Also, you can use it to import files from your computer, and manage your iPhone library whenever you want.
Add songs to existing playlist(s)
If you have a huge music collection on your iPhone, you can use the search box on the upper right corner of the interface to locate a specific track, or sort the library by Name, Artist, Album, Genre, Added, Time. Once you tick the check box next to the tune, it will be highlighted with light green background color.

Remove & create playlist(s)

Delete unwanted iPhone song(s) before you get onto Mac
The utility gives you ability to erase the iPhone music files before or after they're copied to Mac, which is pretty helpful to free up storage space of device. To implement this simply select songs from the window, right click on them and select Delete from the right-click menu. Alternatively, you can

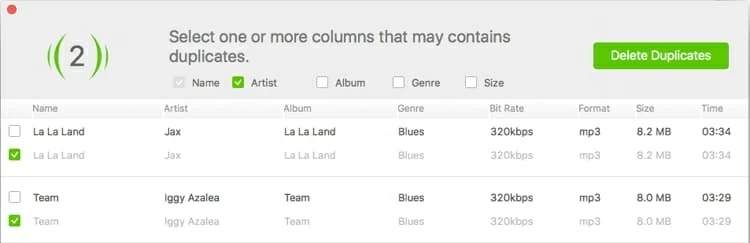
Remove duplicate music files
Fix music ID3 tags
There are two ways you can follow to fix the music ID3 tags including Name, Artist, Album, Genre, Year, Track No.
1) Fix ID3 tags in batch automatically.

2) Fix ID3 tags manually one-by-one

Enjoy!
Mac: iMac, MacBook, MacBook Air, MacBook Pro, Mac Pro, Mac mini
iPhone Models Supported: iPhone X, iPhone 8/Plus, iPhone 7/Plus, iPhone SE, iPhone 6s/Plus, iPhone 6/Plus, iPhone 5c/5s, iPhone 5, etc.
How to migrate data from a Windows-based PC to a Mac
How to move data from one Mac to another using Mavericks and newer versions of OS X