How to Export iPhone Contacts to Computer

Don't want to get lost in the tedious system of iTunes? You don't need to use a lot of time to transfer videos from computer to iPad without iTunes after reading this post.

Key point: To enrich your iPad with the videos so you can watch them on the go, you might need to transfer videos from your computer to your iPad. Apple's iTunes offers a feature to transfer videos from computer to iPad. But you don't need to confine yourself to the tedious operations of iTunes. You can transfer videos from computer to iPad without iTunes in various ways.
![]()
You can transfer videos from PC to iPad without iTunes by using cloud-based service, file transfer tool.
Most of us choose to watch movies on our computers in our spare time. However, when you are on a flight and you want to spend the time watching a movie, you may desire to have a replacement because of your computer's inconvenience of portability. At this time, iPad comes into your mind: the screen is not as small as the iPhone, but at the same time it is easy to carry.
To watch movies on your iPad, you may need to transfer videos from your computer to your iPad. Many people are constrained when it comes to transferring videos from computer to iPad. They rely on iTunes for videos transfer but it becomes quite a challenge because of the difficult interface of iTunes and its limited number of options.
The good news is, you do not need to use iTunes anymore. In this post, we have brought you some methods which are going to help you transfer videos from your computer to iPad without iTunes in no time.
How to transfer videos from computer to iPad without iTunes?
For those who wants to get rid of iTunes to transfer videos from computer to iPad, third-party transfer tools are worth considering. Among them, iPhone Data Transfer will be your most reliable choice.
With a user-friendly interface, iPhone Data Transfer is an easy-to-use media management and transfer tool. It can transfer videos, music, photos and any other data to iPad and vice versa with the blink of an eye. Besides, you don't have to worry about compatibility anymore as iPhone Data Transfer will automatically convert it to a format readable by your iPad.
Now you can click the button below to download iPhone Data Transfer.
Step 1: Open iPhone Data Transfer on your PC
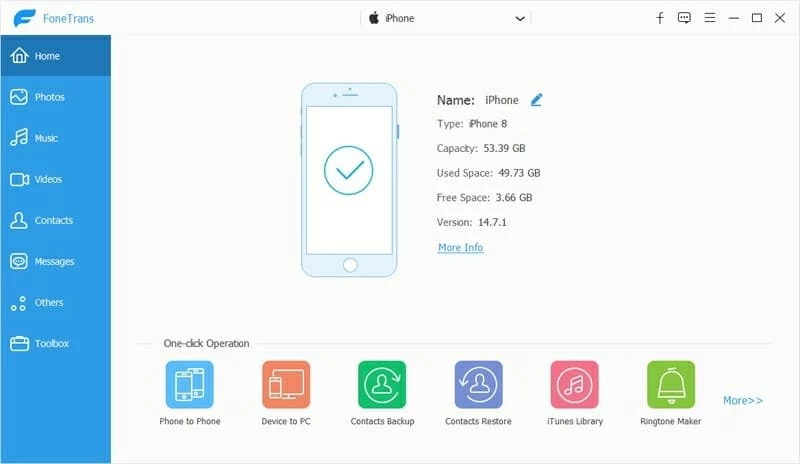
Run iPhone Data Transfer on your computer and connect your iPad to it using a USB cable. A window will appear on your iPad asking you to trust the computer, tap on Trust to connect successfully. Once iPhone Data Transfer has detected your iPad, you can view the details about your iPad on the screen.
Step 2: Click Photos from the sidebar
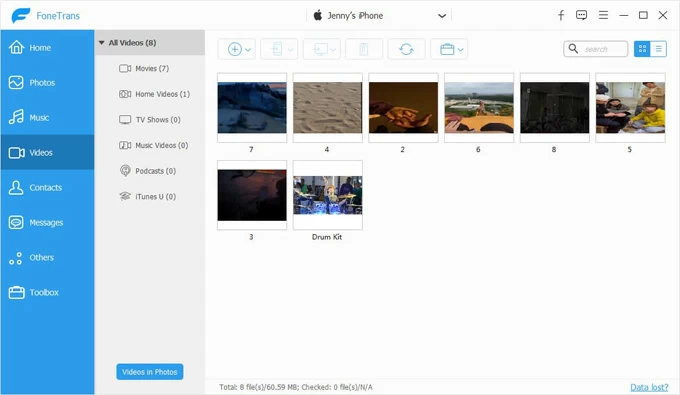
Click on the Videos option in the left sidebar, which will show you all the videos and photos from your iPad.
Step 3: Add videos you want to transfer
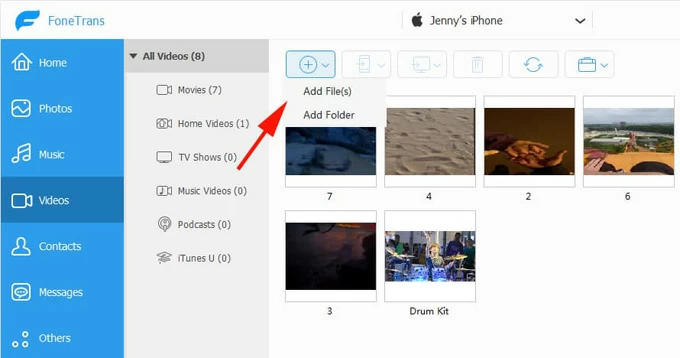
Click on the "+" sign at the top and select the videos that you want to transfer. You can either add folders or files. If you've multiple videos to be transferred and you've sorted them in a folder, click on the Add Folder option and select the folder that you want to transfer.
The synchronization is usually completed within seconds. After that, you can find the videos in your iPad.
Tip: you can transfer videos, photos and other data to your iPad by following the same steps above. Also Read: How to Music from iPad to Windows PC
Move videos from computer to iPad with iCloud
You might not want to connect your iPad to your computer with a wire, in this situation you will have to rely on network to move videos from computer to iPad without iTunes and a wire. The cloud-based option— iCloud is an alternative of wire connectivity but a negative part attached with it is that it only offers you 5 GB of free storage. Of course, you can get more storage by paying for an upgrade.
Step 1: Enable iCloud photos on your iPad
On your iPad, go to Settings > Your Name > iCloud > Photos > iCloud Photos.
Step 2: Upload videos from your computer to iCloud
Move to your computer, visit iCloud.com and sign in the same Apple ID as your iPad. Click on the Photos option at the top of the interface. Then, in the right corner, click on the Upload button with a cloud icon. From your computer local folder, choose the videos that you want to transfer to upload them from computer to iCloud Photo Library.

Step 3: Enjoy your videos on your iPad
When the transfer process is complete, iCloud will automatically sync these videos to your iPad. You can open Photos app on your iPad to view them.
If you've installed iCloud for windows, you can also use this app to transfer videos from computer to iPad.
1. Like above, enable iCloud Photos on your iPad.
2. Open iCloud app on your computer.
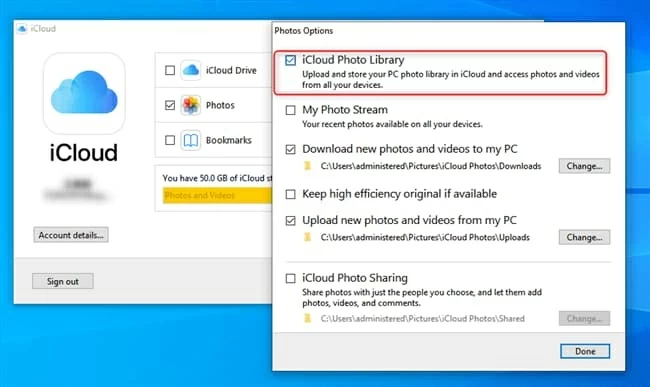
3. Go to Settings > Photos to turn on iCloud Photo Library.
4. Check the little box next to "Upload new photos and videos from my PC."
5. Click Change button to select the folder from which you want to transfer videos.
After the completion of sync process, open the Photos app on your iPad and you should see the videos that have been transferred from your computer.
[Don't Miss: How to Recover Permanently Deleted Photos on iPhone]
Sync pictures between Mac and iPad via Google Drive
Apart from iCloud, there are also other cloud-based methods can help you transfer videos from your computer to your iPad, one of which is Google Drive. Unlike iCloud, every Google drive user gets 15GB for free to start.
Here we will show you how to upload videos stored on your computer to Google Drive. Then, you can view them on your iPad. Of course, you can also use other cloud storage services to transfer videos to your iPad. The process is basically the same.
Transferring videos from computer to your iPad can be challenging but with these right methods, you can transfer your videos easily. You can choose the method that suits you the most and transfer the videos from computer to iPad.
Enjoy transferring!