How to Import Blu-ray Movie into iMovie for Personal Editing


MOV is a file extension developed by Apple, it normally represents QuickTime multimedia file, often used in websites and in a lot of digital cameras, compatible with both Mac and Windows OS.
Blu-ray Disc (BD) is a great way to keep feature films. The conventional BDs contain 25 GB per layer, while the capacity of the dual layer discs is 50 GB. However, Blu-ray is not the friendly of format. It is copy protected, making it is hard for users copying its contents to the hard drive on your Mac/PC, or even ripping the Blu-ray in a file format of your choice to stream over network or on your multimedia device on the go. Anyway...Extract the movie files from BD seem like a complicated task, but it's actually pretty simple.
Fortunately, you have access to the right place for getting the Blu-ray into MOV, MP4, AVI, iPad, Apple TV, Xbox One and more. There are many of ways to handle the task efficiently, but our favorite method uses a program called Blu-ray Ripper.
Blu-ray Converter is an easy-to-use utility that focuses on BD/DVD ripping and converting. In addition to converting Blu-ray to MOV format on Mac and Windows, the program also can extract the contents of BD and save in an impressive amount of video formats, as well as ripping the audio into popular audio formats. No third-party codec package is needed.
Plus, it offers a wealth of ready made profiles for mobile devices so that you don't need to manually configure the settings. Its flexibility gives you options to merge Blu-ray chapters, you can even choose subtitles/audio tracks in the ripped content.
Better still, It can act as a video converter that helps you convert your digital video & audio files to whatever type of formats you need.
Step 1: Load Source
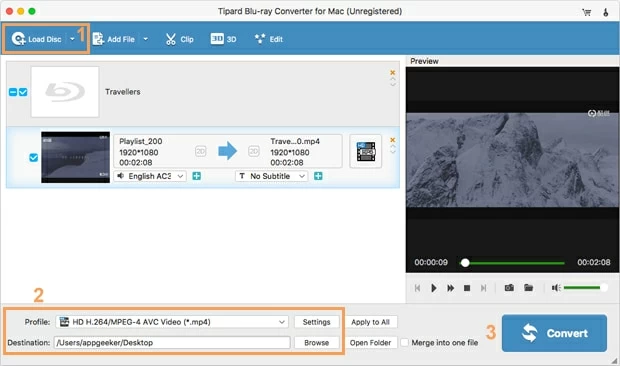
Insert the Blu-ray Disc and fire up the program. The interface of this Blu-ray to MOV converter for Mac is as basic as it can get. Go to Load Disc button to locate and open the BD movies you wish to convert. Or just drag files and drop into the working area.
Once the movie files is imported, you can use the built-in player to preview them in real time by clicking the preview thumbnail on the left side.
Step 2: Choose the format of the output video
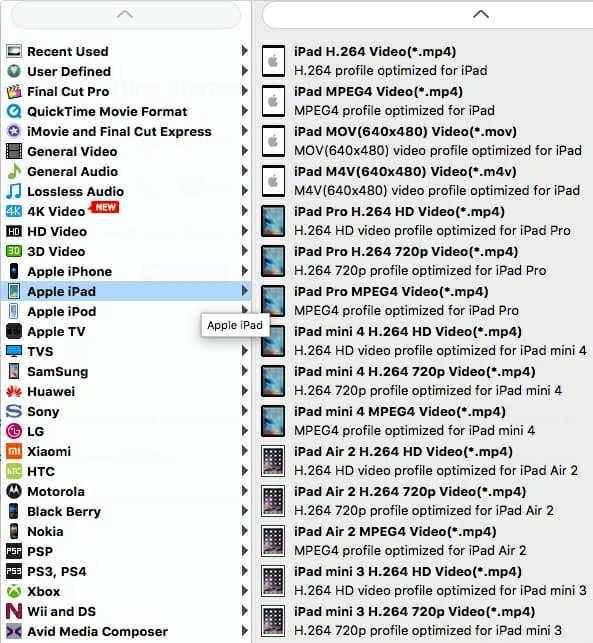
Now that you've selected the content to rip, you'll need to choose the profile you want the new file formatted in.
On the bottom area, click on the Profile dropdown menu, this will pop up the target format panel. Since we are going to rip Blu-ray movie to MOV video format, so here we click HD Video category and select HD MOV Video (*.mov) profile as output file type.

The Blu-ray to MOV ripping tool also gives you a little more control for manually managing the output results. By clicking on the Pen icon on the corner of the MOV profile, a new window will be introduced where all video and audio encoding parameters are well labeled.
Just remember that the higher the quality, the larger the file size. If your machine is short on storage space, try to prepare an external hard drive to store the ripped MOV videos.
However, the given default settings is a good set of optimal settings. If you don't know what you're doing, leave them alone.

For simplicity, this software has a list of presets for known devices, varying from Apple products, Android mobile phone, Microsoft and others. If the rip project is intended for a specific device, this is the place to select one. For instance, If you want to stream blu-ray movies on Apple TV, just choose a ATV model under "Apple TV" category and you are good to go!
This comes in very handy, not only to make a perfect backup of your blu-ray movies, but also to watch them anywhere on the go.
The Blu-ray to MOV converter is also embedded with a handy video editor: cutting a part of the video, rotating and flipping a video, setting the brightness/saturation/contrast of a video, or even making deinterlacing. You can do this by clicking the Edit icon on the top menu bar of the main interface.
Step 3: Convert Blu-ray into QuickTime MOV on Mac (or PC)
Go ahead and pick the directory where to store the new created MOV files using Destination field beneath Profile menu.
Finally! It is time to convert your Blu-ray to a MOV format of your choice. Simply hit the blue Convert button at the bottom right corner and stand back.
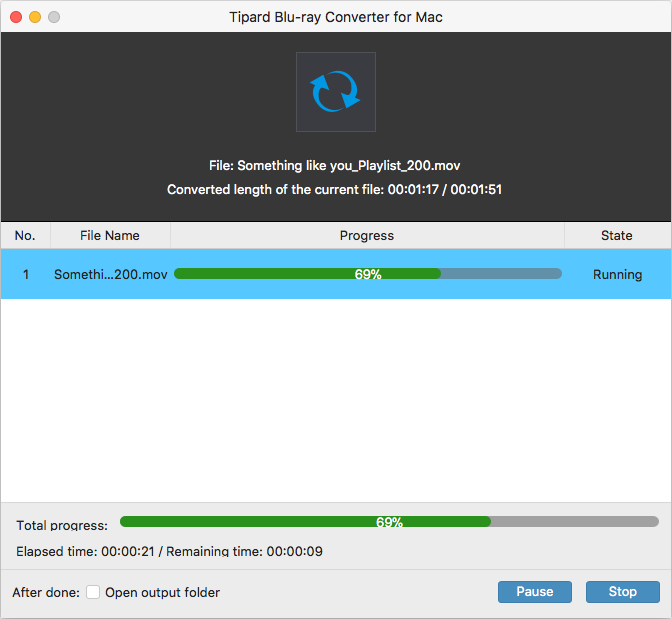
Be aware that the encoding process might take some time depending on several factors such as: the speed of your Mac, the length of the video files, the output settings you have chosen, what other tasks your computer is currently doing.
Once completed, open the folder where all of the converted .mov videos go and you're all set. Now you are ready to enjoy them: play them on QuickTime player on your Mac, drop them into iTunes to sync with your iOS device, or import them into iMovie/ FCPX for editing, or something like that.
Enjoy yourself!