How to Convert MPEG Files to DVD Disc for Mac OS X


Go to try Blu-ray Creator if you want a way to burn large ISO image to Blu-ray disc.
An ISO image, much like a .zip archive file, is simply a disk image distribution format containing all the files and folders that were on an optical disc such as CD or DVD. It is becoming a common way of distributing programs with large size this way instead of providing disc, making it convenient for downloading or for storing on a computer.
It used to be true that, to create a DVD from ISO or other files, one may need to face a burning program with a lot of fiddly options. As more and more DVD burning applications emerge these days, burning something to DVD that's playable in your home big TV is simple enough.
Today I'll be showing you how to burn ISO image to DVD on Mac and PC machines with a simple and plain program. For Mac users, DVD Creator for Mac is our favorite. Drag and drop your ISO files onto the program, select a DVD menu style if required, click Burn – and that's it. The program also has plenty of features to grab your attention: customize you own menu (frame, text, button), add background song and photo, video editing and more.
Windows users please try DVD Creator for Windows, which also makes creating a DVD from ISO image file and most known video files a breeze.
Materials Needed:
The requirements for this burning process is very simple- an external DVD drive, an Mac with OS 10.7 Snow Leopard or above, and a blank writable DVD disc to store your ISO files. Download the program and installed on your computer, launch it.
Step 1: Put ISO file(s) to the DVD Creator
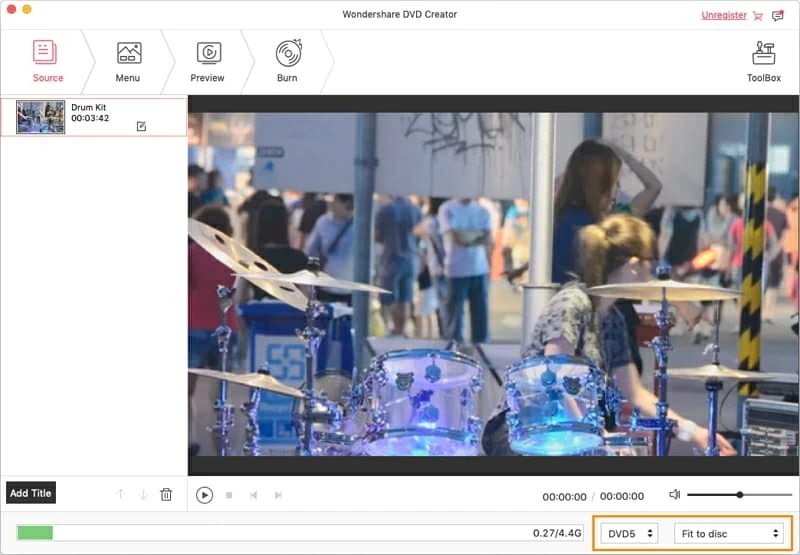
Launch the program ,click on the "+" icon in the blank area of the program window. In the file browser window, locate the ISO files and import them. It also supports all popular videos including MP4, MKV, WMV, MOV, MPEG, AVI, etc. You can select anyone according to your need.
To know how many files you can still add, you have to check the calculating bar on the bottom which signifies the disc capacity used and left.
<
Step 2: Customize DVD menu
The ISO to DVD converter includes several pre-installed DVD menu templates. Go to "Menu" tab (see screenshot below), then on the right portion of the screen are menu options for you to choose from. To add one of these to your DVD project, scroll one by one down the list until you find one you like and click.
Backgrounds can also be personalized, you can add your own music or picture.
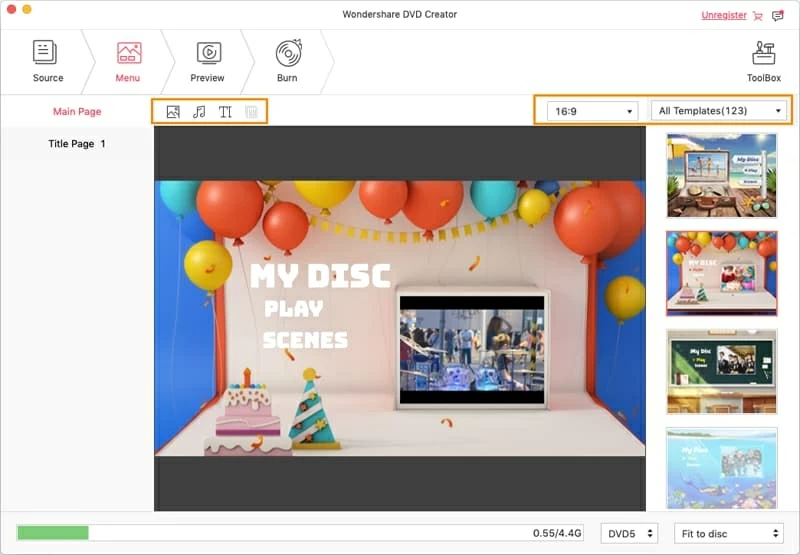
When you are done, do not forget to go to preview how the menu will look like by clicking "Preview" tab next to "Menu". If you are still not satisfied, you may again go back and edit unless everything is OK.
Note that on the other hand, you can select "No Menu" option in the list if you don't want a menu and instead just play the movie directly.
Step 3: Burn ISO image
When you've finished adding ISO files and customizing A DVD menu, you're ready to start burning ISO onto DVD on MacOS.
Hit the "Burn" tab located in the top center, and you'll see a dialog prompt, which asks you to fill up some output settings. You can change the title name from "My DVD" to what you like, often used for identification purpose, for example.

Again, just click on the red "Burn" and the program will do the rest of things. A progress window will be displayed as ISO file is converted to DVD on Mac, so just sit back and relax until the burning finishes.