How to use OBS virtual camera
Figuring out how to use an OBS virtual camera isn't simple, but there are some tips and we're here to walk you through the process.

William Davis Updated on Sep 5, 2023 11:25 AM
This article will teach you to use OBS virtual camera in several applications.
OBS is one of the best live streaming software and recording software. Many broadcasters record screen on Windows and Mac with OBS. And by enabling the virtual camera feature in OBS, you can stream or share your OBS output directly to applications that support webcam functionality. Besides, you can add some filters to OBS virtual camera to improve your screen recording quality.
You may wonder how to use the OBS virtual camera. Luckily, this post will teach you how to apply your OBS virtual camera to other applications and some tips are provided to help you improve your recording quality.
Resources
How to use a virtual camera in OBS on Windows
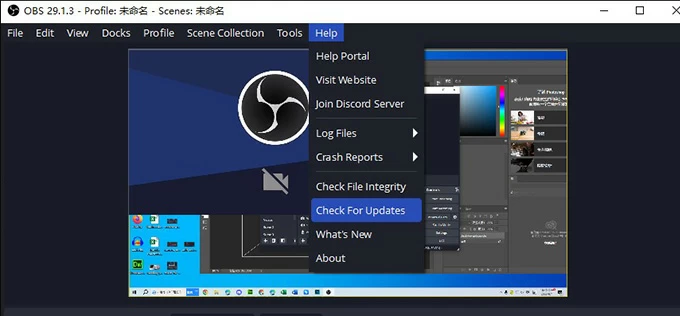
Step 1. Install or update the program. Go to OBS downloaded website and download OBS according your computer's operating system. You can get virtual camera as long as you get the latest version of software. Navigate to "Help" > "Check for Updates" to check your update.
Step 2. Add a source. Click on the "+" icon in the "Sources" box at the bottom of the OBS Studio window. Choose the appropriate source type from the list that pops up. You can select from options like Display Capture, Window Capture, Video Capture Device, Image, Media Source, etc.
Step 3. Start the virtual camera. Click "Start Virtual Camera" in the controls section in the bottom-right to start OBS virtual camera.
How to utilize an OBS virtual camera on your Mac
Step 1. Download the latest version of OBS. Go to OBS downloaded official website and click the "Apple" icon and download the installer in your computer. If OBS has been installed and you want to check if it has latest update, go to "Help" > "Check for Updates".
Step 2. Set up your scene. Click the "+" button in the Sources section. Then choose a wanted source, such as Display Capture, Media Source.
Step 3. Open the camera. Click the "Start Virtual Camera" in the Controls section in the bottom right to open the camera.
Tip: With OBS virtual camera, you can also record video on Mac. Just go to "Settings" > "Output" to select the desired video format. Click "Start Recording" in the bottom-right corner of the OBS Studio window. Click on "Stop Recording" to finish the video recording.
How to configure an OBS virtual camera in Zoom application
When you start and record Zoom meetings and want to improve your camera quality, the operation of configuring OBS virtual camera in Zoom meetings is also easy as long as you follow the steps below.
Step 1. Ensure OBS Studio and the OBS-VirtualCam plugin are installed on your computer, as explained before.
Step 2. Open OBS Studio and configure your desired scene and sources.
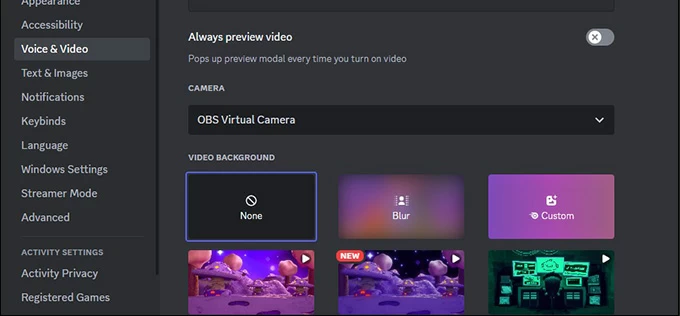
Step 3. Start a Zoom meeting. Launch Zoom and go to "Settings" > "Video". Choose "OBS Virtual Camera" in the Camera drop-down menu.
Step 4. Finally, go back to OBS and click "Start Virtual Camera" to sync virtual camera with Zoom.
Step 5. To check if the virtual camera is working correctly, start a Zoom meeting or join a test meeting before your actual call. You should see your OBS Studio content being broadcasted as the video feed on Zoom.
How to adjust an OBS virtual camera in Teams
Step 1. Download the OBS software to your computer or check your update by going to "Help" > "Check for updates".
Step 2. Add a new source you want to display in Teams.
Step 3. Launch Microsoft Teams and go to "Settings" > "Devices". Select "OBS Virtual Camera" from the drop-down menu of Camera. In OBS Studio, click "Start Virtual Camera" to enable OBS virtual camera.
Step 4. Now, you can start a meeting in Teams using OBS virtual camera.
How to arrange an OBS virtual camera in Google Meet application
Google Meet allows individuals and businesses to hold virtual meetings, webinars. You may want to customize your virtual camera. Here's step to achieve it.
Step 1. Go to the official OBS website and download the installer suitable for your computer' s operating system.
Step 2. Choose the sources you want to display by clicking "+" icon.
Step 3. Open Google Meet and go to "Settings". Choose OBS Virtual Camera in the camera section. Open OBS again and click "Start Virtual Camera" in the Controls section in the bottom right of the interface.
Step 4. Then you can begin a call and meeting in Google Meet using OBS virtual camera.
How to prepare an OBS virtual camera in Skype
It is convenient for you to videos calls with friends and colleagues in Skype and you can use OBS virtual camera to improve your OBS recording quality.
Step 1. Install OBS and Skype from their own official website. And check their updates.
Step 2. Launch OBS Studio and click on "+" icon in the Sources section. Then choose the sources you want to share to Skype. Open Skype and go to "Settings" > "Calling" > "Advanced" to click "Allow NDI Usage". Then go back to "Settings" > "Audio & Video" and select "OBS Virtual Camera" from the drop-down menu.
Step 3. In the OBS Studio, click on "Start Virtual Camera" to enable OBS virtual camera. Then you can start a call on Skype using OBS virtual camera.
How to access an OBS virtual camera in Discord
Step 1. Get OBS Studio from the official website and note that if it is compatible with your PC' s operating system.
Step 2. Add sources from the Sources box. Click "+" icon and choose the Display Capture or "Video Capture Device". Click "Strat Virtual Camera".
Step 3. In discord, navigate to "User Settings" > "Voice & Video" > "Video Settings". Select "OBS Virtual Camera" from the Camera drop-down menu.
Tip: By accessing an OBS virtual camera in Discord, you can share your OBS Studio scene. If you have recorded YouTube videos on Mac, you can share the recorded YouTube videos when streams on Discord.
How to improve your webcam in OBS Studio
To make your webcam look better in OBS Studio, you can apply various settings and filters to enhance its appearance. Here are some steps you can follow.
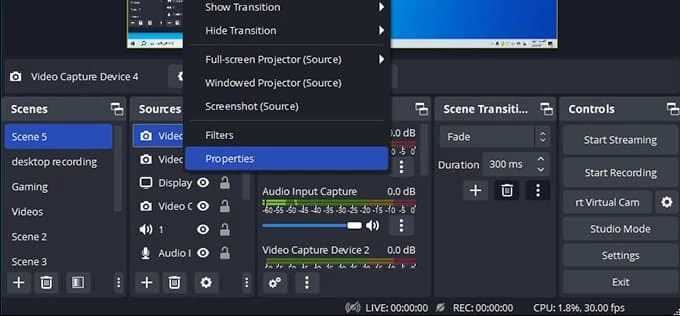
Step 1. In OBS Studio, right-click on your webcam source in the "Sources" box and select "Properties." In the properties window, adjust the video settings such as resolution, FPS, and video format to improve your desired output quality.
Step 2. Filters can enhance the look of your webcam feed in OBS Studio. Right-click on the webcam source and select "Filters" to open the filters window so that you can improve your webcam appearance.
Conclusion
OBS is a very good helper if you want to improve your recording experience. Its powerful compatibility allows it to meet the needs of both Windows and Mac users. In this post, you can find the right way of how to use an OBS virtual camera.