How to use iPhone & iPad Data Recovery - user guide

Support Updated on Apr 15, 2022 4:52 PM
iOS Data Recovery is a great piece of data recovering software that does its job easily and quickly. It's capable of recovering lost data directly from the iPhone/ iPad/ iPod, and regaining lost data from an computer's iTunes backup or iCloud backup.
The recoverable data types including: Contacts, Call history, Text Messages & iMessages, Notes, Reminder, Calendar, Safari history, Safari bookmark, WhatsApp chats history, Voice memos, photos, videos, audios, voicemails, documents.
This guide involves three general approaches to tackle iOS data recovery:
The first and the foremost thing that you need to do is download the software and install it on your computer.
Option 1: Recover from Device Storage
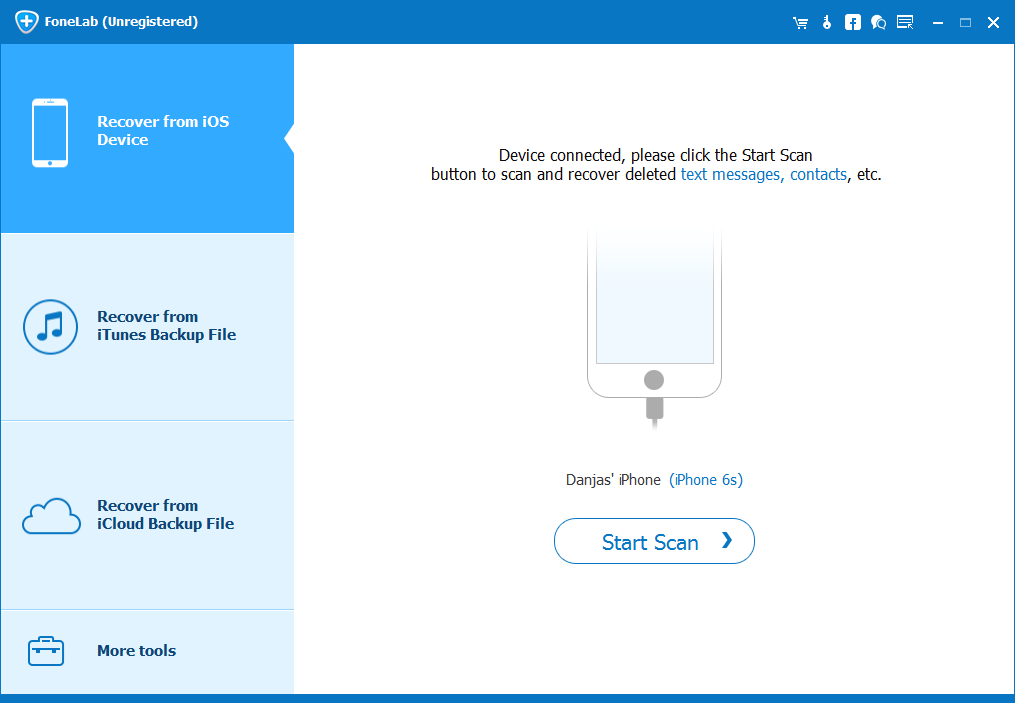
Step 1: Connect your iOS device
Launch the program on your computer, you'll see a clean and simple interface where there are three modes located in the left side: Recover from iOS Device, Recover from iTunes Backup File, Recover from iCloud Backup File.
Connect your device (iPhone, iPad, iPod) via USB cable. Once it is connected successfully, the program will recognize it automatically and display its name and version in the interface of software.
Tip: Check out detailed tutorial on How to back up iPhone & iPad data.
Step 2: Scan your iOS device
Next, click the "Start Scan" button located at the bottom center of the interface to begin scanning it for deleted files. The whole scanning process might take a while, depending on how many files on your devices.
The program should scan for all types of files automatically including camera roll, photo library, app photos, app videos, app audios, messages, message attachments, contacts, call history, voicemail, whatsapp, whatsapp attachments, notes, calendar, reminders, safari bookmarks, safari history and app documents.
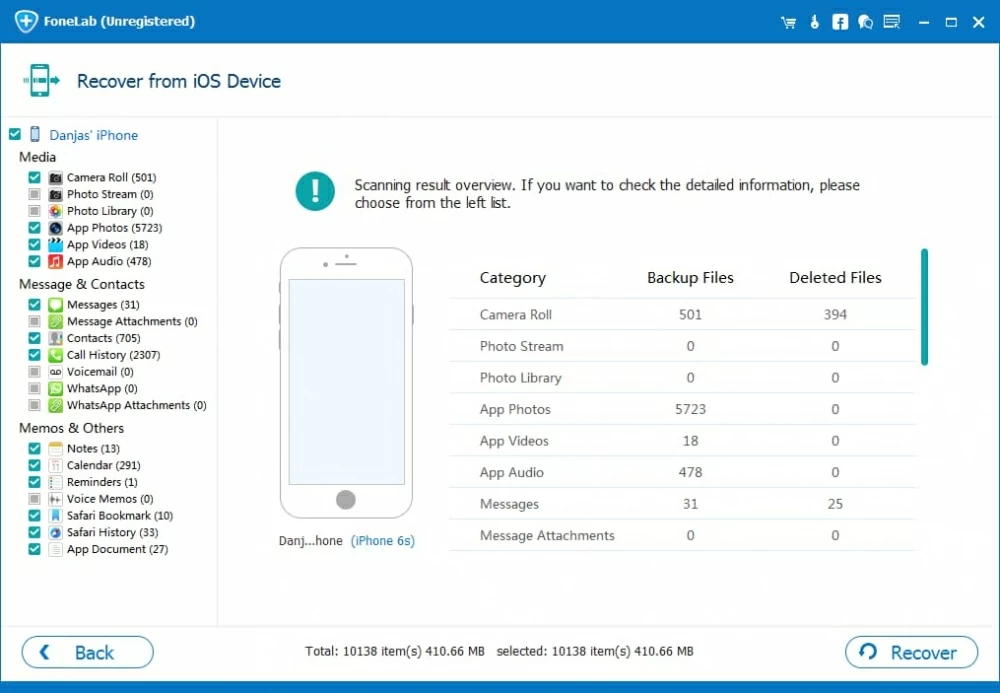
Step 3: Preview
Once the scanning process is complete, it should tell you how many of files for each type of data it managed to recover on the left side of the interface. Clicking any of the categories will expanding its files on the right side.
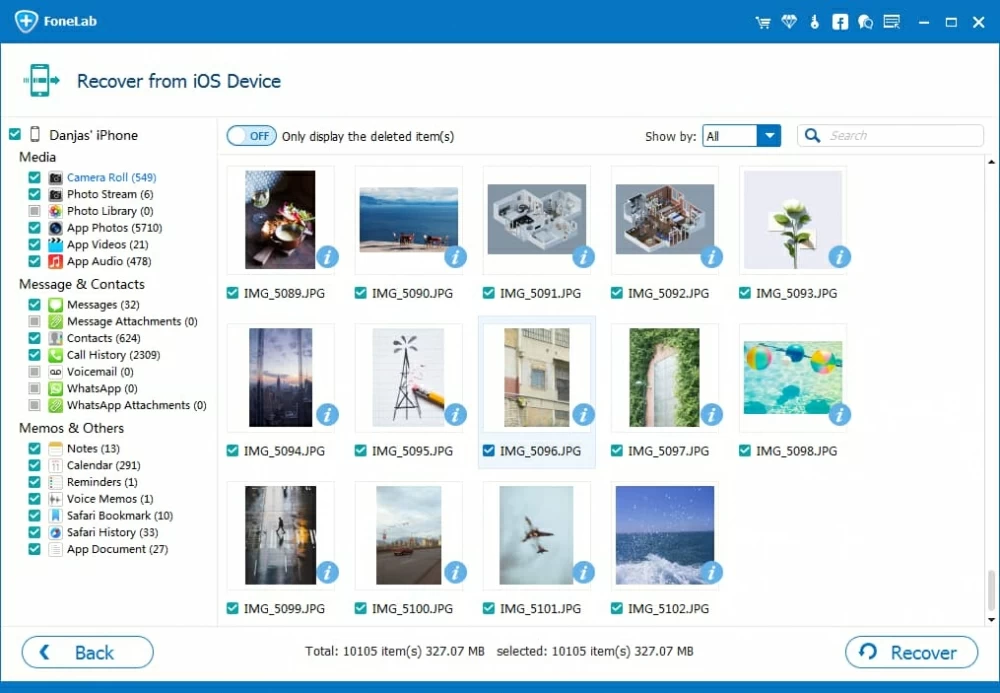
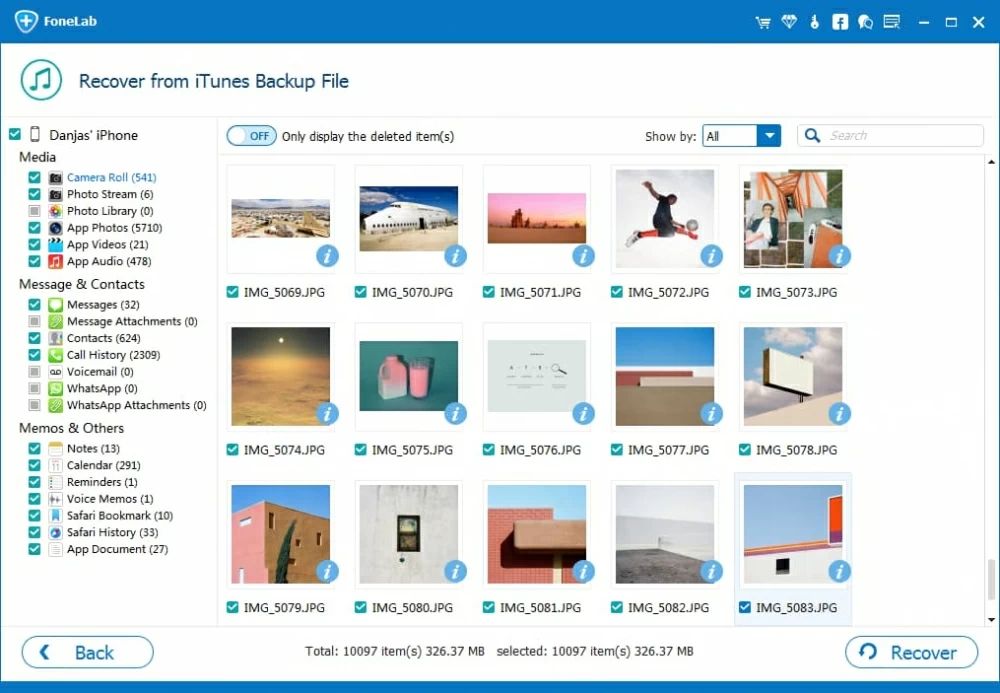
You can turn the "Only display the deleted item(s)" option on if you just want to check the deleted files, as well as do a fast search through a search box on the upper right corner for the file you want.
Step 4: Recover the lost files
Now, choose which types of data (on the left side) and which files (on the right side) to recover by checking the corresponding box, and then press "Recover" button at the lower right side corner of the interface. This should pop up a dialog box, asking you to select a directory where you would like the files to be saved.
After that, again, click the "Recover" button in the dialog, then the software will start recovering the data you choose to your computer. Be patient.
Option 2: Recover from iTunes Backup
If you don't have access to your iOS device, or if you lost your device, or if you're using a newer iOS device, you can also extract backup files from the local computer's iTunes storage with the program.
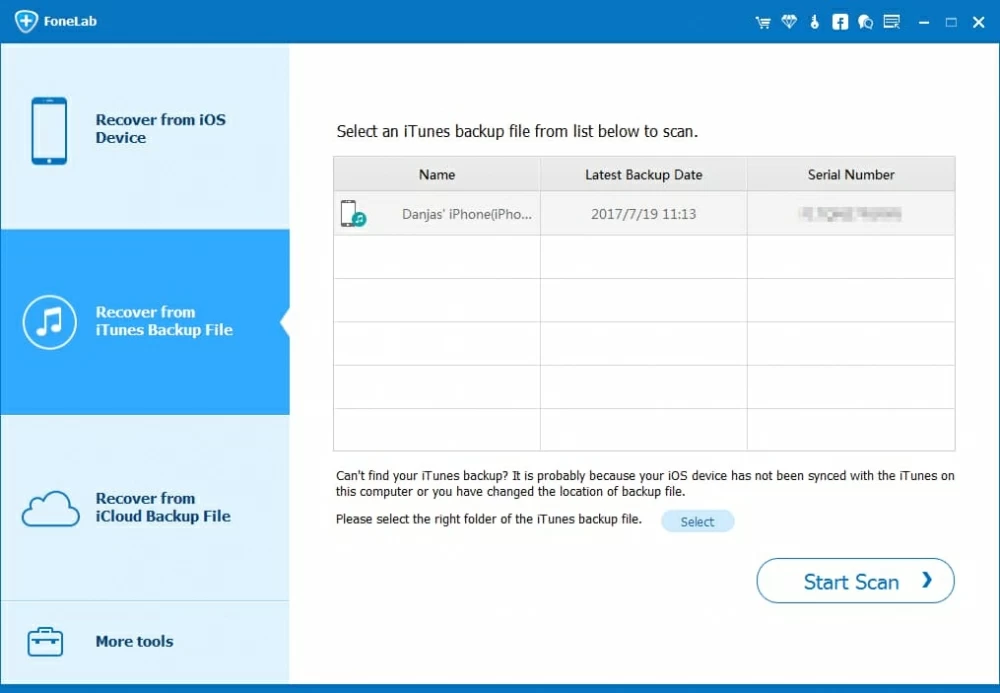
Step 1: Run the program and choose "Recover from iTunes Backup File" mode
Open up the software. Switch to the 2nd Recover from iTunes Backup File mode.
The software will load a list of available iTunes backup files that're stored on your computer in the window automatically, as the image demonstrated below. They're sorted by backup date.
Please note that the backup file with LOCK icon in the list is known as encrypted backup. You'll have to input the backup password to unlock it before scanning.
Step 2: Scan data from iTunes Backup File
In this step, select one iTunes backup file from the list you'd like to recover data from, and press "Start Scan" button in the lower right corner of the screen. Then the software will start scanning process. It may take seconds or minutes, depending on the files number you have on this backup.
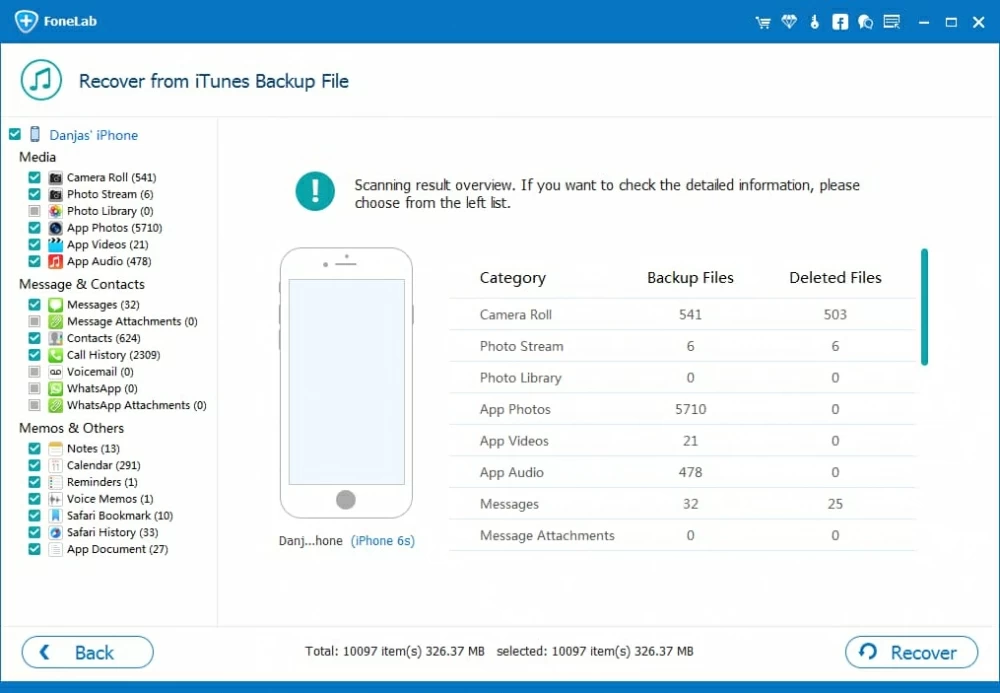
Once the scanning process finishes, all recoverable content contained in the backup file will be displayed in the screen and sorted by different of data types.
Step 3: Preview and recover your lost data
You can have a preview over all the recoverable files found in the scan result.
Now, selectively check the box beneath the files you want to recover, or put a check mark in the boxes to the left of each category on the left side of the window to select all of files, then hit the "Recover" button in the bottom corner. A window opens, asking you to choose a folder for saving files on your computer.
Once you've selected an output folder, click the "Recover" button again in the window, then the software will start recovering the data you choose and export to your computer. Be patient.
Tip: a search box is available in the upper right corner of the screen, allowing you to type in the name of a file to find it quickly from the scanning results.
One thing that should be noted is that don't run iTunes at the same time when using the software to recover data from iTunes backup.
Option 3: Restore from iCloud Backup
iCloud is a great syncing and backup service to keep your iOS data from lost. If you already have a backup in iCloud, you can also regain data back.
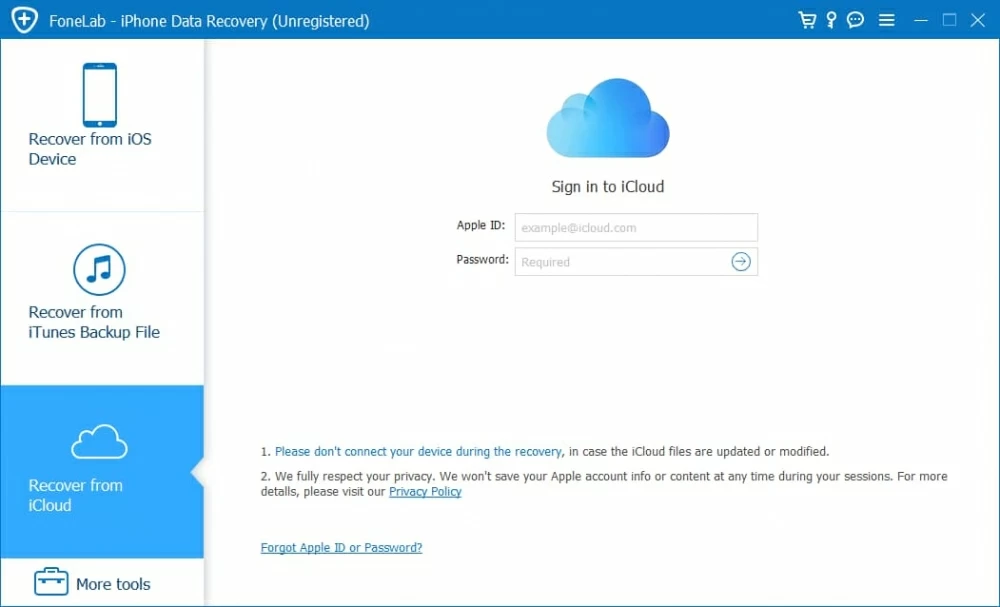
Step 1: Log in your iCloud Account
Once you open up the program, choose the 3rd "Recover from iCloud Backup File" mode, this you get you into a screen like this.
Then enter your Apple ID and password.
Note: iOS Data Recovery takes your privacy seriously. We never keep a record of any your Apple account info or content at any time during your sessions.
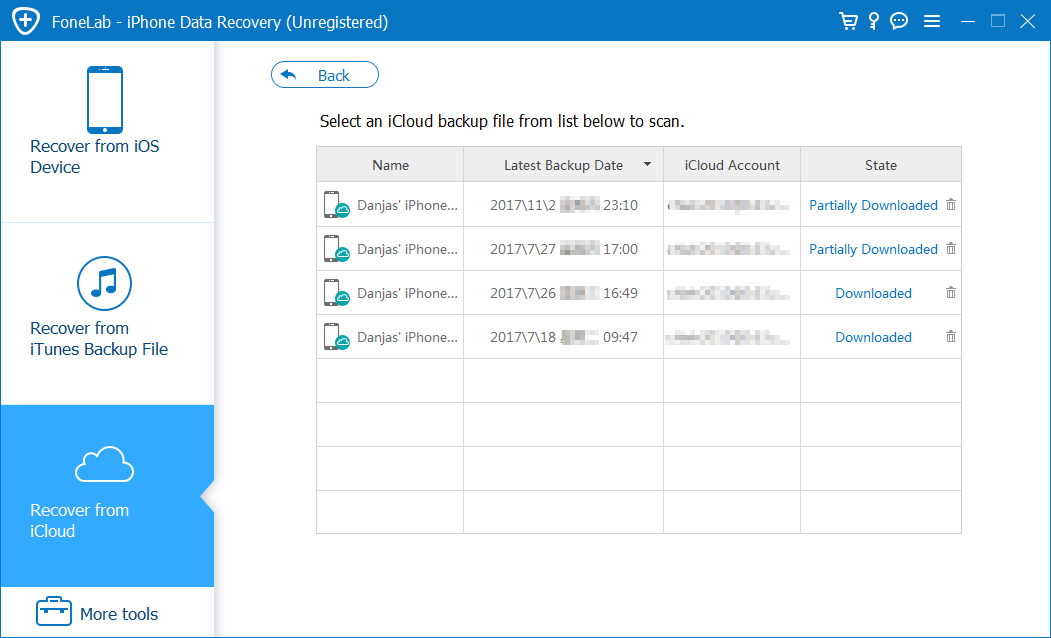
Step 2: Access your iCloud backup files and select one to download
After entering your iCloud account, you should see all backup files available in the window, as image shown below.
Select which one you're going to recover data and click on the "Download" button.
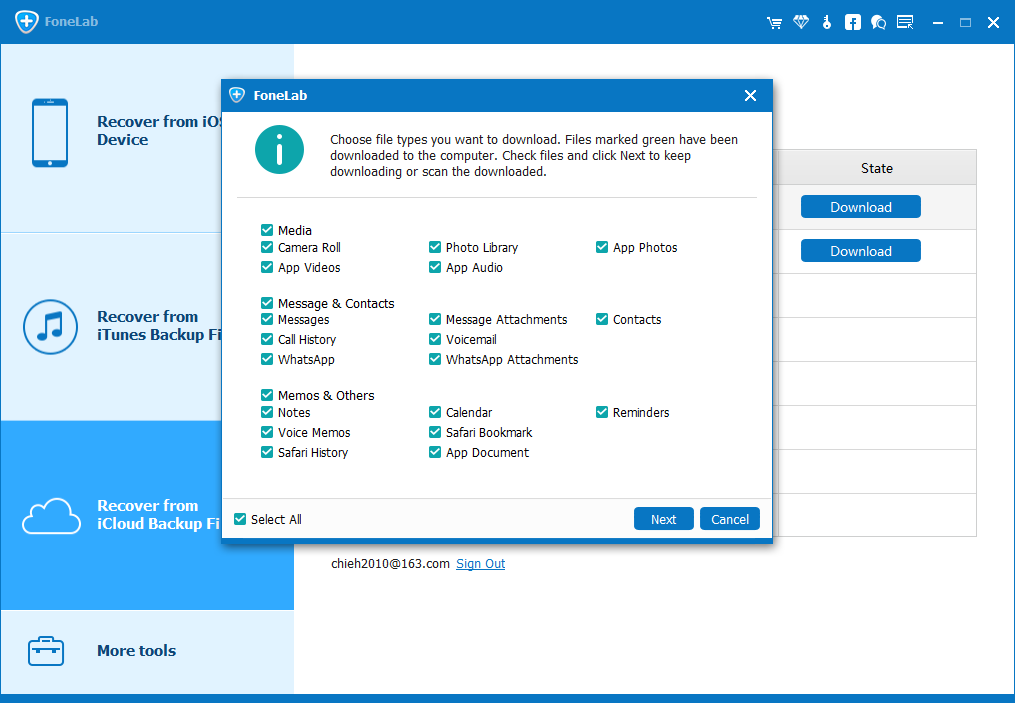
This will open up a dialog where you can choose the type of files you would like to download.
Once selected, press the "Next" button. The software will start downloading the backup files to your computer. This will take you some time. Just wait for a moment.
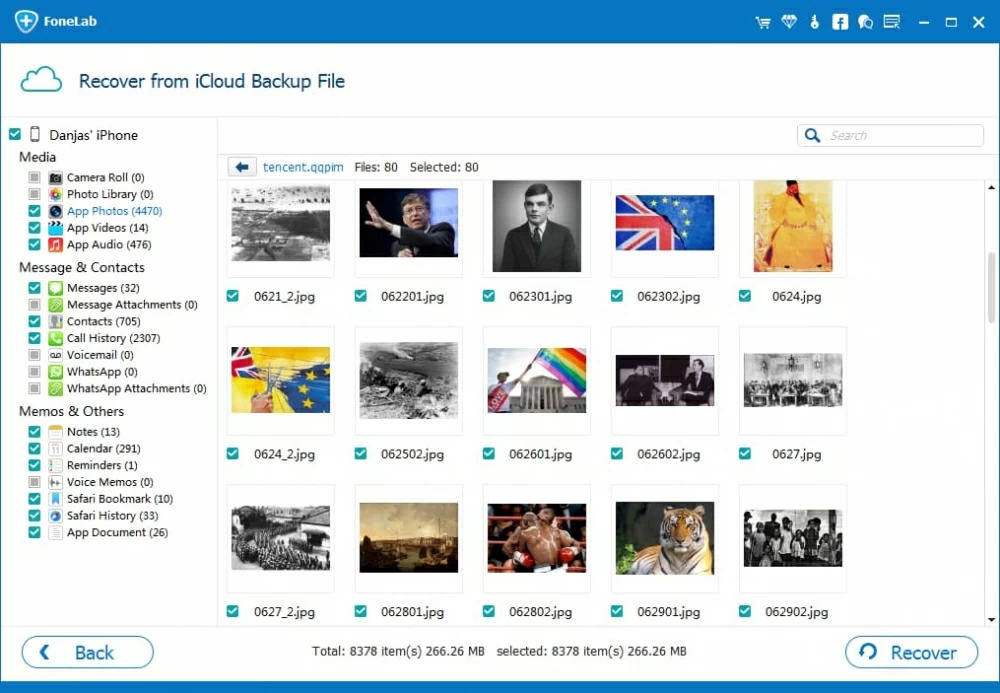
Step 3: Preview and start recovering data
After all selected backup files downloading, you'll be presented with a screen like this. From there, you can see the list of files from the categories you choose.
You can preview the data you want to recover, like contacts, messages, photos, and more.
When you are satisfied with the preview of your lost files, select them you want to recover one by one, or check the box next to the category on the left side of the screen to mark them all.
Finally, press the "Recover" button in the lower right corner. A dialog box will appear, requiring you to the specify a local folder where you'd like the files saved to on your computer.
Once you have chosen where to save the files, again, click the "Recover" button to begin recovering your lost data. Wait until the program recover all you selected files and save them in your computer.
Done!