How to use Screenshot Capture tool in Screen Recorder app

Support Updated on Dec 13, 2022 11:59 AM
Tip: If you're running a Mac and want to use Screen Recorder to take screenshots, see here.
Before you actually start taking screenshots with Screen Capture tool built in Screen Recorder, you'll want to download the software by clicking the links below. Install it to your either PC or Mac as you would any other application.
Step 1: Run the app and select Screen Capture
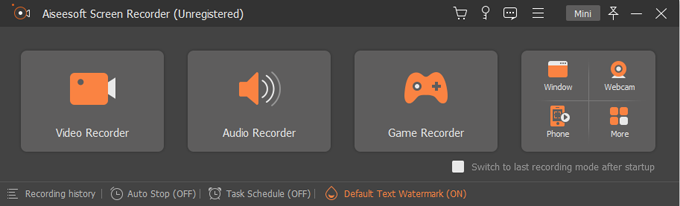
Launch the Screen Recorder application.
In its main interface, hit any recorder tool, Video Recorder for example, and then click the Camera icon (, near the Rec button) on the upper right corner.
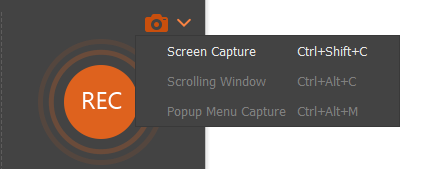
Click the down arrow to select the modes: Screen Capture, Scrolling Window, and Popup Menu Capture are supported.
Step 2: Select your area to capture
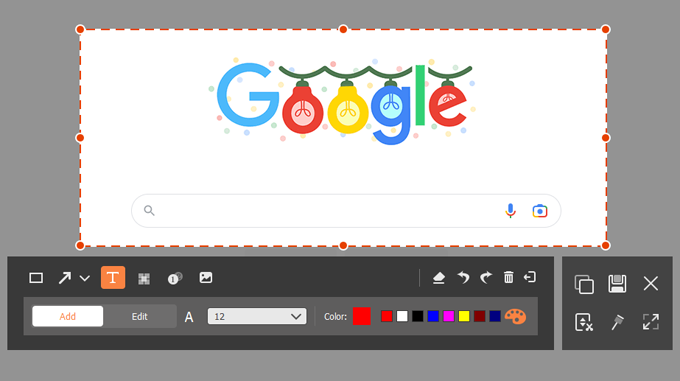
Here we take Screen Capture mode for example. Once you select it, an orange crosshairs appear. Use your mouse to draw a box around the desired area that you want to take screenshot on the screen.
Step 3: Annotate the screenshot and save it
After you have selected the screenshot area, a toolbox will pop up under the area, allowing you to apply special effects to the screenshot, such as text, shapes, arrows, lines, image, squiggles and drawing, step by step numbering.
If everything looks good, click the Save button.
When a dialog box pop up, specify a path where you want the screenshot to save on your computer, and click Save to store it locally in PNG format.
That's it!
You can save images to your computer in one of 5 formats, including PNG, BMP, GIF, JPG/JPEG, GIF, and TIFF. To change an output format of your screenshot, click on the three horizontal lines stacked on top right corner of the interface, and then go to Output > Screenshot Settings.