How to Add Ringtones to iPhone Without iTunes

Users who are looking for the way on how to cut and trim audio in Audacity can refer to this guide. Here, they will get to know it is easy to audio trimming in Audacity.


8 solutions are provided for you to trim audio in Audacity
What is Audacity? Audacity is a well-known and widely used audio editing software, allowing users to download, use, modify, and distribute without any cost. After recording internal audio on Windows 10, you may want to remove the background noise and apply effects to enhance the audio quality in Audacity. But you may wonder how to trim audio in Audacity?
Look no further! The following guide covers multiple tips and steps like select and trim multiple tracks and rearrange the clips to help you use Audacity to trim audio so that you can use it to efficiently improve your audio quality in Audacity.
What is the characteristic of Audacity
After recording audio from website, you must want to trim audio in Audacity to improve your audio quality. Here's step on how to cut and trim audio in Audacity.
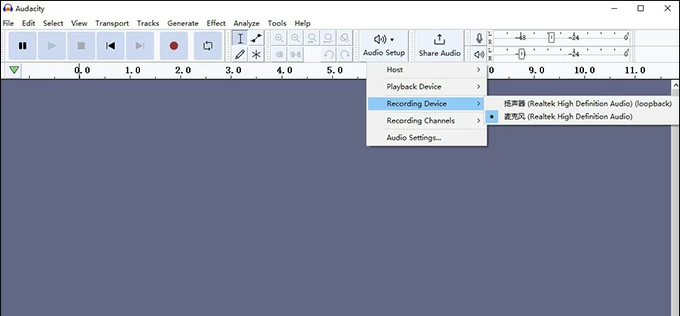
Go to Audacity's official website. Then locate the download link of your operating system and begin downloading. If you want to use any hardware to trim your audio in Audacity such as microphone, headset, please ensure that you have connected them to your computer. And then go to "Audio Setup" to select your recording device, recording channels, and so on.
Audacity is capable of importing a wide range of audio formats. So, you can import your MP3 after you record MP3 audio on Mac or other devices. To import audio files, navigate to "File" > "Import" > "Audio" to search for the wanted audio files and click "Open".
Besides, there is another shortcut that if you are a Windows user, you can press keyboard shortcuts "Ctrl+Shift+I". If you are a Mac user, you can press "Cmd+ Shift+ I". When you still feel hard to import the audio files, you can locate the audio files and then drag and drop the audio files into the Audacity workspace.
Before cutting the audio, you need to select the portion you want to cut or trim. Use the selection tool (the "I-beam" icon) from the toolbar. Then click and drag over the waveform to highlight the desired portion. To cut the audio, you can either go to "Edit" > "Cut" or just press the keyboard "Delete" or shortcut "Ctrl+X".
After the identified audio segment is deleted, the remaining parts will seamlessly merge together on the track, creating a unified audio clip.
To trim the audio and remove unwanted parts from the beginning or end, select the audio track section where you want to keep using section tool. Then, go to "Edit" > "Remove Special" > "Trim Audio" or use the shortcut key "Ctrl + T". This action deletes everything before and after the section you have selected.
Tip: If you record computer audio on Mac using Audacity and want to trim the audio on Mac using Audacity, you can use keyboard shortcut "Cmd + T" on Mac.
If you want to remove mistakes, create loops, and adding or removing sections, you can use Split feature to have more control over the trimming process. To do this, select the wanted portion of the audio by the section tool as mention before and go to "Audio Clips" > "Split" or use the keyboard shortcut "Ctrl+I".
Then Audacity will split the audio track into two separate portions and you can see the split point as a vertical line.
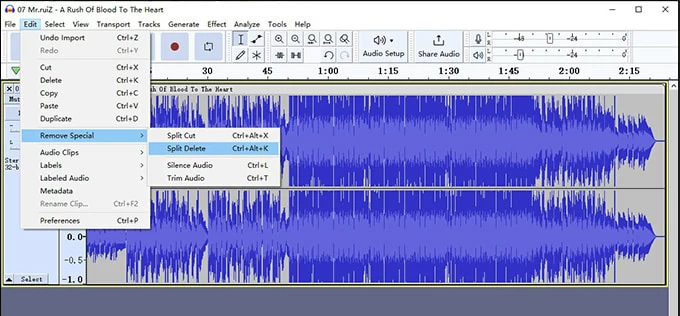
Now, if you want to cut any portion, you can go to "Edit" > "Remove" > "Special" > "Split Delete" to remove it. Then there is a gap in between the left clips and you have room to add other audio section in it. Moreover, if you don't want to completely delete the unwanted clip and keep it for future use, you can go to "Edit" > "Audio Clips" > "Split New" to preserve it in a separate track.
If you are working on a film or video project, there must be several separate audio tracks for dialogue, background music and you need to cut and trim multiple audio tracks in Audacity simultaneously but you don't want to do the boring and repetitive work.
How to fix? You can select the same portion in all tracks and delete the same portion at one time. Select the portion first and then navigate to "Select" > "Tracks" > "In All Tracks" or press the keyboard "Ctrl+Shift+K".

In addition to trim the sound, you might want to rearrange them for a better hearing effect or structuring your audio content with a clear and engaging storyline. Using Audacity, So convenient that you just need to click and drag a track to the desired position in the timeline. This will change the order of the clips accordingly.
To edit the clips further, you can perform various actions such as cutting, copying, pasting, and deleting. Use the selection tool to select the desired portion of a clip, then go to the "Edit" menu and apply appropriate action to the clips according your need.
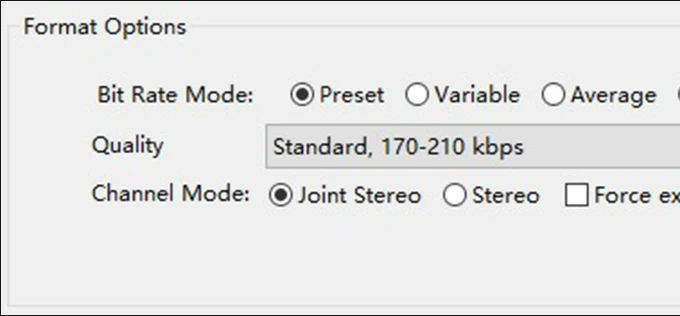
After finishing trimming the audio in Audacity, you can go to "File" > "Export". Then you can select audio formats, the storage destination and name it. You can also adjust Bit Rate Mode, Quality and Channel Mode as you like in the format options at the bottom of the pop-up window. If you're satisfied, click "Save" to export the trimmed audio file.
Besides, you can go to "File" > "Save Project" to save the Audacity trimmed audio project. And the next time, you can open it and continue to edit.
Conclusion
Cutting and trimming audio in Audacity is a good way to enhance your audio quality. The above steps have taught you how to cut and trim with Audacity. You can choose the ways as you need.