
Recover Old Deleted Files on Android

Moving contacts from one smartphone to another doesn't have to be complicated. Some effective tools can greatly simplify the steps and save your time.

Contacts are frequently used and very essential in our daily life. But nowadays, we rarely remember the contacts info as all of them are mainly stored on our phones. Therefore, when we buy a new Android phone, we will try to transfer our contacts as soon as possible.
Usually, to avoid missing important messages or incoming calls, some cannot wait for a few days to transfer the contacts or enter the contacts one by one manually on the new phone, which is pretty time-consuming. Fortunately, if you need your contacts instantly, here are several easy ways to transfer contacts from Android to Android within a few minutes. And for your ease, we will share the detailed instructions letting you move contacts from Android to Android step by step. Scroll down to pick a suitable one for your needs.
Transferring contacts could be easy especially when it comes to from Android to Android.
Some people try to transfer contacts one by one, which is really not a smart approach. Just think about if you could transfer all contacts from one Android phone to another with just one click, wouldn't it be great? With an all-in-one data transfer solution, Phone Transfer, you can easily achieve a transfer of contacts between your Android phones without hassle.
Not only that, but you can also transfer other data files from one Android to another, including your call logs, text messages, images, videos, audio, WhatsApp chat history, and almost everything on your Android device. Surprisingly, all of that is just a matter of a single click.
With Phone Transfer, all you need to do is to connect your Android devices and pick whatever you want. Then your contacts and other data will be transferred in no time, which saves you a lot of time and makes transfer hassle-free. Most importantly, it supports almost all Android brands. So, you can transfer contacts from Android to Android with no worries.
Step 1: Install and launch Phone Transfer on your PC or Mac.
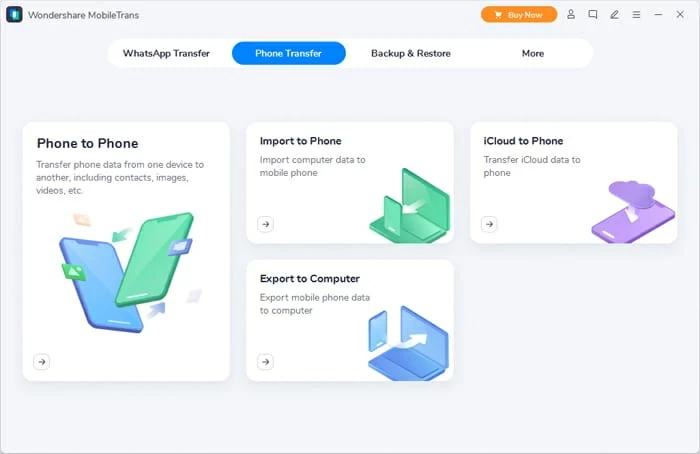
Various transfer options are available when using Phone Transfer on your computer.
Step 2: Head to Phone Transfer > Phone to Phone.
Phone Transfer is used for various purposes. For contacts transfer, click on the Phone Transfer tab at the top. You will have several options; click on Phone to Phone.
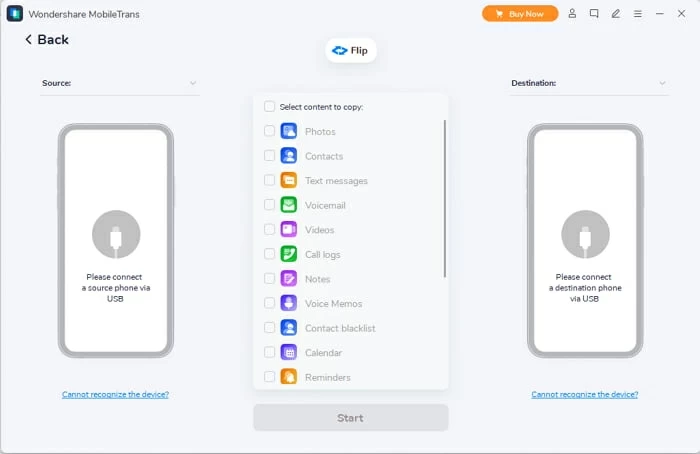
Choose Phone to Phone pattern for transferring contacts from Android to Android.
Step 3: Connect your Android devices and transfer contacts from one to another.
Now, connect your source and target Android devices. Select the manufacturer of your Android phones, and follow the instructions on the application to turn on USB debugging if asked. You can also flip the two Android devices if you want.
Select Contacts and click on Start. Phone Transfer will start moving the contacts. You may wait for a few minutes. After it's completed, disconnect both your Android devices. The contacts will be successfully copied to your new Android phone.
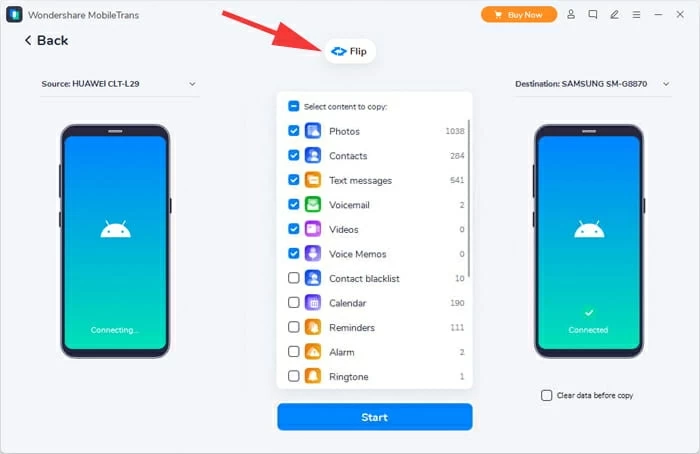
Transfer contacts from Android to Android with a single click via Phone Transfer.
Phone Transfer has made the transfer of contacts and other data from one Android to another easier than ever. You just need one click, and the contacts and also other files will be automatically transferred to the desired device. Moreover, the transfer is pretty quick, saving you much time. And the best part is that anyone can use Phone Transfer because it is so simple and user-friendly. Even beginners can use it without any trouble.
Android users may be aware that Android devices are always connected to Google account, which means you can use the same account to transfer contacts from one Android to another. You sync the contacts to your Google account. After that, you can have those contacts on any Android phone by logging in to the same Google account.
It is an excellent method to transfer your contacts from Android to Android. Your contacts are saved in the Google account, and you can recover them as you like. Even if your device is lost, you can log in to the same Google account on another Android phone, and access your current contacts. Thus, it also works as a backup.
1. Android devices are usually connected to a Google account. If your smartphone is not connected, go to Settings > Accounts. Tap on Add Account. Tap on Google. Enter the email address and password to log in to the account.
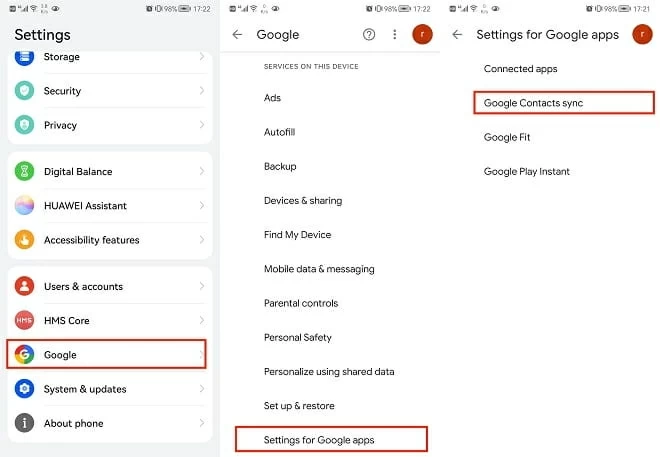
2. You are now ready to sync the contacts to your Google account. Open your Google account, go to Settings for Google apps > Google Contacts sync.
3. You will see various options. Tap on Also sync device contacts > Automatically back up & sync device contacts. Turn on the option and wait for it to sync all your contacts to the Google account.
4. On the other Android phone, add the same Google account. If any Google account is already connected, you can remove it. After that, tap on Add Account. Enter the same email address and password you used.
5. Once you log in to the same Google account on the target Android phone, go to your Settings and head to your Google account.
6. Go to Settings for Google apps > Google Contacts sync. After that, choose Also sync device contacts. Finally, tap on Automatically back up & sync device contacts. Wait for a while, and you will have all your contacts on your new Android phone.
Sync the device contacts to your Google Contacts.
It is easy to transfer contacts from Android to Android using a Google account. It's also available for backup, but make sure you remember the ID and password. Keep in mind that the process may take much time, depending on the number of contacts you've stored on your Android phone.
Apart from saving contacts on Android device storage, some people prefer to keep them on their SIM card. Actually, the SIM card can also be used to transfer contacts from Android to Android. It is because SIM cards have a little memory space to store contacts.
You save the contacts on the SIM card, and then you can put that SIM card on the destination phone. You will have the contacts then, and if you want, you can import them out of the SIM card to your Android phone storage.
1. On your source phone, insert the SIM card. Now, go to Contacts. Tap on the menu icon, and then tap on Manage Contacts.
2. You will see the Import/ Export option; tap on it. Now, you will have two options: you can either import the contacts from the SIM card or export contacts to it. Hit the Export option. It will take some time to transfer the contacts.
3. Now, take out the SIM card and insert it into the destination Android phone. Go to Contacts and tap on the menu icon. Tap on Manage Contacts.
4. Hit on Import / Export. This time, you need to tap on the Import option to save the contacts to the phone memory. Within a few minutes, the contacts will be transferred.
Transferring contacts through a SIM card is pretty simple. But the memory storage of a SIM card is limited. Typically, it cannot store all your contacts and transfer them. Thus, it only works if you have just a few contacts on your Android phone.
After changing a new phone, the first thing you want is to transfer your contacts. There are various ways that can help you move contacts between Android phones. As the three ways mentioned above, the SIM card method is excellent, but it cannot store all contacts. A Google account is also a commendable way to sync the contacts and transfer them to the new Android. But if you want to save time and transfer all the contacts with one click, Phone Transfer will be your best option, allowing you to transfer all your contacts within a few minutes.


