Home > Resources >

How to enable USB debugging mode on Android phone & tablet

face
Support Updated on Apr 15, 2022 4:53 PM

USB Debugging Mode is a mode that can be enabled in Android phone & tablet to establish a direct connection between an Android device and a computer and readies it for deeper-level actions. Since USB debugging mode grants you a level of access to your device (delete apps, edit the system file, root the device, etc.), enabling it gives you much more freedom of control over your device that you normally couldn't. Let's take a look at how to enable USB debugging mode on your Android device. We will cover all the Android versions in this guide.

Related: Phone Transfer - move data from one iOS & Android phone to another

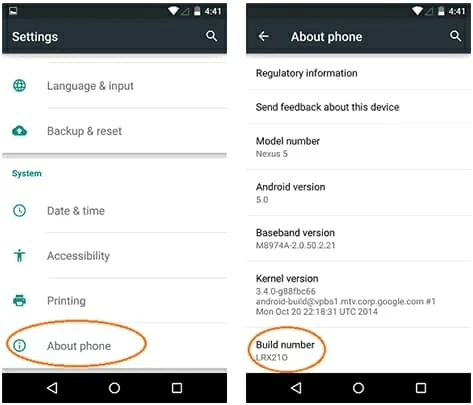
Part 1: Android 5.0 Lollipop or higher

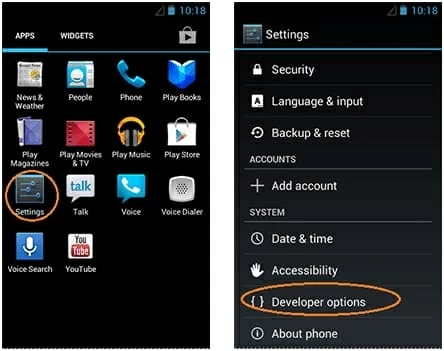
Google hides Developer Options after Android 4.2 to keep less confusion for most "normal" users. Follow the steps mentions below to enable developer options and activate USB debugging.

  • Go to Settings
  • Scroll down to the bottom and tap About Phone.
  • Find Software Information (this step may be absent in some phones).
  • Then tap Build number 7 times until a message "You are now a developer!" appears at the bottom of the screen.
  • Bac to Settings and you should see the Developer options menu just above the About Phone.
  • Tap the Developer options, and then turn on the toggle for USB debugging.
  • Tap OK to confirm the pop-up "Allow USB debugging" message.

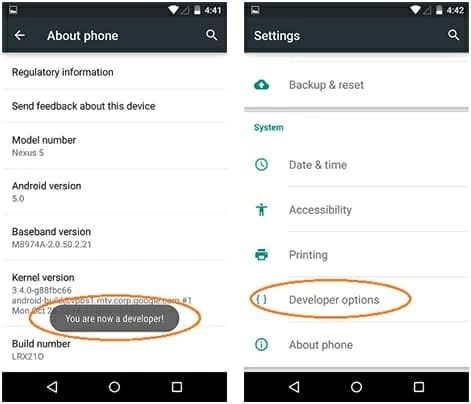
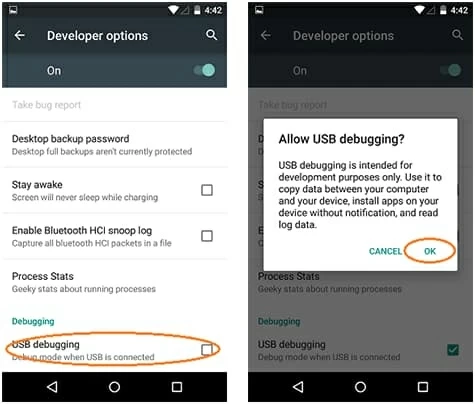
Now, your phone is on USB debugging mode and you have deeper-level access to your phone data.

Note: while the process of enabling Developer Options is the same for almost every Android device, but not all phone manufacturers put the option in the same place. Here are some exceptions.

  • Most phones: Settings > About Device > Build Number > Develop Options > USB Debugging.
  • Some LG phones: Settings > General > About phone > Software info > Build number > Develop Options > USB Debugging.
  • Some HTC phones: Settings > About > Software information > More > Build number > Develop Options > USB Debugging.

A special note about the Kindle Fire tablet.

  • Kindle Fire always has USB Debugging mode on.
  • On the Kindle Fire HD, you can enable USB Debugging by pulling down the notifications bar, tapping More > Security > Enable ADB.

Leaving USB debugging mode enabled all the time is kind of a security risk. To disable it, simply slide the switch at the top of the screen to OFF.

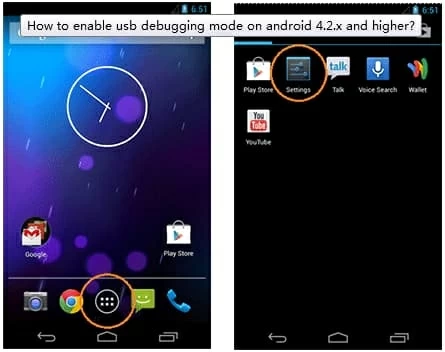
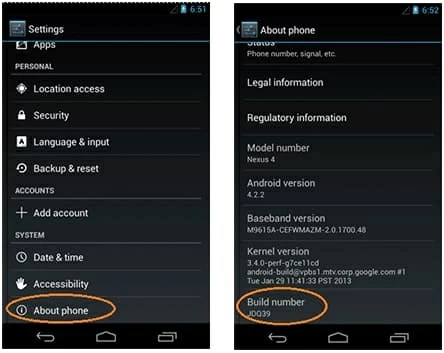
Part 2: Android 4.2.x - 5.x.x

  • Go to Settings
  • Scroll down to the bottom and tap About phone
  • Scroll down to the bottom and find Build Number, tap it 7 times.
  • Tap the Back button and you'll notice that the Developer options should now be unlocked and available in Settings screen.
  • Tap Developer options and tap the USB Debugging checkbox
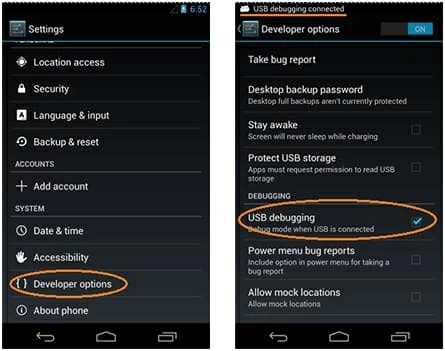
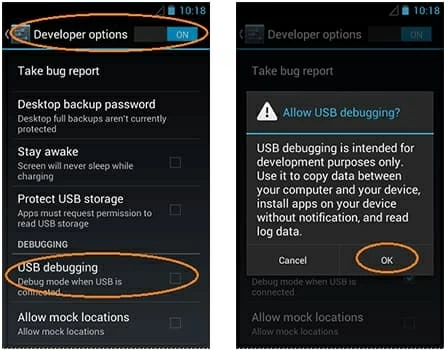
  • Congratulations. You're in USB debugging mode.

Part 2: Android 3.0- 4.1.x

  • open the Settings screen, tap Developer Options on the bottom of the screen.
  • Slide the switch of Developer options at the top of the screen to ON.
  • Check the USB debugging box.


Highlight
By clicking "Agree" you allow cookies that improve your experience on our site, help us analyze site performance and usage. See Cookies policy.Agree