Video Converter for Mac user guide
Converting a digital video file with a desktop based video converting application is easier than you might think on both Windows PCs and Macs. Here's how to do.

Support Updated on Jun 15, 2022 4:13 PM
Tip: If you're on a Windows computer, see Video Converter for Windows user guide.
Video Converter is a simple and versatile program that allows easy conversion of videos & audios from one format to another with size limitation, and can extract audio tracks from a video and save in format you want. Even better, it gives you more advanced options to get full control over the output quality of video.
To make things easier, the program comes with a large selection of ready-to-use presets designed for popular devices, multimedia players, game consoles, websites, apps and more. Besides, the program also has some filters for editing video, allowing you to trim, crop, rotate the video, add effects and watermarks, remove video noise and more.
Here below is the detailed guide about converting between video & audio formats in a Mac. First of all, click the link to download the copy of the software and install it following the installation wizard instructions on screen.
Part 1: Steps to convert video files on Mac computer
Step 1: Load source video files into the program
Open up the program on your Mac, you'll see an easy-to-navigate interface where contains all the program's core features. You should have no trouble getting started.
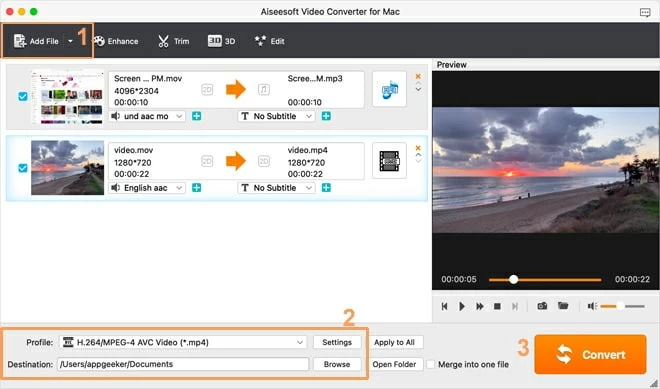
Head to top toolbar and select "Add File" button. In the dialog that opens, select the location of your video file(s) that you want to convert, and open it. Alternatively, simply start by dragging the movie file(s) and drop them into the program window.
Batch conversion is supported, which means you can import multiple files and convert them at one time without a hitch.
Some of you may want to join two or more clips together and export a continuous output video, this Mac video converter takes care of it and includes a "Merge into one file" option (next to the orange "Convert" icon) located at the bottom right corner of the screen. Just highlight the video clips you want to combine, then check this option.
By the way, under the preview window (see right side) there is a camera icon, which is very useful if you want to get thumbnails from your video and save as JPEG/ PNG/ BMP snapshots.
Step 2: Configure output options
Select an output format
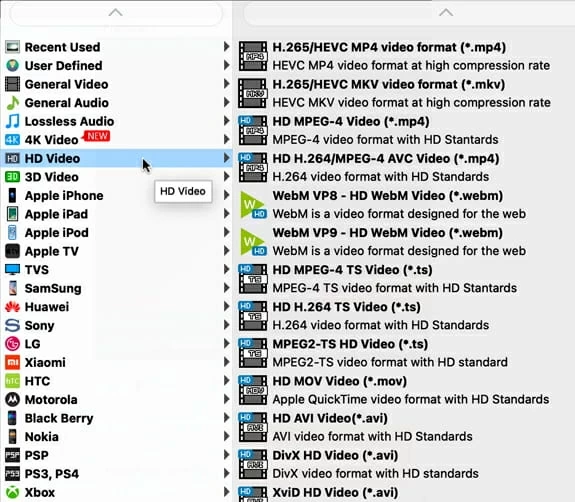
Click the "Profile" drop-down menu at the lower left side of the interface, this will take you to the output format selection panel, where a large number of formats and presets you can choose from.
For example, if you want to convert a Windows .wmv video to a .mov file for use on Mac, then you can move cursor to "General Video" category on the left pane, then select "MOV - QuickTime Video (*.mov)" from the expanding list on the right pane.
Tip: the first time you launch the program, it has set the "MPEG-4 Video (*.mp4)", the most widely used format on the planet, as the default output for any video conversion. If your source file is high-definition or 4K resolution and don't want to lose image quality of the result, you may want to select output format from "HD Video" or "4K Video" list.
Next, head to "Destination" field beneath "Profile" menu to specify the folder on your computer for saving output files, or leave the default path unchanged.
Tweak the conversion settings (optional)
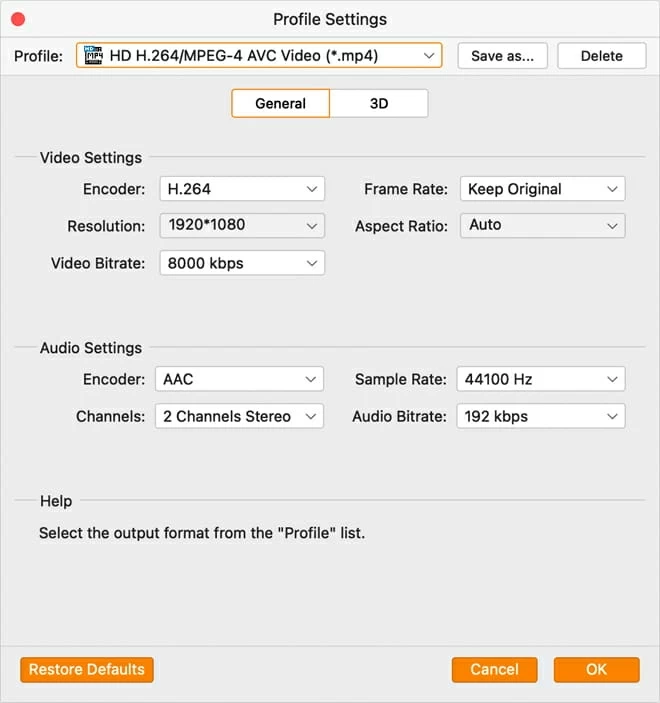
For advanced users who wish to further fine-tune the quality of the resulting file, the software offers you lots of customizable conversion options such as video Codec, Frame Rate, Resolution, Bitrate and audio Codec, Quality, Bitrate, Sample Rate, Channel. To do this, you just click the "Settings" button to the right side of "Profile" drop-down menu at the bottom center of the screen.
Technically, the higher the quality setting you configure, the larger the resulting file will be, and the more space it will take up on your HDD.
Do note that we wouldn't recommend fiddling with the default settings which are good enough for average users, if you do not know what you're doing.
- Encoder: describes the method by which the video & audio has been compressed, the most common used encoders includes mpeg-4, h.265, h.264, wmv7, xvid, divx, wmv8, wmv9, mpeg-2, etc.
- Frame Rate: the number of video frames captured or displayed per second.
- Resolution: the number of pixels displayed in each dimension on screen
- Aspect Ratio: refers to the proportions of the height and width of an image. The most common videographic aspect ratiOS are 16:9 and 4:3.
- Bitrate: the number of bits that are processed per unit of time (usually measured per second). The higher the bitrate, the more information is reproduced and so the higher quality the video (or the audio) will be.
- Sample Rate: the number of samples extracted from the continual signal of the audio file every second
- Channels: the audio signal during sound recording or reproduction. Two common categories: Mono and Stereo.
Also, if you want to keep the settings you configured manually for use next time, you can hit the "Save as..." button at the upper right corner to create a custom profile, which should display in "User Defined" category.
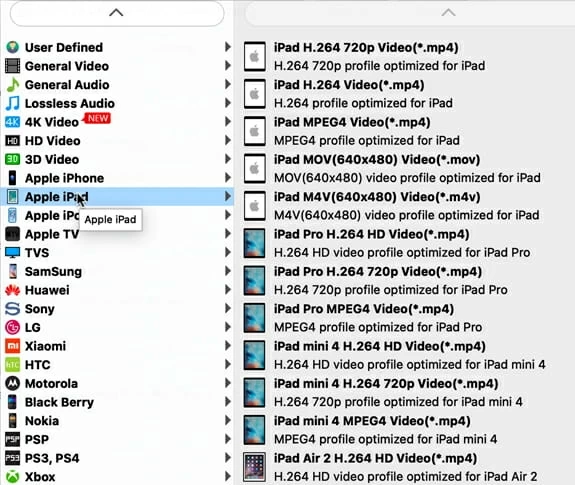
Select a preset (optional)
The program includes a library of presets to tailor your conversion for smartphones, tablets, TVs, game consoles, apps, media players, websites and more. If you intend to convert the video to play on a device which included in the preset lists, instead of selecting a format and tweaking its settings, you simply pick that device preset from the lists and you're done.
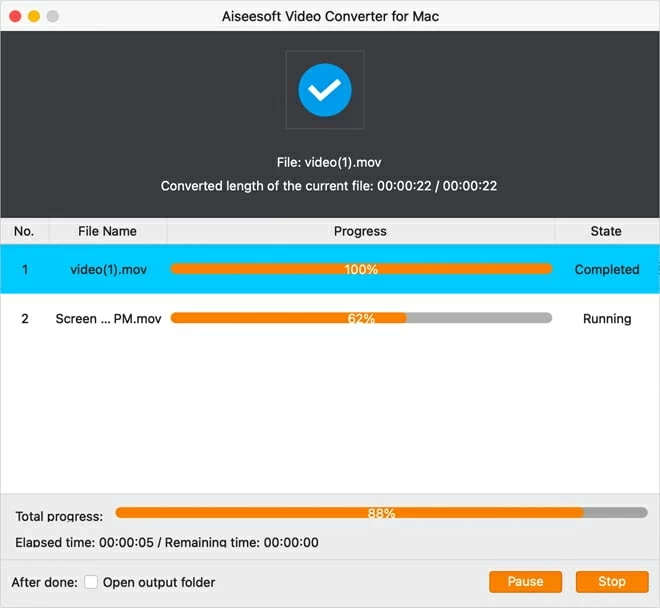
Step 3: Start converting videos
Once everything is set, hit the orange "Convert" button at the bottom right corner to start converting process. A status window will come up, along with progress bars indicating the progress of the video conversion.
You can check the "Open output folder" option in the bottom of the window so that it will open automatically when the conversion is complete.
Basic Video Editing
With the built-in video editor, you can do some basic edits on the video. This will be beneficial if you are cropping inside the video, adding your signature and things like that. You can investigate them yourself to see if they are of any use to you.
To do this, just highlight the video you want to edit and clicking the Edit or Trim button on the top toolbar, then you'll be presented with a window where you can do trimming, cropping, deinterlacing adjustment and adding watermark or special features to your file.
In Trim window
Trim: You can clip video duration by setting start time and end time to keep the segment you want, or directly drag the slider to the exact point.
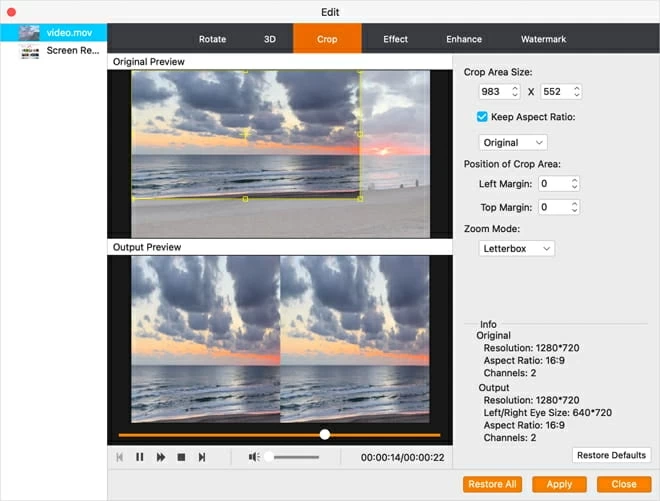
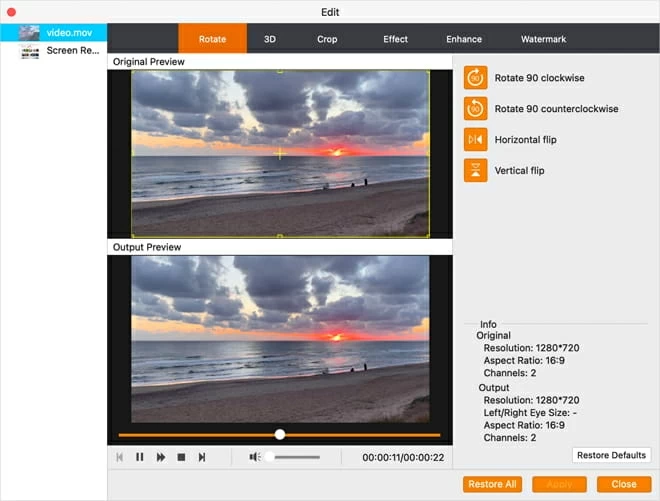
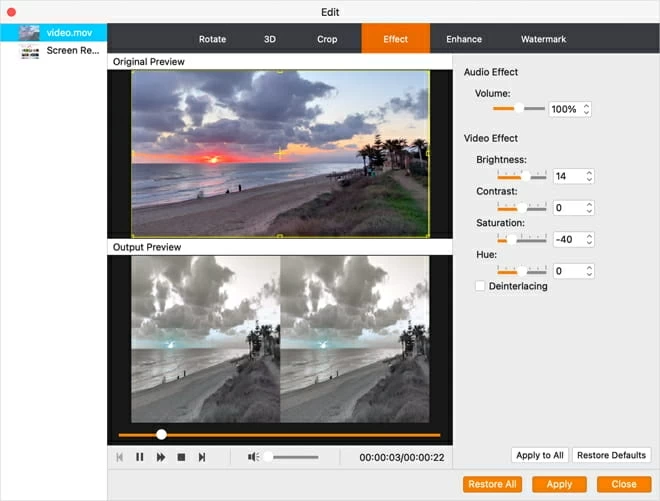
In Edit window:
Crop: Click "Crop" button to customize the frame size (4 modes: 16:9, 4:3, original, crop area) and crop out any black borders of the video. You can enter the number of pixels to crop from each side of the video, and the result video dimension will change; or use your mouse to drag the edges so that all the black border is gone.
Rotate: Revolve the video to the needed angle. You can achieve horizontal flip & vertical flip, or realize to rotate 90° clockwise and rotate 90° counterclockwise.
Effect: Click "Effect" button to set video brightness, contrast, and saturation for better output quality.
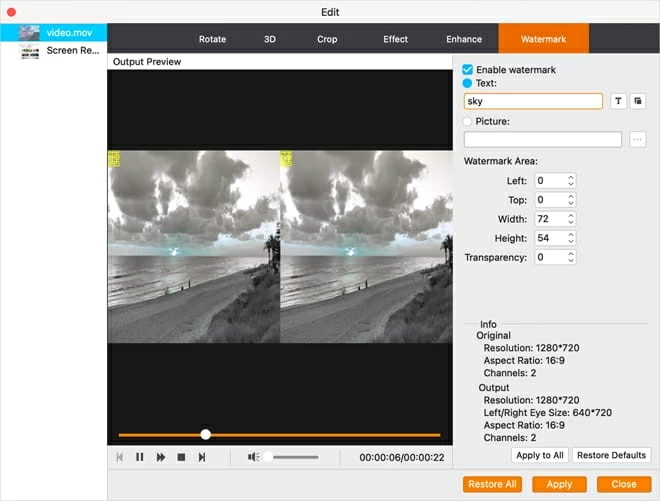
Watermark: Check "Enable Watermark", and then click "Text" or "Picture" to add watermark to the video, then adjust the Transparency and watermark area.
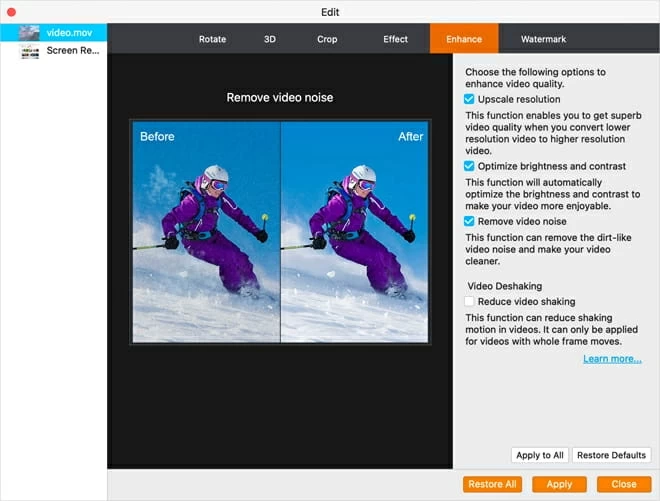
Enhance: In this tab, you can upscale your video resolution to get superb video quality, optimize brightness and contrast, and even remove video noise.
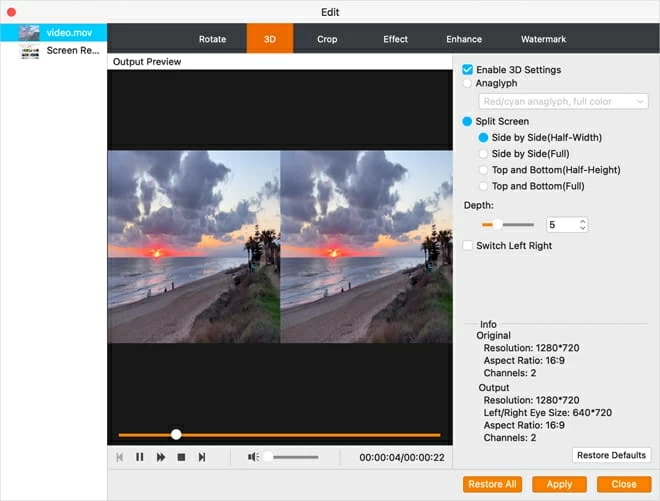
3D: Tick "Enable 3D Settings" option. Then you could select 3D effect, adjust 3D Depth and get instant preview of 3D effect.