How to use Game Recorder tool in Screen Recorder app

Support Updated on Dec 12, 2022 9:06 AM
Before you actually start capturing your gameplay with Game Recorder tool built in Screen Recorder, you'll want to download the software by clicking the links below. Follow the onscreen wizard to install it to your either PC or Mac as you would any other application.
Game Recording tips:
- Make sure the game process is starting.
- When you hide or exit the game window, the program will end the recording automatically.
- You can use the shortcut key to start and end the game recording.
- If there is no game window selected or the current window you choose is invalid, the recording area would default to full screen.
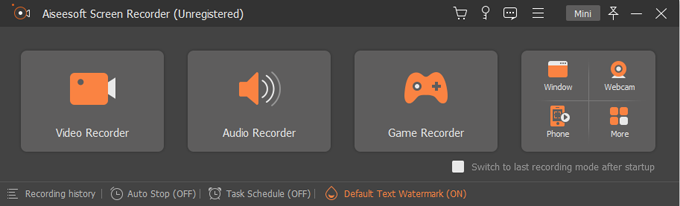
Step 1: Run the app and select Game Recorder
When you launch Screen Recorder, the software displays a simple interface with friendly design. It sports 3 big, orange boxes for most common recording tasks: Video, Audio and Game, as well as a box with 4 other recording options.
To capture footage of a gameplay in action, select the third icon named Game Recorder. You will get into the next screen, like image below:
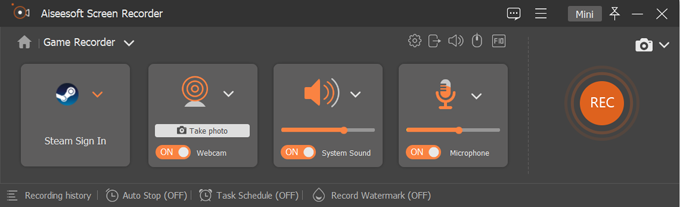
Step 2: Select what you'd like to record
In this part, you're going to choose how you want to record your gameplay, including recording gameplay area, microphone audio, system audio, and even a webcam.
Select the gameplay recording area
To do so, click the down arrow icon, and then select the game that's running on your computer from the opening window. How large size of the recording area depends on the size of your game window.
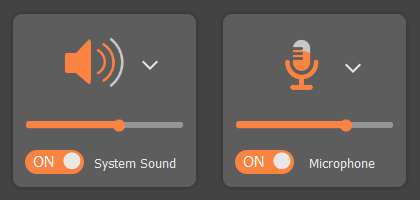
Select either your system sound or microphone, or both.
During gameplay recording, the program lets you record the computer audio (sounds from Windows apps and websites) as well as sound from microphone if you want your voice heard.
To do so, toggle the switch beside System Sound or/and Microphone to ON position. The software lets you change the sound volume by simply moving the volume slider left or right on the screen. You also can tweak some settings of audio before recording. See Audio Settings.
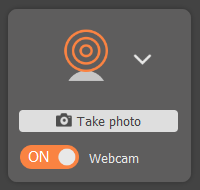
Select Webcam (optional)
You may want to use a webcam to create a picture-in-picture video, which can better explain what's happening on gameplay.
To do this, toggle Webcam on and a live window of camera opens. You can then drag and resize the webcam frame just the way you like it. Don't forget to test the camera before recording — you don't want your webcam not to capture video and audio correctly.
If you have more than one webcam connected to your Windows, you can click the down arrow icon to choose the one you prefer. See Camera Settings to adjust your camera parameters if required.
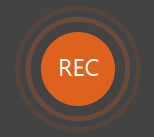
Step 3: Start recording the gameplay
Press the Rec button on the right side of the program window to start a record of your gameplay that's running on the machine with the current settings selected.
You will see a float bar under the recording frame, which helps you keep track of the time that has passed since you begin game recording. It also allows you to do some extra works: pause the recording, make a recording schedule, capture screenshots, adjust volume, etc. See Float Bar Controls.
Step 4: Stop recording
Once you are finished recording your gameplay, click the Stop button (the red square icon) to end the recording.
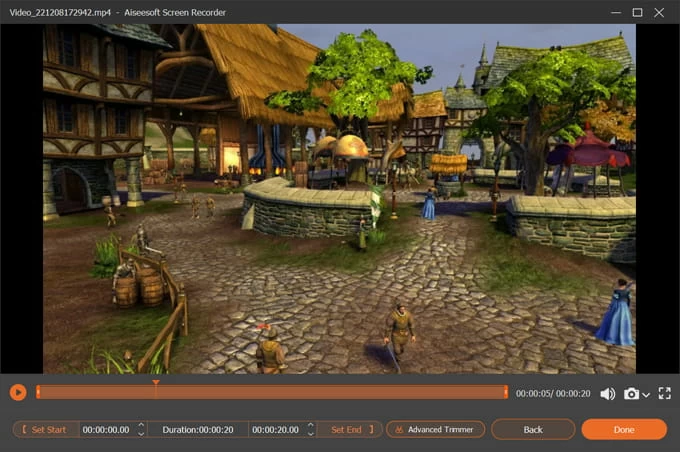
Step 5: Preview, edit, and save the recording
You will get a new window in the software where you can preview and edit of your captured gameplay video, and even capture a screenshot.
If you're happy with the result and want to skip these options, just hit the Done button in the lower right corner to save it to your computer.
Preview
To view how your game recording looks like, click the Play icon located in the bottom left corner.
Screenshots (optional)
You can take screenshots on your recording to save the image you want by selecting the Camera icon on the bottom right side.
Edit the recording (optional)
The software includes a handy trimming tool on the screen allowing to trim the beginning and end of the gameplay video. You can do this by one of the following ways:
- Click the Set Start option on the trimming bar, then slide the beginning to the correct location in preview bar. The same goes for Set End.
- Enter the accurate time in the beginning and end field.
- Use the down or up arrow to fine-tune the beginning and end time.
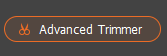
You can also click the Advanced Trimmer button near the Set End to have a further editing on the video.
It comes with options to split the recording, merge multiple segments into a single one, fade in or out while playing, adjust output settings (resolution, formats, fps, codec, etc.) in the Output field, and rename the video.
Save the recording
If the recording is acceptable, click the Done button in the bottom right corner. The software will save it to the default location automatically on your computer. By default, your recorded video will be save in MP4 (H.264 + AAC) format.
Tip: you can click the Recording History option located in the lower left corner of the program main screen to see your recordings history.
More...
The Screen Recorder application gives you various of settings that can be tweaked for recording.
See recording settings.
Also, you're able to tweak screen recorder preferences, including Recording, Output, Sound, Camera, Mouse and Keystroke, Hotkeys and more.
See Screen Recorder Preferences.