How to suppress background noise in OBS Studio?
If the background noise in OBS Studio has got you down, you can't miss it! This article takes a closer look at how to suppress background noise in OBS Studio.

William Davis Updated on Aug 25, 2023 5:44 PM
This article provides tips and ways to suppress OBS background noise.
Most times, if you are screen recording on Windows using OBS Studio, you want the clear and professional-sounding audio with no distracting background noise. Your audio might somehow include background noise like traffic, people talking or just simply the background sound that you don't need for your audio and you are upset.
Relax! With OBS Studio, you can suppress background noise of an audio through its editing features like noise suppression, noise gate. This will make it easier for viewers to focus on your voice, resulting in a more engaging experience. And this article will teacher you how to suppress background noise in OBS.
How to make noise suppression in OBS
After we record internal audio on Windows 10 using OBS, it will be annoying if there is so many distracting sounds. The following passage will help you find out how to remove these OBS background noise.
Using Noise Suppression filters to suppress background noise in OBS.
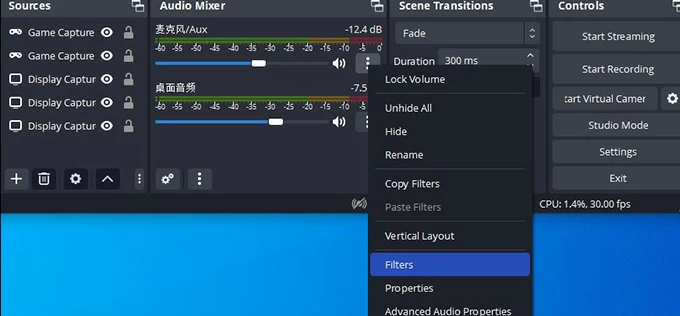
Step 1. Launch OBS and click on the three dots in the Audio Mixer section. Select "Filters" from the drop-down menu.
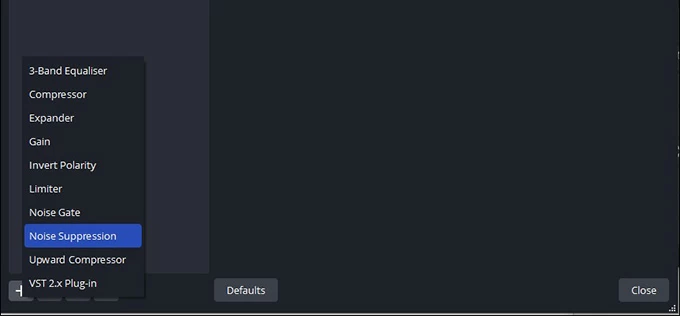
Step 2. In the Filters Window, click on the "+" button and select "Noise Suppression" to add a Noise Suppression filter.
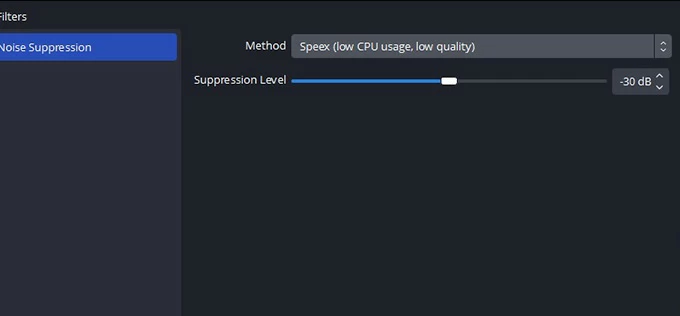
Step 3. You will see the default method set to RNNoise, which requires more CPU usage. NVIDIA Noise Removal option is available only when you have NVIDIA Broadcast SDK redistributable installed.
It is recommended to choose Speex (low CPU usage, low quality) from the Method drop-down menu first and you can adjust the level of the suppression. The default Suppression level will be -30dB. You can slide the control towards the left, leading to the elimination of more sounds.
However, it's important to note that excessive filtering can potentially filter out other sounds, including your own voice.
Using Noise Gate filters to suppress background noise in OBS
Step 1. In the Filters Window, click on the "+" button and select "Noise Gate" to add a Noise Gate filter to set the threshold to prevent the background noise in OBS.
Step 2. Adjust the "Close Threshold" slider to determine the level at which the microphone should activate and start picking up sound. It is advisable to set it slightly above the background noise level. Adjust the "Open Threshold" slider to specify the level at which the microphone should stop picking up sound. You can set it slightly below your normal speaking volume.
Please note that you should try moving the slider to work for a best setting for reducing your OBS background noise more accurately.
Using Noise Gator to suppress background noise in OBS.
If you are still stuck with suppress background noise in OBS Studio, you might as well use Noise Gate software. It is convenient that you just need to download the .exe file and ensure your computer's operating system and hardware meet the necessary requirements for the software.
Java 7 or higher is needed for Windows users and Java 6 or higher is essential for Mac users. A virtual audio cable is necessary if you intend to utilize the Noise Gate software with VOIPs.
Here is how to use Noise Gator to suppress background noise.
Step 1. First, you should install virtual drivers on your computer and guarantee the JAVA can run on your computer.
Step 2. Download the Noise Gator .exe file from its official website and double-click on the .exe file to run it. From the Input dropdown menu, select "CABLE Output (VB-Audio Virtual).
Step 3. Set the "Threshold" settings according to your preference to suppress the background noise. Adjust the "Attack" > "Release" settings to determine how quickly the background noise is suppressed.
Step 4. Open the audio input settings in the software you want to use Noise Gator with (e.g., Discord, OBS, Skype). Then open Noise Gator again and click on "Activate" button to apply the settings to the software.
Conclusion
That's all about the ways to suppress background noise in OBS Studio. And you can choose to use or not use the OBS internal features to achieve it.
FAQs
1.What is the Expander and Noise Suppression in OBS?
The Expander filter is designed to reduce the volume of audio signals that fall below a certain threshold, while Noise Suppression filter analyze the audio frequencies to suppress background noise. Both the Expander and Noise Suppression filters provided by OBS can significantly improve the quality of your audio recordings or streams by reducing unwanted noise.
2. What is suppression level in OBS?
The suppression level setting allows you to adjust the level of the noise reduction applied by the filter. Higher suppression levels (closer to 100%) may lead to more pronounced reduction of background noise but may also have a impact on the overall audio quality, such as reduce your desired sound.
3. How do I stop my OBS mic from picking up background noise?
1. Pay attention to Microphone Placement. Position your microphone as closely as possible to your mouth. 2. Adjust the microphone gain or volume levels appropriately. 3. High gain settings can increase sensitivity, making the microphone more likely to pick up background noise. 4. Use Noise Gates and Noise Suppression filters in OBS.