How to Record Mac Audio Using QuickTime


Platforms
Developed for both Windows & Mac users

If you are still struggling with how to record internal audio on your Windows 10 PC, then this guide will be your savior. Read this tutorial carefully and find the answer.

What to know about internal audio recording on Windows 10:

Using Windows 10's Voice Recorder tool allows you to easily record internal audio on your PC.
Recording internal audio on Windows 10 is common among podcasters and vloggers. Whether it is for work or personal use, you will find it beneficial to record the audio coming out of your Windows PC.
Whatever the case, plenty of programs are available to help you record internal audio on your Windows 10. While Windows 10's Voice Recorder can fulfill basic recording needs, advanced users prefer to use audio recorder alternatives in pursuit of more professional recording and editing features.
This post will introduce several excellent audio recording software for Windows and explain how to record internal audio on Windows 10 step by step to make your recording experience easier and more efficient.
Table of Contents
The Voice Recorder is a pre-installed audio recording software that comes with the Windows 10. It allows you to capture audio on your PC using the built-in microphone or connecting an external audio source. The recorded file will be saved in M4A format on your Windows 10 and you can trim it.
With its easy-to-use and convenient interface, Voice Recorder makes it easy to record your voice or other sounds for free, including capturing internal audio from your Windows 10.
Step 1. Launch the Voice Recorder app on your laptop or computer.
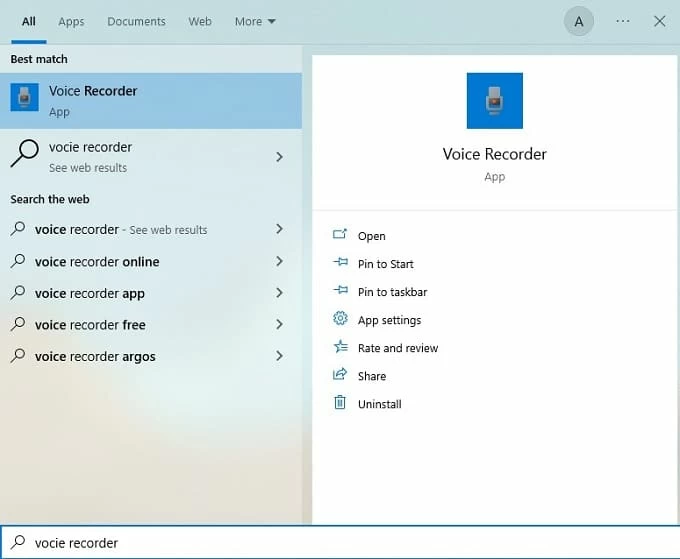
Search for Voice Recorder in the Windows search bar and launch it.
Tip: In rare cases, the app may not be pre-installed on your computer. Go to Microsoft Store, search for Windows Voice Recorder, and click Install.
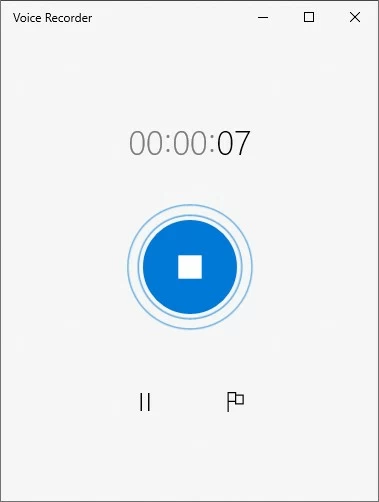
Step 2. Click the microphone icon to start recording audio.
If your built-in microphone is not defective, you can easily record any internal or external sound on Windows 10 PC or laptop. You can use an external microphone or a condenser if the microphone driver is faulty.
Click on the blue microphone icon on the main page to start recording audio and mark it with the flag icon.
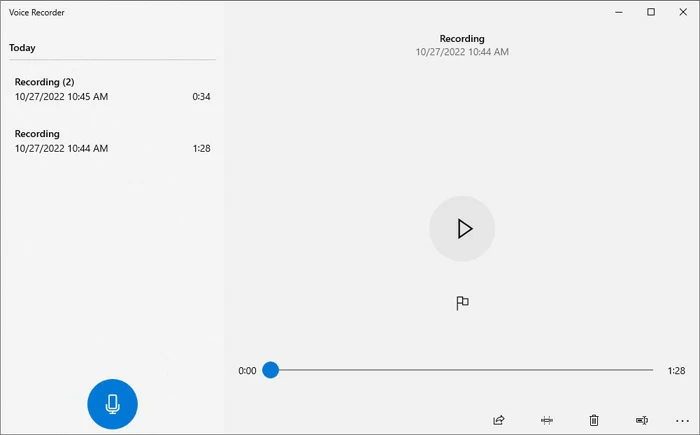
Step 3. Once you've finished recording, click the Stop Recording button.
You can also pause and resume the recording by clicking the icon with two vertical lines under the Stop Recording button. And the recorded audio will be saved as a M4A. file.
Click on the blue circle icon in the center to end the recording.
After the recording, you can choose to replay, edit, rename or remove recordings from your list. You can also share the audio recording with a nearby device via Bluetooth, Wi-Fi, or email by clicking the Share button at the bottom of your Voice Recorder window.
The Voice Recorder is only for basic recording. And the prerequisite for using Microsoft's default recording tool is that you have enabled the microphone on your Windows 10. Although it can record sound from computer applications, the quality of the internal audio will be poor due to the accompanying microphone, and the entire audio will be mixed with microphone noise.
Your sound card might probably support you to clearly record audio in Windows 10. But if you find that it doesn't, don't worry, the following four options will help you record internal audio on a Windows 10 like a pro!
If you're serious about recording audio, then go for AppGeeker Screen Recorder, which gives you more flexibility when it comes to recording internal audio on Windows 10 computer.
This computer audio recorder has the ability to record system sound and microphone together or separately, unlike Windows 10 built-in voice capture tool, which means that you are free to choose the audio source and ensure the purity of internal audio recording on Windows 10.
Besides, its built-in noise reduction and microphone enhancement features are also beneficial for you to record audio on PC during meetings or games. All in all, it's an all-in-one audio recording software to capture computer audio on Windows 10.
Key features:
Here's how to record computer audio on Windows 10 with AppGeeker Screen Recorder:
Step 1. Download AppGeeker Screen Recorder and launch the app.

Step 2. Choose "Audio Recorder" and pick your audio source. You can choose System Sound or Microphone as your output sound source. To record audio from your PC, enable "System Sound" and drag the volume slider to adjust levels as needed.
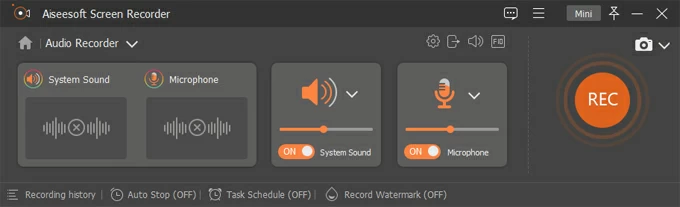
Step 3. To start recording, click the "REC" button on the right side of your screen. It will begin to capture the audio coming out of your computer.
Step 4. When finished, click the "Stop" icon. Also, you can locate the Pause button on the floating bar if you need to pause the recording.

In the audio preview interface, you can use Advanced Trimmer to trim it or combine different segments. The Fade in and Fade out options are also available. After that, click Done to save the soundtrack on your PC.
With this audio recorder software, you can easily record system audio on Windows 10 computer, whether you need to record YouTube videos, online meetings or create a video tutorial.
Here is a video tutorial for you to see how to capture internal audio on your Windows 10:
As open-source sound recording software, Audacity allows you to record internal audio on Windows 10 and edit it by cutting them into smaller parts or adding effects like reverb or compression. You can trim silence automatically from the beginning or end of recordings and export audio files in different formats, like WAV or MP3.
1. Download and open Audacity on your Windows 10 PC.
2. Click "Edit" tab and then hit "Preferences."
3. Navigate to the Devices > Host and select "Windows WASAPI." Then click "OK" to save the changes made.

4. Hit the red "Record" icon and try recording the sound from your PC. When you see the sound wave running on Audacity, you successfully record the audio from your Windows 10 PC.

5. Click the "Stop" button once you finish the recording.
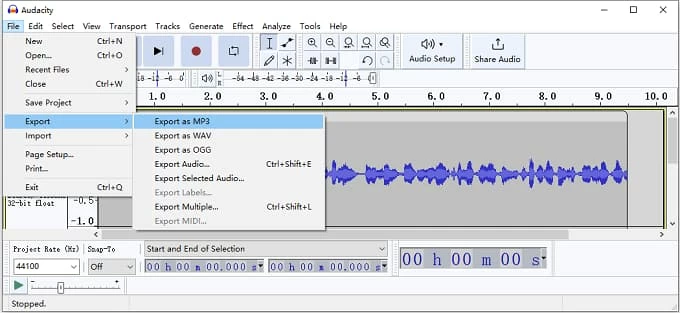
6. To export the audio file, head to File > Export and select MP3, WAV, OGG, or another format. Then save the recording and choose a file location.
Tip: If Audacity can't record computer sound, you can check Audacity Won't Record from Windows and Mac to find the solution.
Extra notes:
Although Audacity is a free and full-featured program, it is not novice-friendly owing to its complex pages, which will take you a while to get familiar with its features. Besides, some users may experience frequent crashes that require rebooting the computer to restore the audio recording function.
Tip: AppGeeker Screen Recorder is the best choice if you want something that gets the job done without cluttering up your screen or overwhelming you with options.
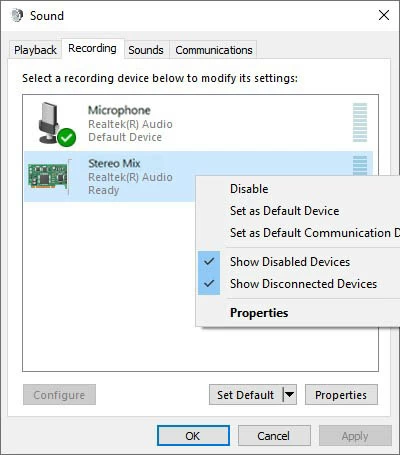
Stereo Mix is a feature that lets you record audio from all sources on your Windows PC, including any apps that are playing internal sound. It's different from other recording features because you don't need to install any extra software; it's an integrated part of Windows 10. To capture audio from specific programs, you can use the Stereo Mix to make internal audio recordings on your Windows 10.
Step 1. Enable Stereo Mix on your Windows 10
Step 2. Record computer audio
After setting Stereo Mix as the audio output, run the Voice Recorder app and click the "Record" button to start recording computer audio. At this time, the Voice Recorder will not capture the sound from the microphone, but will record sound from your Windows 10 PC.
Using an audio cable is another option if you need to record your Windows 10 PC's internal sound and don't have any other options. You can connect it directly to your computer's microphone jack and start recording immediately.
To capture internal sound with an audio cable:
To make this fully operating, go to your computer's sound settings:
Open any audio recording program on your computer and start capturing sound on Windows 10.
Limitations of using an audio cable
The audio quality may not be as good as other in computer audio recorder, and there may be unpredictable problems when recording audio from PC.
Final thoughts
We hope our guide on how to record internal audio on Windows 10 has been helpful. It is possible to record audio on Windows 10 by using the native recording software in Windows 10 or any other PC audio recorders, allowing you to create high-quality sound files for your projects.

