How to Record with Webcam on Windows 10?

Xbox Game Bar was the inbuilt software from Windows 8, but it features screen recording from Windows 10. Is there a tool for Windows 8 screen recording?

Screen capture on Windows 8 has some differences with that on Windows 10 and 11.
Screen capturing is highly beneficial in this epidemic era. However, the process can be intimidating, especially for folks using the Windows 8 computer.
If you own a Windows 8 computer and need to capture videos on the screen, we are here to help you. This article will introduce the different techniques to record your screen with or without a third-party tool. Read on!
Table of Contents
Yes, Windows 8 computer systems come with a built-in screen recorder (popularly known as Step Recorder) like the Xbox Game Bar on Windows 10 and later versions. Though Xbox Game Bar was released with Windows 8 and works as a built-in game-related tool, it didn't feature screen recording. The native screen recorder of Windows 8 is called Step Recorder.
Step Recorder is easy to operate but can be difficult to locate. To launch this tool for operation, simply follow the instructions given below:
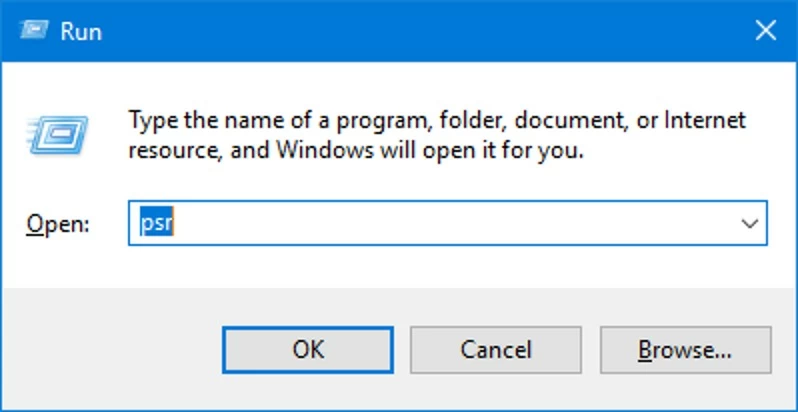
Step 1: Head to the Start menu, or better yet, use the hotkeys Win + R to launch the Run dialogue box. Enter the key phrase psr in the space provided to open the Step Recorder on your Windows 8 computer.
Step 2: Click on the red circular icon labeled Start Record to commence screen recording. Wait patiently until the screen capturing is over, then move to the next step.
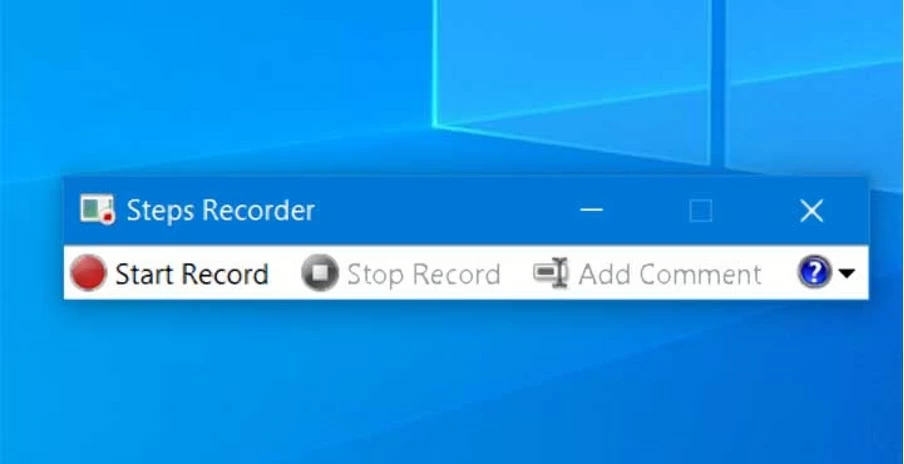
Step 3: Once the recording is over, click on Stop Record to terminate the process. Step Recorder will create a ZIP file with the video content you just recorded. Check your hard drive to access the file on your computer.
It enables you to capture your screen and audio simultaneously. One challenge users may face when using this tool is the support for limited output format. Step Recorder saves recordings in MHTML format.
As aforementioned, the Step Recorder has its limitations. And to fix them, we advise you to install third-party screen recording software with quality features for excellent output. One tool with similar attributes is Appgeeker Screen Recorder – the top-ranked capturing solution that you can employ to record any event you find on your screen. This simple tool is built with no operating system limitations. It enables you to capture your Windows and Mac screens in different dimensions, whether full-screen or partially.
Other interesting features include the capability to record webcam and audio simultaneously, support for several media formats, annotating tools, schedule recording, etc. You can also merge, trim, and compress recordings conveniently with Appgeeker Screen Recorder. This is convenient for advanced users. If you are a newbie, operating this software program is easy thanks to the comprehensive user interface.
Using an internet-enabled Windows 8 device, download and install Appgeeker Screen Recorder. Run the software and follow the steps below to record your Windows 8 screen:
Step 1: Select Video Recorder as the recording mode.

Step 2: Choose the Full screen as the recording area, or you can customize the range. Hit on the appropriate keys to capture audio sounds. You can choose to record the System sound or Microphone or both when recording the screen. If you need to capture your face at the same time, you need to toggle on the webcam.
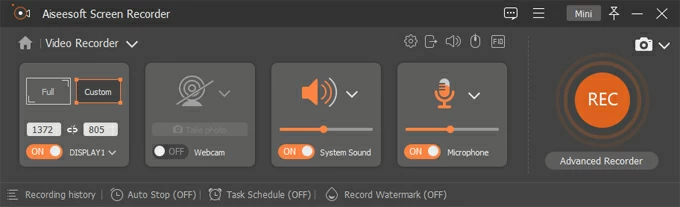
Step 3: Now head to the settings tab, make the necessary changes like the recording format and output folder. Then hit on OK once done.

Step 4: Click on REC to start screen recording the activities perform on the screen.
Step 5: Wait for the recording to complete then click on the stop recording box to end the screen capturing. The recording will be automatically presented on the screen.
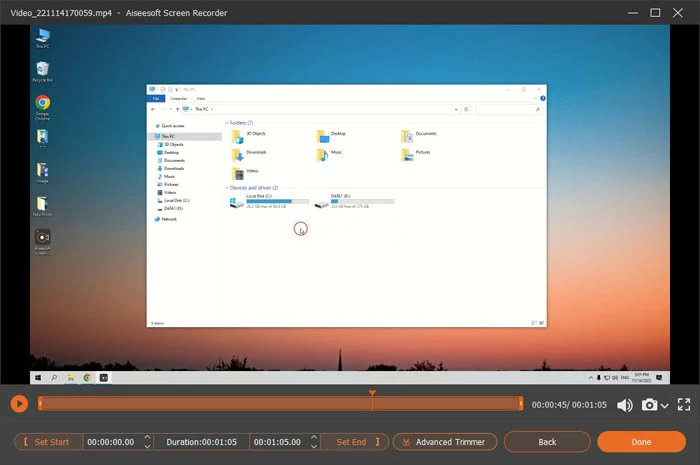
Once you are satisfied with it, you can export it to your local folder at your convenience. Appgeeker Screen Recorder will move the recorded file to your local drive in no time. You can always check there for the recordings in the future.
Q1. How to Record the Screen on Windows 10?
Recording a Windows 10 computer screen is straightforward. You can employ the services of the built-in system app, Xbox Game Bar. The app is structured to help users capture not only games but whatever performs on their computer screen. But only one application can be recorded at a time.
To record an event on Windows 10 using Xbox Game Bar, kindly enable the app to capture your screen, and follow the instructions below:
Step 1: Launch the page containing the content you want to record.
Step 2: Press the hotkeys Win + G to open the Game Bar widgets.
Step 3: Then use the combination Windows + Alt + R to initiate screen recording. Otherwise, you can click on the Capture button and hit on the Start Recording button.
Step 4: Enable or disable the microphone using the shortcut Windows + Alt + M during the recording process.
Step 5: Once done with the screen recording, press Windows + Alt + R again to end the recording session.
Q2. How to Record Windows 11 PC?
Like Windows 10, the Xbox Game Bar is also a reliable recorder on Windows 11 computers. The approach required to record a Windows 11 screen using Xbox Game Bar is almost the same as recording Windows 10. You can also employ the services of a third-party app like Appgeeker Screen Recorder.
Q3. How to Record the Screen on Mac?
Screen recording on Mac is also an easy task to execute. Users can rely on the built-in screen recording app, QuickTime Player. The guide required is simple.