
How to Screen Record on Mac with Audio

In this essay, we will explore the steps to use VLC to record a screen with audio. And how to use VLC alternative to record a screen with audio. Then compare their pros and cons.

Overview of VLC:
VLC, short for VideoLAN Client, is a popular open-source media player that offers a wide range of features for playing various screen and audio formats. While primarily known for its ability to play various multimedia formats, VLC also provides additional functionalities such as screen record, video capture, screen capture with audio, etc.
Maybe you want to use VLC to record a screen with audio. With VLC, you can conveniently capture and record your computer screens with audio, making it a versatile tool for creating tutorials, presentations, or capturing gameplay footage. Whether you are looking to record your desktop screen, a specific application window, or even live streaming content, VLC offers a straightforward and user-friendly solution for screen recording.
Are you curious about how to use VLC to record a screen with audio now? Using VLC to record a screen with audio is easier than you thought. In this article, we offer you with 2 useful tools to record screen with audio.

When you need to record with VLC or VLC alternative, there're 2 approaches to help you.
Table of Contents
VLC media player is not just a tool for media playback; it also offers a convenient solution for screen recording with audio. You can use VLC screen recorder to record computer sound and microphone sound as well as desktop screen. After the recording is complete, you can edit the recorded audio and share it on your personal social platform. Additionally, the software is compatible with Windows, macOS, Linux, and mobile devices. Let's give it a shot!
Here are the specific steps on how to use VLC to record a screen with audio:
Step 1: Installing VLC record screen
Before diving into screen record with VLC, it is essential to have VLC media player installed on your computer. To download VLC, visit the official website and choose the appropriate version for your system. Once downloaded, follow the installation instructions to complete the setup process.
Step 2: Launching VLC Media Player
After installation, launch VLC media player by double-clicking on its desktop icon or locating it in your applications folder. VLC's user interface is straightforward and user-friendly, making it accessible for both beginners and advanced users.
Step 3: Accessing the VLC Screen Record Feature
To begin recording your screen, navigate to the top menu bar and select "Media". A dropdown menu will appear, and you need to choose "Open Capture Device" from the list. Alternatively, you can use the keyboard shortcut "Ctrl + C" to access the same feature.
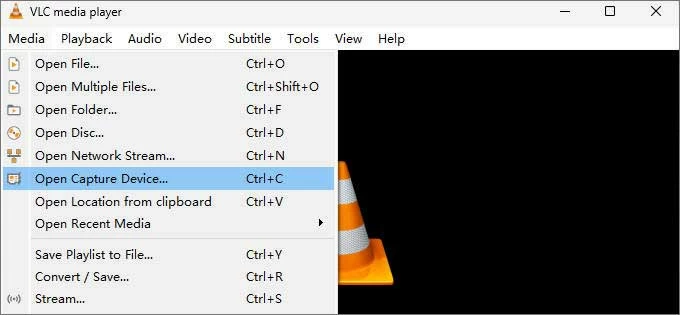
You need to click the "Media" tab, and select "Open Capture Device" from it.
Step 4: Configuring Capture Device Settings
Upon selecting "Open Capture Device," a new window will appear. Within this window, you will find various tabs. Click on the "Capture Device" tab to proceed. In the "Capture mode" section, choose "Desktop" from the dropdown menu. Additionally, select the desired frame rate for your recording. A higher frame rate will result in smoother playback but may require more system resources. Experiment with different frame rates to find the optimal balance for your needs.
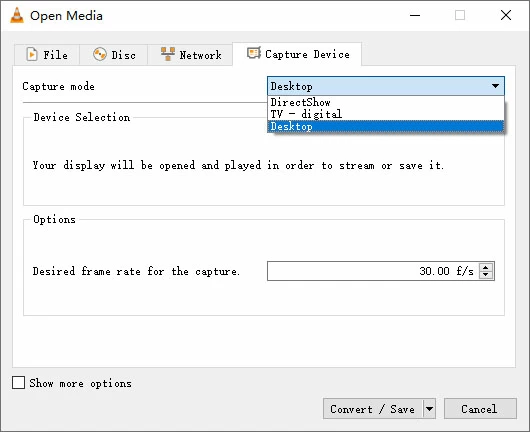
In the "Capture mode" section, please choose "Desktop" from the dropdown menu.
Step 5: Selecting Audio Input
To record audio along with your screen, click on the "Audio" tab within the "Open Capture Device" window. Here, you will find the "Audio device name" section. Use the dropdown menu to select the appropriate audio input device. This can be your computer's built-in microphone or an external microphone connected to the system.
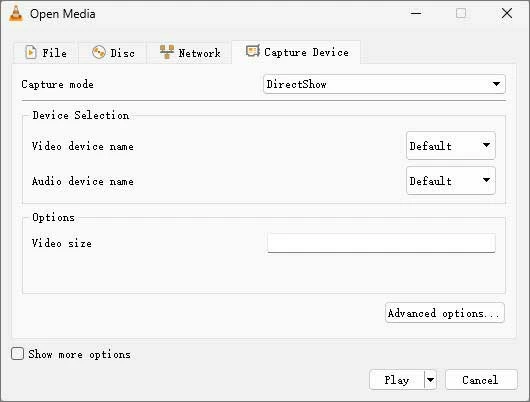
Please select the device on which you input the audio.
Step 6: Starting the Screen Recording
Once you have configured the capture device settings and selected the audio input, click on the "Play" button located at the bottom. VLC will start capturing your screen and audio simultaneously. You will notice a new VLC window displaying the recording in real-time.
Step 7: Pausing and Resuming the Recording
During the screen recording, you may need to pause and resume the process. To pause, click on the "Playback" menu at the top of the VLC window and select "Pause." Alternatively, you can use the keyboard shortcut "Spacebar" to pause and resume the recording. This feature is particularly useful when you want to exclude certain parts of the screen recording.
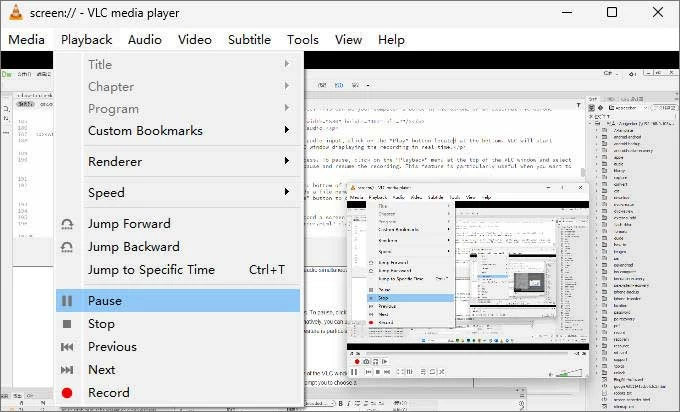
Select "Pause" under the "Playback" menu.
Step 8: Ending the Screen Recording
To stop the screen recording, click on the "Stop" button located at the bottom of the VLC window. You can also click the VLC record button to end the recording. Once the recording is stopped, you will have the option to save it. VLC will prompt you to choose a destination folder and provide a file name for the recording. Select a location on your computer where you want to save the file and enter a meaningful name. Finally, click on the "Save" button.

Click the VLC record button to end the recording.
Some of you may be asking if there are other recording option that offer you more features when recording voice and screen on your device. AppGeeker Screen Recorder comes in handy. It is an all-in-one screen recording tool for capturing screen, video, audio, game, phone, webcam and screenshot. It comes with the below main features. Let's see it together!
Main Features:
Here is a step-by-step guide on how to use VLC alternative tool to record a screen with audio.
Step 1: Download and install Screen Recorder from the official website. Then launch the program after installation.
Step 2: On the main interface, click on the "Video Recorder" option.

Click "Video Recorder" button on the main interface.
Step 3: Adjust the recording area by selecting the desired screen region using the drag-and-drop cursor or by entering specific dimensions

Customize the recording screen size.
Step 4: Enable the audio recording by toggling the "Microphone" and "System Sound" icon on the toolbar. Make sure your microphone is connected and working properly.
Step 5: Hit the gear icon to open "Preferences" settings. Customize other settings such as video quality, frame rate, keyframe interval, output format, and destination folder according to your preferences. Then click OK to complete the preference settings.

Customize your personal "Preferences" settings.
Step 6: Click on the "Rec" button to start recording your screen and audio. During the recording process, you can use the toolbar to pause, stop, or cancel the recording.
![]()
Select Pause or Stop Recording on the toolbar.
Step 7: After finishing the recording, click on the "Stop" button to end the recording session. Then click the "Done" button in the bottom right corner. And then click "Save any way" to save your record video on your PC. The recorded video will be saved to the specified output folder. You can find it in the "Recording history" of the software.
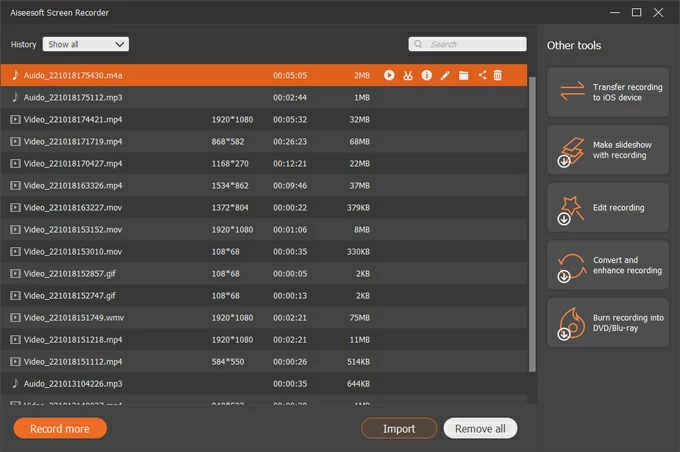
View saved video files in Recording History in the main menu.
Note:
VLC and AppGeeker Screen Recorder are two popular software tools for recording videos and audio. Here is a comparison of their pros and cons:
VLC
Pros:
Cons:
AppGeeker Screen Recorder
Pros:
Cons:
Conclusion
Ultimately, the above are the specific operation steps of recording a screen with audio using VLC and AppGeeker Screen Recorder. The choice between VLC and AppGeeker Screen Recorder depends on individual preferences and specific needs. VLC is a versatile media player with recording capabilities, while AppGeeker Screen Recorder is a dedicated recording software with a user-friendly interface. Stay tuned, I will keep updating the article.