How to Screen record on Windows 10 with Audio

It's easier than you think. Learn how to record MP3 with the built-in Windows 10 Voice Recorder free, as well as some great third-party sound recording programs.

Things you need to know for making an MP3 clip on a Windows 10 desktop or laptop:

There are a few MP3 audio recording apps available for Windows 10 to create a sound or music file.
Creating an MP3 file sound recording from a PC or laptop installed with Windows 10 sounds like a simple task. You just have a Microphone as the audio input device and the native Windows 10 Voice Recorder in place and the audio recording is saved to your computer. Wait! The only thing is that the sound files recorded with Windows Voice Recorder are exporting to M4A, rather than MP3 format. So how to get Voice Recorder to record as an MP3 file?
Don't Miss: How to Screen Record Video and Audio in a Windows 10 Computer
In this article, we'll explain how to record MP3s on Windows 10 either using the built-in Voice Recorder or some of effective MP3 recorder programs. It shouldn't be daunting as long as you know your needs regarding making an MP3 audio file with your own voice or internal sound that comes from any media playing on your Windows 10 computer.
Jump to get the best MP3 recorder to record audio files on Windows 10:
You don't have to spend one cent on an audio recorder. Windows 10 operating system has a built-in Voice Recorder, which is a pretty simple tool that offers very basic ability to record the audio files, including interviews, conversations, lectures and many more sound events. That gives you the power to record your voice using the microphone to create an audio file without having to download any recorder. If you're interested in learning how to audio record with Windows 10 using the included Voice Recorder, look no further.
Pros
Cons
Although Voice Recorder in Windows 10 is not a standard MP3 audio recorder, it could be a good option to capture the voice for its simplicity.
1. Invoke Windows Start menu, type "voice" or "recorder" in the search field and click to open Voice Recorder app under best match result.
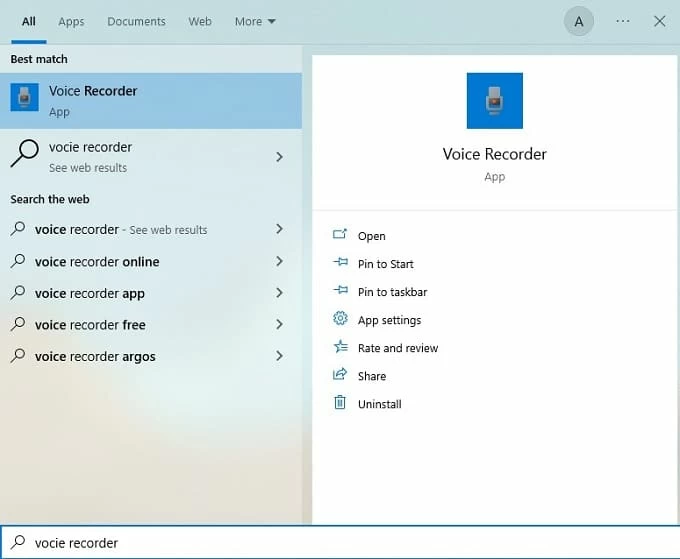
If you can't find Voice Recorder in your Windows 10 PC, go to Microsoft Store to install it and then launch it.
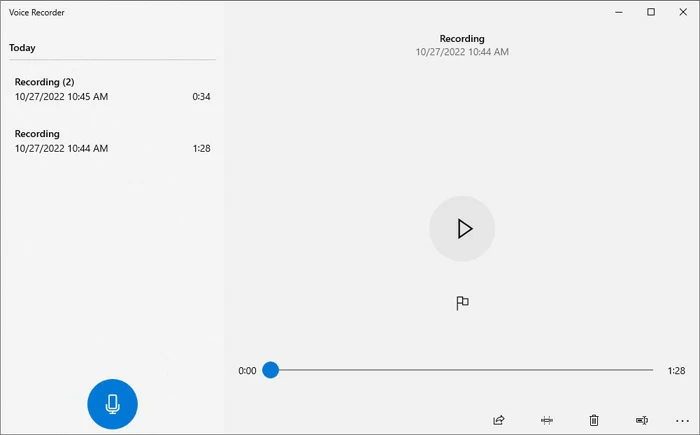
2. Click the big blue Microphone-shaped icon in the left side of the screen to start a recording immediately.
Before sound recording on Windows 10 kicks off, make sure to allow Voice Recorder to access your microphone.
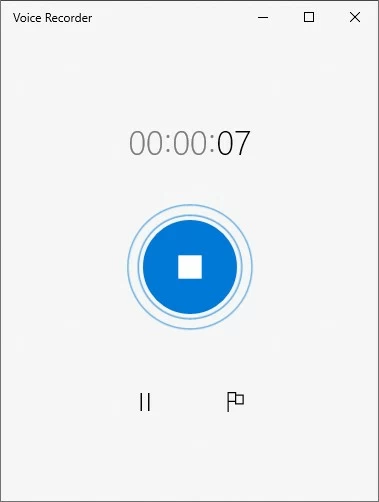
3. While it's recording, speak closer into your mic so your voice can be captured in the recording. There's a timer on the screen counting how long the audio file has been recording. Be sure that your microphone is connected properly to capture the inputs via the software.
You can control over the audio recording: stop, pause & resume, flag specific moments.
4. When completed, click the large blue Stop icon in the middle. The recorded audio can be found on the left pane of the program's main screen as soon as the recording comes to an end. You can play, trim, rename and share the clip any time. You can see all the previous voice recordings, as well.
The audio file you recorded is saved in an M4A file, which is the Windows 10 Voice Recorder default file format. That said, sometimes, you plan to save the recorded .m4a file as .mp3. In this case, you have to do an extra converting step with the help of a third-party audio converter utility or any online free service for the task. So the final step of recording MP3 from Windows 10 PC using Voice Recorder is to convert the M4A sound file to MP3 format.
Done! Set up Microphone and you've successfully recorded your voice in an audio file with the free Voice Recorder on Windows 10.
Quick Tip:
If you want another MP3 recorder Windows 10 — always a good idea if you're concerned you need an additional application to convert recorded clips, and your primary Voice Recorder doesn't record the audio or music coming in through media player or website to a PC running Windows 10 — you can perform a MP3 recording with a different recorder, too.
We like and recommend Audio Recorder, which pairs well with the PC speaker and microphone to capture the sound from any source on Windows 10 to an MP3 file.
Unlike Windows 10 built-in Voice Recorder not including the microphone audio and internal sound together in a recording file, AppGeeker Audio Recorder has the smart capabilities to record those two audio inputs separately or simultaneously, and customize the output sound file directly to MP3. For higher-quality recordings, the software lets you remove the background noise and echo that come in through the microphone so you can get a clean sound record.
Step 1: Run the software on your Windows 10 PC or laptop.
Step 2: On the initial screen, choose "Audio Recorder" tab for MP3 sound recording task.

Step 3: Select which type of audio source input to be captured: System Sound, Microphone. If you tend to record voice to MP3 as well as song from YouTube or any other platform at the same time, make sure to turn on both toggles.
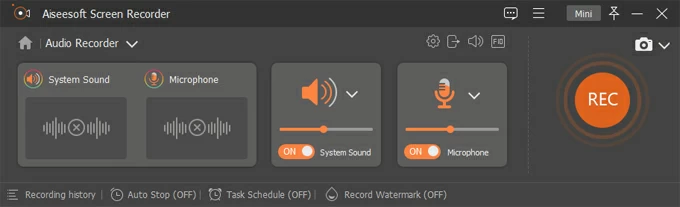
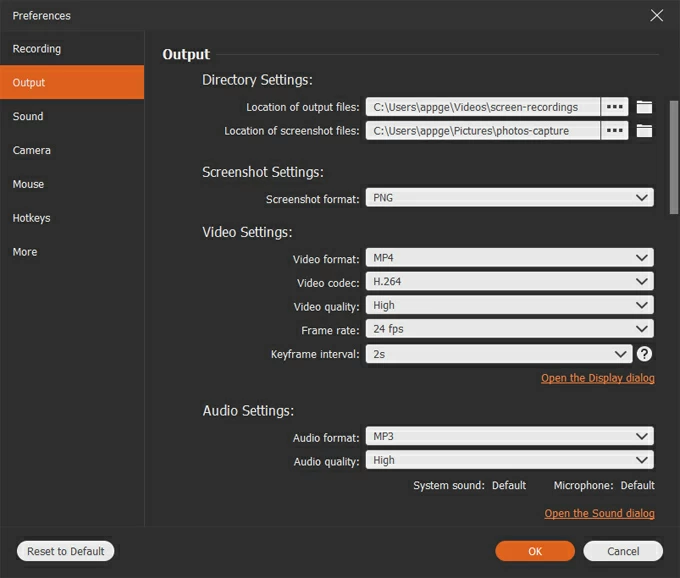
You can click on the gear icon (located right above the Microphone) and when Preferences windows opens, go to the Output section and the default "Audio format" under Audio Settings has been set to MP3 so you can record MP3 audio files in a direct manner. Of course, you can change to M4A, WMA, OGG or whatever.
Step 4: Hit REC button to let the software do its business. You need to play media with the sound you wish to record on your Windows 10 computer as MP3, and if you need to add narration, talk to yourself using the microphone so your own voice can be captured.

Step 5: Hit the Stop icon (the square symbol) from the top-left of the float bar when you're ready to end the recording. You can then listen to soundtrack in the preview window, or trim it and save it. The outputting sound file is accessible as .mp3 for playback offline in Windows Media Player, Moves & TV app, or other media player.
Useful Guide: How to Transfer MP3 from a Computer to an iPhone
So far, you've got audio recording on Windows 10 to MP3. Not only can AppGeeker Audio Recorder capture from microphone, but it can also record any sound that is coming out of the computer even you don't have Stereo Mix feature enabled, be it an old song or background music from YouTube or whatever media.
Audacity is a popular free MP3 voice recorder for Windows 10 users to record music and podcasts, offering many advanced features and customization options to record PC's microphone and then export the result to an MP3 file.
To get started recording vocal audio with Audacity, you must do a little setup first. You need to change Audio Host to Windows WASAPI, and change which microphone you're using to capture the input.
When you finish the recording, Audacity doesn't save your project as a playable audio file in .mp3. Instead, you need to save the recording via File > Export > Export as MP3.
Free Sound Recorder, as its name suggests, is designed for all your audio capturing needs and records MP3, WAV or WMA. It's able to record voices, streaming audio broadcasts, music and pretty much any audio device that's attached to your Windows 10 PC. However, you only have limited editing option to make your voice recording polished.
Does Windows 10 have an MP3 recorder?
Windows 10 has a hidden Voice Recorder to record audio in M4A file, and it's dead simple to use when it comes to capturing sound:
Can Windows 10 Voice Recorder save recording as MP3?
No. Voice recorder come included with Windows 10 captured audio from the microphone that is connected to the computer, and save the voice recording to M4A. There isn't a converter in Voice Recorder after you finished recording so bear in mind you'll need to decent converting tool for the recorded sound track afterwards if you plan to save to .mp3
Alternatively, you can employ a flexible and straightforward sound recorder for Windows 10 that grants you to record to MP3. Here are the best Windows 10 MP3 recorders: