How to transfer iPhone photos to PC

HEIC photos taking up much storage place on your Mac and not sure what to do? Fortunately, there are four quick ways to convert HEIC to JPG on Mac that we'll address.

With the upgrade of Apple's hardware facilities, iOS users these days are pursuing higher picture quality in an increasing number. HEIC, the new default image format adopted by Apple can meet their requirements. However, people find it non-universal on some occasions and want to know how to convert HEIC to JPG on a Mac. If you are one of them, just keep on reading.
In this post, we will show you how to convert multiple HEIC to JPG on Mac in several ways.
Table of Contents
Before we start to tell you how to convert HEIC to JPG on Mac, you may wonder what is a HEIC file. If you find many HEICs appear on your MacBook, don't panic! High-Efficiency Image Container (HEIC) is a new image format introduced in Apple's iOS 11 update.
By default, photos are stored in HEIC format when taken on iPhone. Compared to JPG, it takes up less space and the picture quality is better. HEIC photos support iOS11 and macOS 10.13 and later perfectly, but this format cannot be opened in Windows directly using the built-in viewer software.
Although HEIC pictures have many advantages like a smaller memory footprint and higher quality, they are not universally supported. Now that HEIC is a unique photo format of Apple, you cannot easily access this kind of photos unless using some conversion tools on Windows. Converting to a JPG may result in a loss of image quality, but it can be viewed and edited on any device.
If you find it hard to share a HEIC photo with your family and friends, feel free to take a clear look at how to convert from HEIC to JPG on Mac using five simple ways.
The fastest way to change photos from HEIC to JPG is to use Preview, a macOS built-in picture / PDF viewing and editing software that supports the preview of many picture formats, such as HEIC, PNG, PSD, PDF, RAW, etc.
Here's how you can convert HEIC to JPG using Preview.

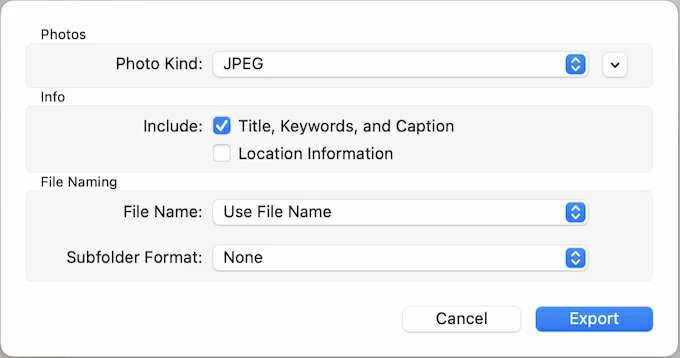
Using the Photos app, you can organize your own photo collections into different albums, or edit images and videos with intuitive built-in tools. On a Mac, it can also help to convert HEIC to JPG with a few steps. Look how it works:
1. First, ensure the photos you want to convert are in the Photos app. If not, import or simply drag them into Photos.
2. Select the images and click File > Export. Then, hit on Export [a number] Photos from the options.
3. Change Photo Kind to JPG and choose other settings according to your demand.
Actually, there is another way how to convert HEIC photos to JPG. The only thing you need to do is to drag the photos from Photos to the Finder app, and they will automatically turn into JPG format. Conversion of single or multiple photos is available.
Converting HEIC to JPG through Preview and Photos is indeed convenient, but if you want to find a more powerful program for file management and transfer, iPhone Data Transfer could be a wonderful choice. The tool with great functionality allows you to transfer a wide variety of pictures to iPhone/Mac and convert them to a common picture format. It can also convert images from HEIC to JPG in large batches with one click.
Read the following instruction to convert HEIC to JPG on your Mac or MacBook.
Step 1: Download and install iPhone Data Transfer on your Mac.
Step 2: Connect your iPhone to the computer with a USB cable.
Step 3: Hit on Toolbox from the left panel and then click HEIC converter.

Step 4: Choose Add files from device or from PC based on your needs. It allows for HEIC conversion of either iPhone photos or Mac pictures.
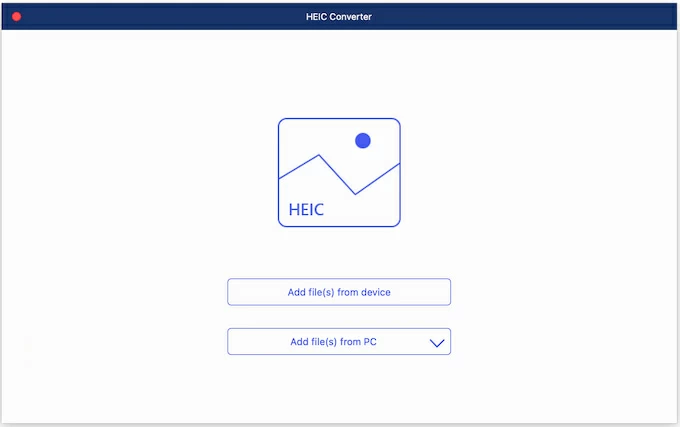
Step 5: Now, you can select the target photos and transfer them to JPG format as guided.
After getting JPG images from this built-in HEIC converter, you can also make clicks to transfer photos from Mac to iPhone for future reference.
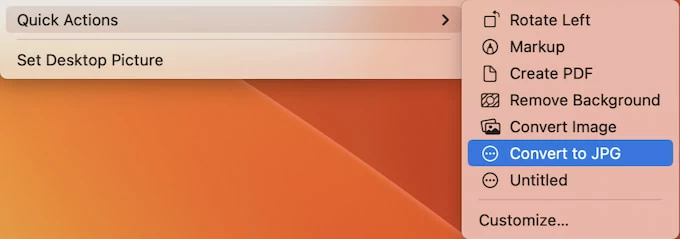
Automator is an Apple built-in program to help set up quick actions and avoid repeated manual operations. If you want to know how to convert HEIC to JPG on Mac using Automator, keep reading.
1. Open Automator and hit Quick Action from the category. Then click the blue Choose button.

2. From the left sidebar named Library, choose Photos > Change Type of Images. When you double-click this option, there will be a window asking if you want to add this quick action. Click on Add to continue.
3. Then you'll find two text boxes named after Copy Finder Items and Change Type of images. Select JPG format in the box below. It's nearly set up!
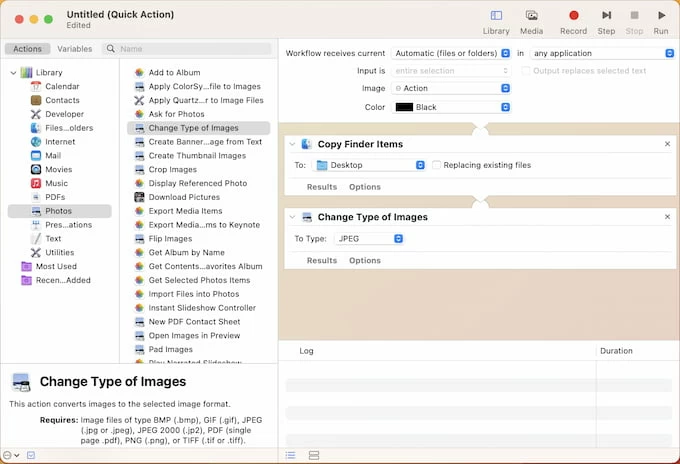
4. From the top menu, choose File > Save. In the pop-up window, enter Convert to JPG or other names you can easily understand.
5. Now it's time to check if you can convert from HEIC to JPG on your Mac! Open the Finder app and right-click on the HEIC picture, search for Quick Actions and select Convert to JPG. There will be a JPG copy in the gallery.