
How to Record YouTube Videos on Mac

Explore the hassle-free ways to transfer photos from iPhone to USB drive, freeing up space and safeguarding your precious moments in just a few clicks!

There are multiple ways to transfer photos from iPhone to USB efficiently.
The iPhone camera takes great photos and videos. However, full-resolution pictures can take up much storage on your iPhone. If your device is running out of space, it's always a good idea to transfer photos from iPhone to USB to free up space and keep them backed up safely.
While Apple doesn't provide a direct way to transfer photos from iPhone to flash drive, there are still ways to do it. This guide will explain how to transfer photos from iPhone to USB with different solutions. You can put pictures on a flash drive from iPhone using your PC or Mac, and also learn how to transfer photos from iPhone to USB stick without computer in easy steps.
Unlock the power of the ultimate file transfer tool for iDevices with Appgeeker iPhone Data Transfer! Featuring a beginner-friendly interface and convenient one-click transfer capabilities, effortlessly transfer your photos from iPhone to USB or other devices seamlessly!
Here are 3 methods to help you transfer pictures from iPhone to USB drive with a Windows PC. Utilize built-in Windows Photos and File Explorer for iPhone camera photos, while third-party tools are required for photo albums, screenshots, videos, and media pictures so that you can transfer iPhone photos to USB stick directly.
Both Windows and Mac computers come with the Photos app, which offers an easy way to transfer pictures from iPhone to USB flash drive quickly. Built into Windows 8 / 10 / 11, the Photos app can't transfer iPhone photos to USB directly, but it allows you to import photos from your iPhone to PC and then save the iPhone photos to USB stick afterwards.
Make sure your USB drive has enough space for the iPhone pictures you plan to transfer. It also needs a USB-to-lightning cable. Here's how to transfer photos from iPhone to USB using Photos:
Step 1. Plug your iPhone into computer with a USB cable. If asked, select Trust when your iPhone pops up the Trust This Computer alert, and input your device passcode.
Step 2. Open the Photos app on your computer. Sometimes the Photos window will appear automatically, or you may launch it from the Start menu.
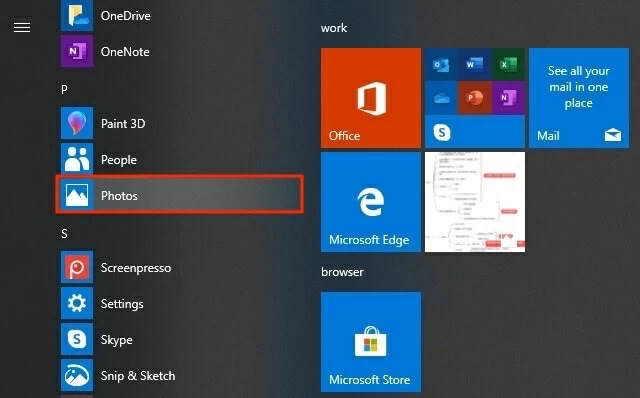
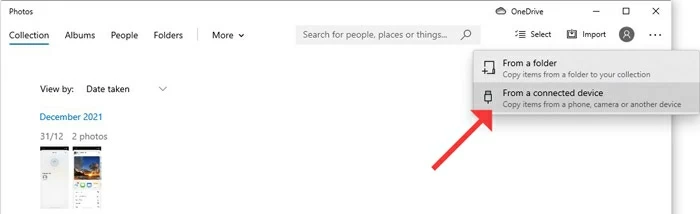
Step 3. Click Import and choose From a USB device at the top. It will auto-detect the connected device and show you the iPhone photos it has found. Note: For Windows 11, select Import > Apple iPhone from the upper-right corner of Photos window.
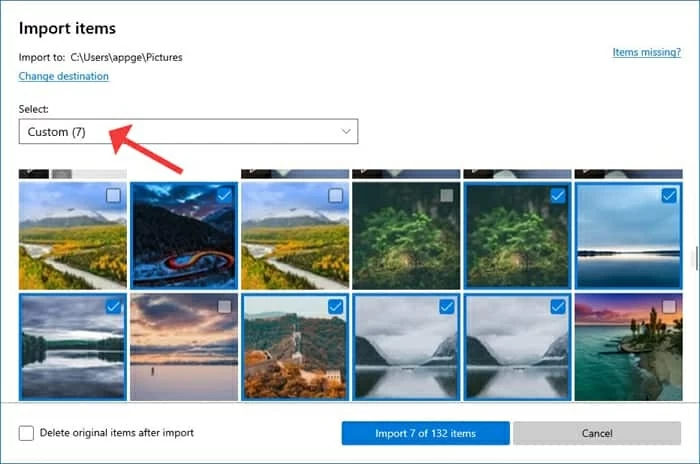
Step 4. Select and import photos from iPhone to PC. Choose the images you want, and check the Import box. To transfer all iPhone pictures at once, select Import All from the Select menu.
Tip: The imported iPhone photos will be saved to Pictures folder by default. You can also use another location to save them before you transfer the photos from iPhone to USB.
Step 5. Insert a USB stick to your computer and open it.
Step 6. Move the imported iPhone photos to USB flash drive. You'll want to create and use a new folder on your flash drive, then copy and paste the iPhone pictures to it.
The Photos app lets you transfer photos from iPhone to flash drive easily. If you're going the opposite way, you may get the USB pictures on your PC first, and then transfer photos from PC to iPhone after that.
The File Explorer is also a good way to transfer photos from your iPhone to USB stick. It's a pre-installed feature on Windows PC that enables you to get photos from your iPhone's DCIM folder, so you're able to transfer iPhone photos to a USB flash drive by copying and pasting. However, for the pictures that are not in your iPhone camera roll, such as the downloaded photos and videos in media albums, you may need help from the next method.
No extra download required, now learn how to transfer photos from iPhone to flash drive with File Explorer (or Windows Explorer for Windows 7) as follows:
Step 1. Transfer photos from iPhone to computer.

Step 2. Put iPhone photos to USB flash drive.
Once you transfer the photos from your iPhone to USB, the pictures will be stored in the drive securely. Take the USB stick with you, your iPhone photos will be accessible anywhere you go.
Like mentioned, you'll need a reliable app like Appgeeker iPhone Data Transfer to transfer photos from iPhone to USB stick in clicks. This tool comes with easy-to-follow interface, even a beginner knows how to transfer pictures from iPhone to USB or other external storage devices easily.
Apart from this, it lets you transfer photos from iPhone to flash drive directly, including the camera roll, screenshots, favorites, downloads, media pictures, and even the images in Recently Deleted folder. Most importantly, it helps you transfer iPhone photos to USB stick in any size or quantity, without compromising the quality or causing any damage to existing data. The best part is that it also automatically detects duplicate pictures and removes them with a single click.
Step 1: Connect your iPhone and USB to your computer.

Step 2: Choose the photos on iPhone to transfer.
Select Photos tab from left menu and select any pictures you want from your iPhone. It can be everything in your iPhone Camera Roll and Photo Library.

Step 3: Transfer photos from iPhone to USB flash drive.
Click the top computer icon to access Export to PC (Mac) option. Alternatively, you can right-click on the checked pictures / albums to select Export to PC (Mac) from the expanded menu.
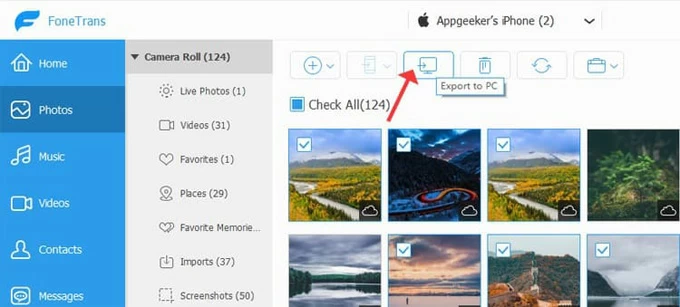
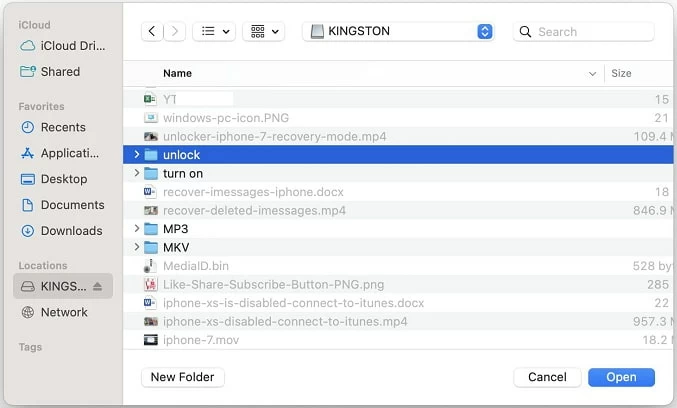
Export iPhone photos to a USB drive on PC directly.
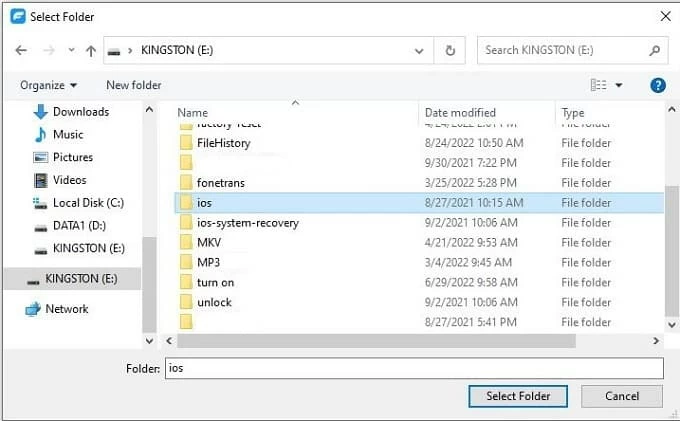
It will pop up a sub-window, from which you can choose the connected USB drive on the left > select a picture folder > click on Select Folder button to put iPhone photos on USB stick.
Similar to the Photos app, the Image Capture app is also a built-in tool on Mac for iOS users to transfer photos from iPhone to USB without extra apps. It's very easy to use, and you're allowed to import all or a selection of your iPhone photos to a USB pen drive attached. See how to download pictures from iPhone to flash drive using Mac Image Capture below, and make sure both your Mac and USB memory drive have enough space for the photos you're transferring:
1. Establish a connection between your iPhone and Mac.
2. Open the Image Capture app. You'll find it in Mac's Applications folder or search it in your Launchpad.
3. Select your iPhone from the Devices list on the left side. This will show your iPhone images as thumbnails or a list for easy viewing.
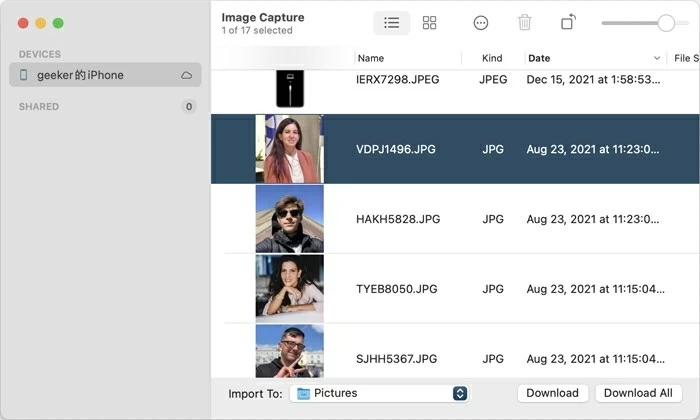
4. Choose the iPhone photos you want. Select the images or photo videos from your iPhone if you're not going to import them all.
5. Check the Import To selector, and pick a destination folder for your iPhone pictures.
6. Hit Download or Download All button to save the transferred iPhone pictures.
7. Attach a USB thumb stick to your Mac computer.
8. Open the external USB drive, and drag the iPhone picture folder to it.
Tip: The downloaded pictures are still existing on your iPhone. If you'd like to free up some space, the Delete after import option in Image Capture can remove the pictures after transferring iPhone photos to USB.
For those looking for the simplest way to transfer photos from iPhone to flash drive, the one-click solution iPhone Data Transfer is the one you can't miss. It has the ability to quickly and easily copy photos from your iPhone to USB stick. All you need to do is to use its one-step shortcut and transfer iPhone photos to your USB flash drive.
Step 1. Link your iPhone to Mac and insert the external USB stick.
Step 2. Open iPhone Data Transfer app.
Step 3. Transfer photos from your iPhone to the USB stick.
![]()
Aside from the one-click transfer to put photos from iPhone to your external flash drive, iPhone Data Transfer also enables you to transfer pictures from iPhone to USB selectively, which you can learn more in Method 3 with detailed steps. It also works when you want to add music to iPhone without iTunes, click to learn more.
Uploading iPhone photos to iCloud is another solution to keep your pictures accessible across devices, which can also be used to download photos from your iPhone to USB drive using a networked computer. It doesn't need a USB cable but requires strong internet on your devices. The free space for each iCloud account is 5 GB, so ensure that there's enough storage for iCloud to transfer your pictures from iPhone to USB flash drive.
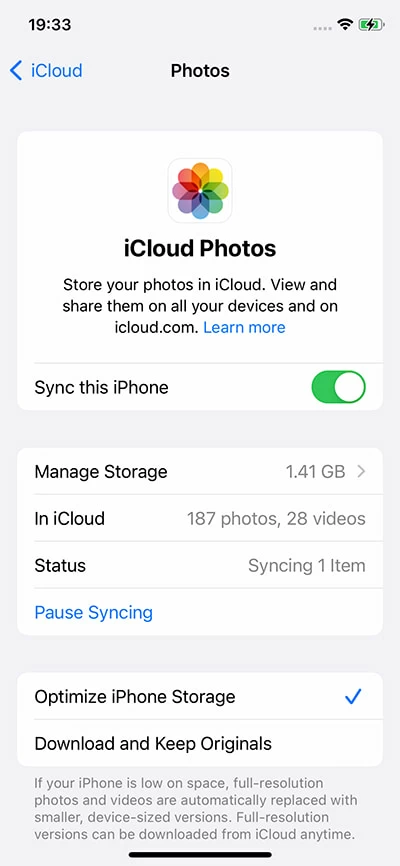
Step 1. Upload photos from iPhone to iCloud. To make it, go to Settings > your device > iCloud, select Photos and enable the toggler next to Sync this iPhone (or iCloud Photos).
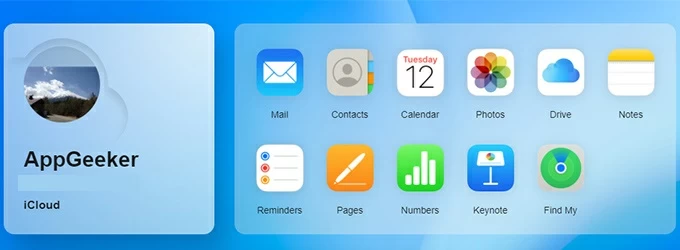
Step 2. Log into iCloud on your Mac or PC. On a browser, visit iCloud.com, and it needs your Apple ID and the password.
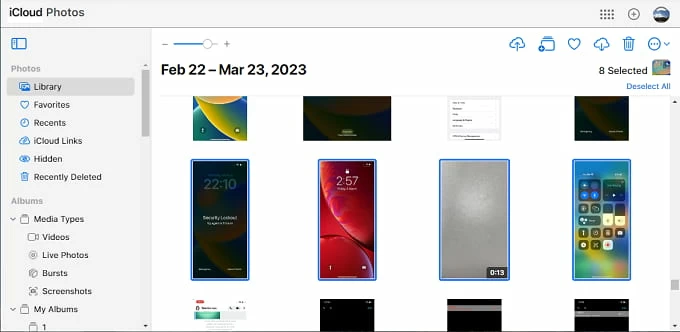
Step 3. Download the iCloud photos you want to transfer from iPhone to USB drive. Choose Photos from iCloud's welcome screen, select the pictures, and click the Download icon at the top to save them on your computer.
Step 4. Copy iPhone photos to USB stick. Insert the external flash drive and load it; then copy and paste the downloaded iPhone pictures to the flash drive folder.
Generally, iCloud storage is capable of transferring a small number of pictures from iPhone to USB. However, if your images are larger than 5 GB, you may upgrade your cloud service to iCloud + or use another online cloud storage like Google Drive which offers 15 GB of free space.
[Further reading: How to Transfer Photos from iPhone to iPhone without iCloud]
When it comes to how to transfer photos from iPhone to a flash drive without computer, the lightning-to-USB flash drive brings the solutions. With the right type of USB sticks, such as SanDisk iXpand Flash Drive, it's possible to transfer photos from iPhone to USB stick without computer.
Step 1. Plug the USB stick directly into your iPhone.
Step 2. Follow the flash drive's own app to access the pictures on your iPhone.
Step 3. Select and move pictures from iPhone to USB drive.
Alternatively, a lightning-to-USB connector or an iOS-compatible adapter will also work. Insert the USB stick into its USB end while connecting the Lightning end to your iPhone; then transfer your iPhone pictures to flash drive without using a computer.
Q1 - How to transfer iPhone photos to external hard drive without computer?
To transfer photos from iPhone to external hard drive without computer, you'll need a lightning-to-USB adapter or an iPhone-compatible USB reader. Connect the lightning side to your iPhone, and join the connection by plugging the hard drive into the other side. Once connected, you can start the process to transfer the pictures from your iPhone to external hard drive, no need for a computer.
Q2 - Can I transfer photos from iPhone to computer with USB?
Yes. There are some USB flash drives that can be inserted to your iPhone directly. USB drives like SanDisk and Apple Lightning to USB Camera Reader allow you to directly transfer photos from your iPhone to a USB stick. After that, you can attach and load the USB drive on a Windows PC or Mac to transfer your iPhone photos to your computer via USB.
Q3 - How do I transfer photos from my iPhone to a flash drive?
1. Make sure your flash drive has enough storage space for the photo transfer.
2. Get both your iPhone and flash drive connected to a computer.
3. Launch a data transfer application, such as AppGeeker iPhone Data Transfer.
4. Transfer photos from your iPhone to flash drive, follow its easy-to-understand interface that guides you.


