iPhone Is on a Restart Loop. How to Fix

Check out this ultimate guide to explore 6 non-iTunes options for transferring iPhone photos to PC, compatible with all Windows 11, 10, 8 or 7.

There are multiple non-iTunes options, enabling users to transfer their photos from iPhone to PC with or without a cable.
Transferring photos from iPhone to PC is a routine task, whether you're looking to free up space on your device or create a backup of your cherished memories.
While iTunes is a popular method for transferring photos between iOS and Windows, it can be time-consuming, especially when moving a large number of pictures and videos. As a result, many users prefer alternative options to transfer photos from iPhone to PC without iTunes.
This guide covers several methods for photo transfer from iPhone to PC without iTunes. Whether you're moving an entire photo library, specific albums, or just a few pictures, these options provide a fast way to transfer iPhone photos to PC or laptop running Windows 11, 10, 8, or 7.
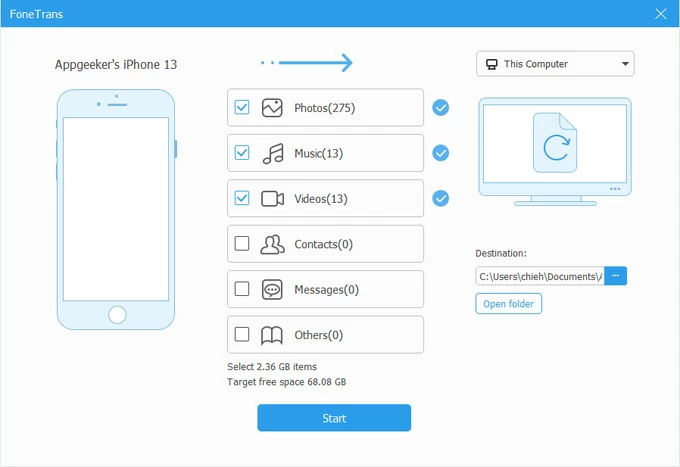
To make bulk transfer of photos from iPhone to computer, Appgeeker iPhone Data Transfer offers a direct way to move your pictures and videos across iOS and PC/Mac without any quality loss.
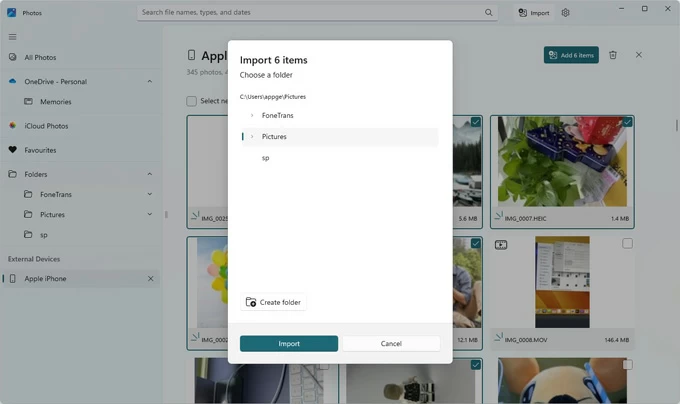
Transferring iPhone photos to PC or laptop without iTunes doesn't have to be complicated. The built-in Windows Photos app lets you import photos and videos directly from your iPhone via a USB cable. Once connected, you can easily access your iPhone photos on PC and preview the pictures you want to transfer to your computer.
Although iTunes is not required for the actual transfer, it'll need to be installed on your PC to establish a trusted connection between iOS and Windows.
Once setup, you're able to transfer photos from iPhone to PC without iTunes by using the Windows Photos app:
Step 1. Open the Windows Photos app on your PC. Press the Windows button on your keyboard to open the Start menu, then type Photos to locate and open it from taskbar.
Step 2. Connect your iPhone to PC using a proper USB cable. If asked, unlock your iPhone and tap Trust on the prompt to allow for connection and data access.
Step 3. Inside the Photos app, click the Import button and choose From a USB device. It's on the upper-right corner of the window.
Step 4. Select your iPhone and preview the photos you want. The Photos app will automatically scan your device and load available photos and videos sorted by date/month/year.
Step 5. Check all or a selection of your desired photos to transfer. You may either choose individual pictures or simply check them all.
Step 6. Transfer photos on iPhone to PC. Click on Import items (or Import All) and specify a local destination to save the iPhone photos on your PC.
By default, the imported photos will go to \Users\Your username\Pictures folder. You may also delete the original items on your iPhone after importing the pictures successfully.
Another Windows-supported way to import photos from iPhone to PC without iTunes is using the File Explorer. This method allows you to access the internal DICM folder on your Apple iPhone and copy the photos to your PC directly via a cable-based connection.
However, note that the photos in DCIM folder are separated by date, which may lead to some trouble in locating specific photos you wish to transfer. Follow these steps to transfer iPhone photos to PC without iTunes by File Explorer:
1. Plug your iPhone into your PC using a USB cable. If necessary, enter your iPhone passcode and tap Trust on the Trust this computer prompt to get truly connected. See what to do if you forgot your iPhone passcode.
2. Open a File Explorer folder on your PC and move to This PC on the left-side menu.

3. Double-click on Apple iPhone under Drives and head to Internal Storage > DCIM folder. Here, your iPhone photos will be stored by month in different folder.
4. Browse the folders to select the photos you'd like to transfer. You may press the Ctrl key and click on each picture, or use Ctril + A keys to select them all.
5. Right-click on the selected photos or folders and choose Copy from the expanded options.
6. Open a local picture folder on your PC to paste the iPhone photos. Alternatively, you can drag and drop the photos to your PC's folder directly.

This way, you're able to get photos off iPhone to your PC for local viewing and sharing, without the need for iTunes. Get help if your iPhone photos disappeared or not showing up.
In addition to Windows Photos and File Explorer, Appgeeker iPhone Data Transfer is another popular tool for transferring photos from iPhone to PC without iTunes. This all-in-one solution allows you to transfer photos and videos between your iOS devices and Windows PC without losing quality.
With iPhone Data Transfer on your PC or laptop, you can easily access and browse your iPhone's entire Photos Library, making it simple to transfer pictures, albums, Camera Roll, Live Photos, screenshots, and more with just a few clicks. Plus, it includes a powerful HEIC Converter, enabling you to convert your iOS photos to more compatible formats like JPG or PNG as needed.
Supporting Windows 11, 10, 8 and 7, the outlined steps below will show you how to transfer photos form iPhone to PC without iTunes or iCloud:
Step 1. Open iPhone Data Transfer on PC and connect the iPhone via a cable.
If it's the first time you link your iPhone, make sure to allow it to trust your computer.

Step 2. Access iPhone Photos Library and choose the pictures for transfer.
Click Photos tab from the left side to have a full preview of your current Photos Library; select the pictures and albums you wish to get to your PC, or click Check All to select the entire library.

Step 3. Export iPhone photos to PC without iTunes.
Hit the Export to PC button at the top toolbar; on the pop-up window, select an output location to save transferred iPhone photos on your PC.

To free up storage, you may choose to delete the original items after moving the photos to your PC. It also works if you're in need for transferring videos, music, contacts, messages, and other files between iOS and Windows.
Aside from the cable-based methods, many cloud services provide wireless transfers of iPhone photos to Windows PC, without the use of iTunes or a cable.
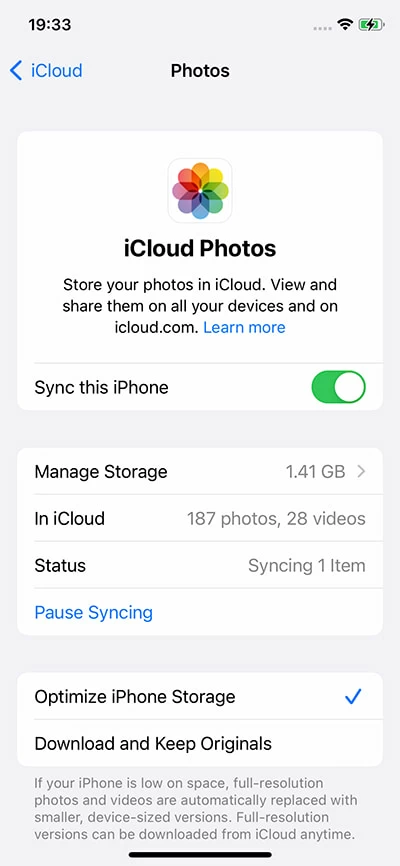
Within Apple's ecosystem, iCloud Photos is a great option for transferring photos from your iPhone to PC wirelessly without using iTunes. When iCloud Photos is enabled on your iPhone, the photos and videos in your Photos Library are automatically uploaded to iCloud and synced across all devices connected to the same Apple account. This lets you access your iPhone photos by logging into your account via a web browser or the iCloud app on your Windows PC.
To use this method, make sure you have enough iCloud storage — starting with 5 GB of free space, or you can upgrade to iCloud+ for additional storage. To download photos from iPhone to PC without iTunes, simply follow these steps:
Step 1. Turn on iCloud Photos on iPhone to sync your Photos Library with iCloud.
It may take some time to upload all your photos and videos to iCloud storage, depending on how many items you have on your Photos Library.
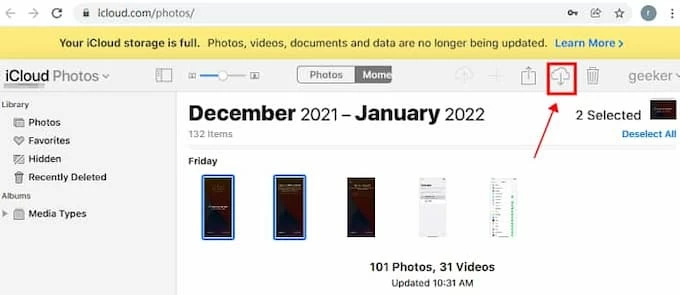
Step 2. Access iCloud Photos Library on your Windows PC.
Step 3. Download iPhone photos to PC from iCloud web.
After downloading the iPhone photos to your PC, feel free to check them anytime you want.
Note: If you delete your pictures from iCloud Photos, they will also be deleted from all your devices linked to the same Apple ID. So, be careful when you want to remove a photo or more. Click here if you're looking for how to retrieve iPhone photos from iCloud.
If you have a large number of photos that exceed 5 GB, Google Photos is also an excellent non-iTunes option for transferring iPhone photos to Windows PC wirelessly. With 15 GB of free cloud storage, it allows you to transfer a larger volume of iPhone pictures to your computer at once.
Before transferring, ensure you have Google Photos app on your iPhone and that your photos are saved to it. Here's how to download pictures from iPhone to PC without iTunes or iCloud:
Once done, the iPhone photos will be downloaded to your Windows PC as a copy.
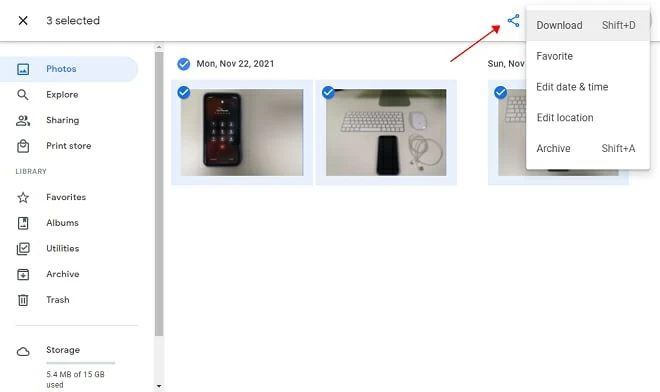
You can also hold Shift + D on your keyboard to download the selected images to your PC.
Emailing is also a quick and simple way to send photos from your iPhone to PC without iTunes or iCloud, especially there are only a few pictures you prefer to transfer. Just attach the photos to an email, send it to yourself, and then download the photos directly to your Windows PC or laptop:
With these useful tools, it's easy to transfer your photos from an iPhone to a Windows PC without needing to use iTunes. You can easily save a copy of your important pictures, or make regular backups of your iPhone photos and videos to prevent unnecessary data loss.
1. How can I transfer photos from iPhone to PC without iTunes?
There are several methods available for iPhone-to-PC photo transfer without using iTunes, such as the built-in Windows Photos app, File Explorer, cloud-based iCloud Photos, Google Photos, and third-party tools like iPhone Data Transfer. These methods allow you to move photos using a USB cable or wirelessly, without requiring iTunes.
2. Why can't I transfer my photos from iPhone to computer?
If you're using a wired method, check your USB cable and the connection. If asked, allow your iPhone to trust this computer and enter your passcode to verify.
When transferring photos via cloud services, ensure that you have enough cloud storage and both your PC and iPhone are connected to an active and stable Wi-Fi network.
3. Can I transfer photos from my iPhone to a Windows PC wirelessly?
Yes! Cloud-based services like iCloud or Google Photos can sync your iPhone photos across devices wirelessly. Simply upload your photos to the cloud and then download them to your computer by using the same account on a web browser or within the app.
4. I have a large number of photos to transfer. How do I get all photos off my iPhone to my PC without iTunes?
For a large photo library, Google Photos and iCloud Photos are excellent options. They offer free cloud storage (5 GB with iCloud, or 15 GB with Google Photos), allowing you to sync the entire photo library to your PC and download all pictures and videos inside without the need for iTunes.
Additionally, the One-click shortcut by iPhone Data Transfer enables you to transfer all photos from your iPhone to Windows PC with a single click, here's how: