How to Screen Record on Mac with Audio

As a free multi-track audio recorder, Audacity is selected by many users because of its professionalism. But the complex interface and recording process also perplex users.

All computers have a native audio recorder that allows you to access audio from the computer and the external microphone, like QuickTime Player for Macs and Voice Recorder for Windows computers.
Streaming audio is real-time audio played through a network connection, but there are some limitations to recording streaming audio via the inbuilt recorders we mentioned before. But worry not, Audacity can help you with streaming sound recording whether on a Windows computer or a Mac. You can also use AppGeeker Screen Recorder to record the streaming voice more straightforwardly than using Audacity.
Online music software, Youtube, online meeting platforms, etc. are platforms that offer audio streaming services.
You are streaming a podcast or listening to an audio file online with your Windows or Mac. You hear some words that are so striking that you feel the need to re-listen to the audio. You can playback the streaming audio or rather still, record while streaming.
If you want to record the streaming audio in high quality and edit it after recording, numerous audio recording software are available. Among those recorders, Audacity is the best software you need. It is an excellent toolkit that records audio and offers advanced features for you.
Table of Contents
Voice Recorder is not a stranger to Windows users. It is the inbuilt tool used for recording streaming audio and microphone sound on Windows computers. But compared to Audacity, it is simply a voice recorder without any edit functions. Audacity is an open-source audio recorder though, it is bundled with a host of features like cut, change effects, adjust the track, etc. to assist users to optimize the recorded audio. Check out this detailed stepwise guide to recording streaming audio with Audacity on your Windows:
Step 1: Open the Audio Source
If you want to record what you hear, you have to open the streaming audio on your computer. Open the appropriate streaming audio folder. Launch the audio using your preferred media player. Or if you want to record the streaming audio from the video, you can open the video.
Step 2: Set up your Device
Navigate to the Start menu bar at the bottom left corner of your screen, click on it, and select System. Click on Sound on the left sidebar to set up your computer audio.
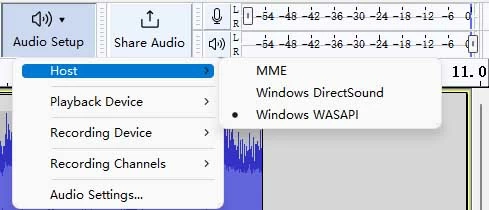
Step 3: Configure the Settings of Audacity
Next, head to Audio Setup, and select Windows WASAPI from the Host panel. Check out the image below for a proper understanding:
If you want to record your voice from the microphone at the same time, you need to connect your microphone to the computer. Hit on the Recording Device drop-down menu and select your computer's speaker or headphones, depending on the Playback Device you use, as the recording device.
Step 4: Start Recording
When you finish these settings, hit on the Start button to initiate the audio recording and play the streaming audio or the video.

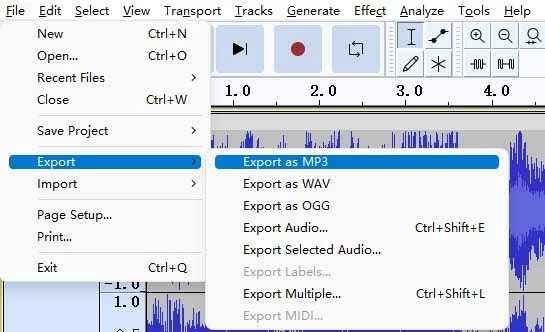
Step 5: Save the Recording
Next, exercise patience for the recording to complete, then hit the Stop icon to end the recording. Save the recorded streaming audio file to your local storage. To do that, click the File icon and select Export > Export as MP3.
Note
Also read: Fixes for Audacity not record computer audio.
Similar to Voice Recorder, Mac also has the native recorder, QuickTime Player. It is a multi-functional player that can play local media files and record the screen with microphone audio. But it can't record the audio from the computer.
Audacity also works with macOS machines. For Mac users looking for a guide on how to record streaming audio from a computer with Audacity, follow the instructions given below:
Step 1: Download Audacity and Soundflower
Go to Audacity's official webpage to download and install the it. Once done, install Sunflower, and launch it.
Note
Step 2: Choose an Audio Source
Next, click on the apple icon at the top right corner of your screen, and choose Sound Preferences. Click on Sounds > Output, and the page below will come up:
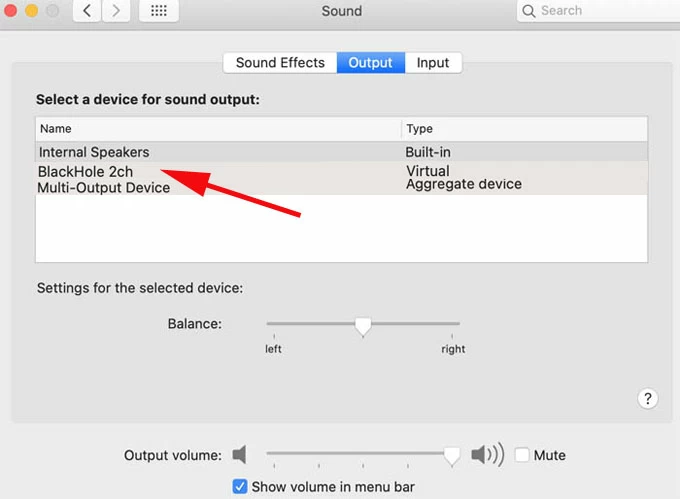
Choose Soundflower (2ch) and move to the next step.
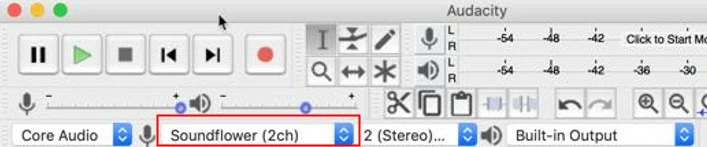
Step 3: Launch and Configure Audacity
Open Audacity on your computer, and set it up for audio recording. You have to select an audio source. To do that, simply navigate to Audio Setup and select Recording Devices > Soundflower (2ch).
Step 4: Record Streaming Audio
Next, click on the Start recording button. Audacity will automatically start capturing streaming sounds.
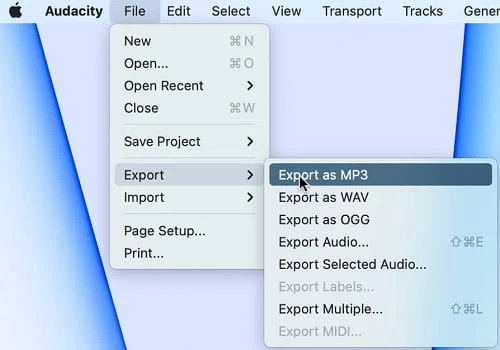
Step 5: Save the Streaming Audio Recording
Once the recording is finished, click on the corresponding buttons to stop recording. Click File > Export > Export as MP3, and select your preferred storage path to save the streaming audio recording.
To record the audio on Mac by QuickTime Player, go to the Launchpad to open the QuickTime Player. Then navigate to File > New Audio Recording. Mac has an inbuilt microphone, but you can also connect the microphone to it for higher quality. Then click the red recording button to start recording.
Although Audacity is a good tool for streaming audio, it still has limitations, especially on Mac machines. We suggest you resort to a more efficient audio streaming program that captures streaming audio with high quality as using Audacity.
Appgeeker Screen Recorder is an amazing audio recording solution compatible with both macOS and Windows computers. This software program captures streaming sounds from the computer and external voices from the microphone without cracks. Compared to Audacity, the process is more straightforward and user-friendly. It also provides some edit features to control the audio quality.
The audio recording process is almost the same on Windows pc and Mac, just install Appgeeker Screen Recorder, and follow the procedure below to record any streaming audio of your choice:
Step 1: Choose the Recording Mode
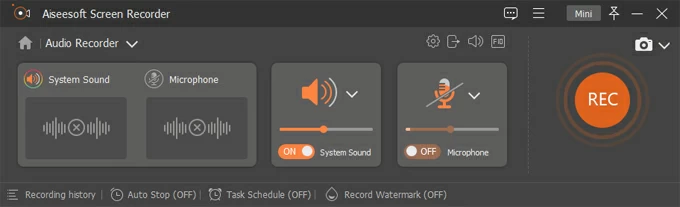
After the successful installation, run the software and choose Audio Recorder.

Step 2: Adjust the Recording Settings
Navigate to the Settings page by clicking on the gear button. Here you can change the settings for the output format, audio quality, volume, mouse cursor, etc. Set these parameters due to your preference and click on OK.
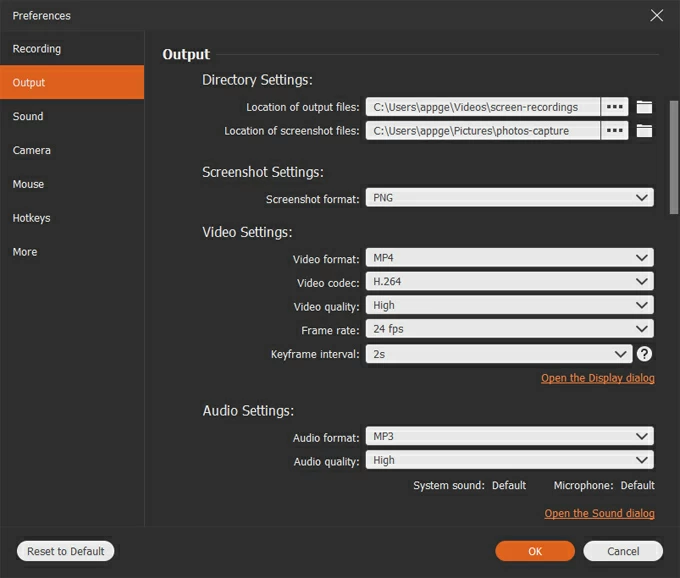
Then toggle on the System sound option to capture the streaming audio from your computer. External audio from the microphone can also be recorded when playing streaming audio simultaneously by turning on the Microphone button.
Step 3: Start Recording the Streaming Audio
Next, hit on REC, and it will immediately commence audio recording. Start playing the streaming audio in case you miss some sound. Wait until the audio recording is over, then hit the Stop key.
![]()
Conclusion
Recording streaming audio with Audacity is an easy task to engage in when you have the right tutorial guide at hand. Here we've compiled a detailed tutorial guide to help you out. All procedures provided are simple and fast to employ.
For folks who find Audacity complex, we introduced a professional audio recorder, AppGeeker Screen Recorder. The software captures streaming audio from any source without cracks or disruption. You should try it out!