How to Screen Record Video on Windows 10

Zoom offers a recording function for host to record Zoom meeting video and audio. This basic guide explains how to record a Zoom meeting on any MacBook Pro, Air.

At a glance: How to screen record Zoom meeting on a MacBook

Getting one of the best Zoom recorders will eliminate your confusions about how to record a Zoom session on MacBooks.
First, a caveat: Zoom allows host to record online meetings, and all meeting participants will be notified as soon as a recording begins. Participant gets no options of recording Zoom meetings but to ask permissions from the host; when obtaining recording privileges, participant will receive a notification.
Remote meetings are becoming a more essential part of work, and Zoom is a popular audio and video conferencing tool that facilitates a good communication and problem-solving. If you're an Apple user, you probably want to record Zoom meeting on MacBook for future references.
Zoom is featuring with native RECORDING function in its desktop app to record Zoom meeting to MacBook for free - if you're the host of the meeting, and after that, you store the recorded files onto cloud storage services or sharing them over streaming sites.
This article will also guide you through the process of how to record a Zoom meeting on a MacBook without others knowing via a reliable Zoom recorder software - Screen Recorder, whether you're the meeting host or a participant without host's approval.
Jump to:
A Zoom meeting recording can only be done by the host using the integrated recorder. On the host party, there's a Record button at the bottom of the Zoom layout that makes recording Zoom meeting on MacBook a breeze. This isn't the case if you're not the host.
Participant can't record Zoom meeting without permission, which means that participants need to request host's approval before they can record Zoom on MacBook. If the Zoom recording privileges are allowed, you'll see a notification and a Record button on the Zoom layout.
This part demonstrates how to record a Zoom meeting on MacBook along with video/ audio for a host or a participant.
With Zoom built-in recorder, host can easily record the meeting by hitting the Record button at the bottom for a Zoom local recording, and then save the recorded file to your MacBook on the desktop or any folder of your choice.
While the recording starts, the Recording indicator will be displayed on the top right position of the conference screen. Once the recording is ended, an automatic conversion will be processed so you can access the file later.
Tip: If you are a paid subscriber on Zoom, you can click Record > Record to the Cloud option, then a Zoom cloud recording triggers. The video, audio, and chat text from the meeting will be recorded to Zoom cloud and can be downloaded to your MacBook locally at any time. This can be achieved by a licensed user - host or co-host, with Pro, Business, or Enterprise account.
Can you record a Zoom meeting as a participant on your MacBook? By default, only the meeting host can record meetings in Zoom. Fortunately, if you have been granted the recording privileges from the host, you can use local recording feature to record Zoom video without any hassle.
So, it's time for host to set up permissions and offer the participant the ability to record a Zoom session on MacBook, Pro or Air:
After getting the permission from the host, use the built-in Zoom recorder to take a meeting recording from Zoom on your MacBook:
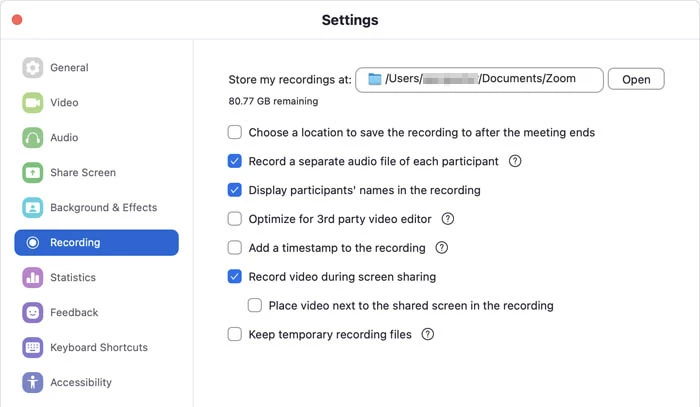
Step 1: Choose a location to save Zoom recordings before joining in the meeting.
Open Zoom app on MacBook, click Home tab, choose Settings at the top right corner, and then select Recording from the left list.
In the Store my recordings at field, choose a location on your MacBook to save the recordings.
Step 2: Start recording Zoom meeting videos with host's permission.
Once you enter the meeting, hit Record button at the bottom to begin recording.
Paid users could get options of Record on this Computer and Record to the Cloud. Which option you're going to take to record in Zoom MacBook desktop application is depending on whether you want to get the recorded files stored locally or online.
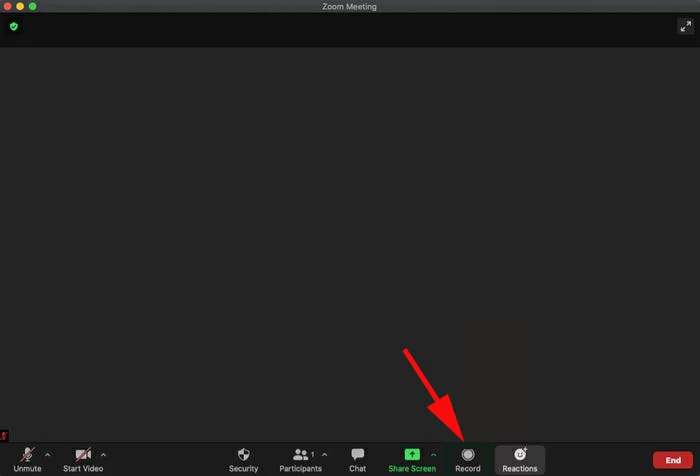
The Record button could only display if your host permits you to use Zoom recorder for a meeting recording.
When the recording is ongoing, there's a recording icon visible next to the approved participant name in the Participants menu, which shows who is currently recording in the Zoom conference.
![]()
Participants cannot record on Zoom without others knowing.
Step 3: Stop Zoom meeting when finished.
While recording, a small Recording... label begins to present on the upper-left corner. You can pause or stop the recording as you want using the controls at the top or at the bottom.
When you're ready to end the Zoom screen recording, click the Stop Recording button at the bottom of the window.

Either host and participant would see the "Recording..." label when the recording is active.
A pop-up dialog will then open, converting the Zoom meeting recording to MP4 format on your MacBook. When done, you'll be guided to the folder where you can open and play your recorded Zoom meeting video at any time.
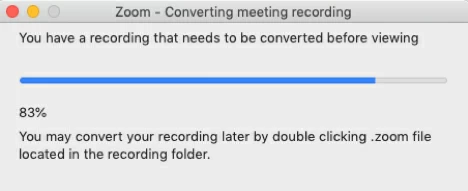
When recording stops, Zoom will convert it to an accessible MP4 video file for viewing.
You can find the new Zoom recording videos on your MacBook from this default path: /Users/[Username]/Documents/Zoom - if you haven't change it outlined in Step 1. To work with your recorded video directly, go to Meetings > Recorded in the app. You'll see your recording listed, which you can open or play it, rename it, or share it via email.
Note:
Basically, a participant with host's permission is able to get the Record button within Zoom recorder and then use the feature on the MacBook to record Zoom session. All participants in the meeting will always know that a call recording is in progress.
However, if you prefer the way of secretly recording a Zoom meeting on your MacBook - with no need to request host's approval, then you need to use other recording apps for the affair. Below are two best Zoom recorders for macOS to take a video and audio recording of Zoom without host and other participants knowing.
Recording a Zoom meeting without permission may involve the legality. It's illegal to record the Zoom conversation without the consent of both or all parties in some countries and states. To avoid potential legal issue, it could be a good practice to obtain consent from participant(s) regarding recording calls.
macOS comes with a free screen recorder - QuickTime Player on all MacBooks. Here's how to secretly record Zoom meeting as a participant with video and audio included.
1. Enter the Zoom meeting on either the desktop app or browser.
2. Open QuickTime Player on your MacBook.
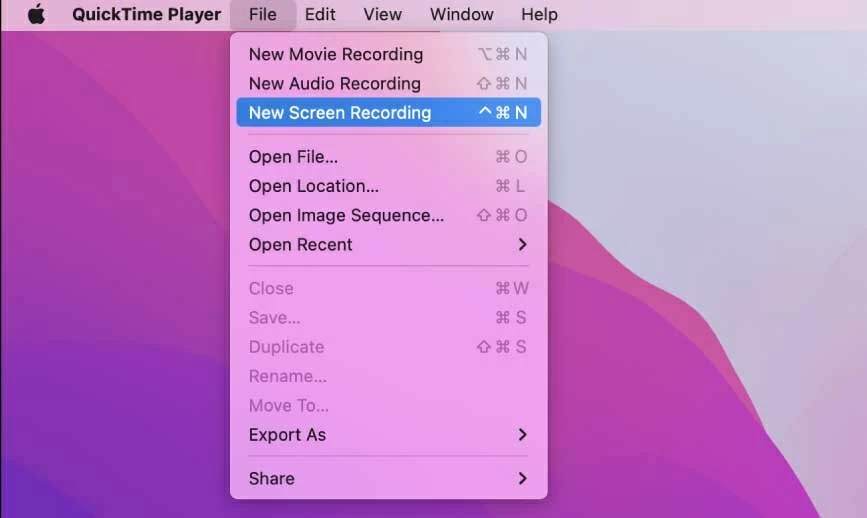
3. From the QuickTime menu bar, choose File > New Screen Recording.
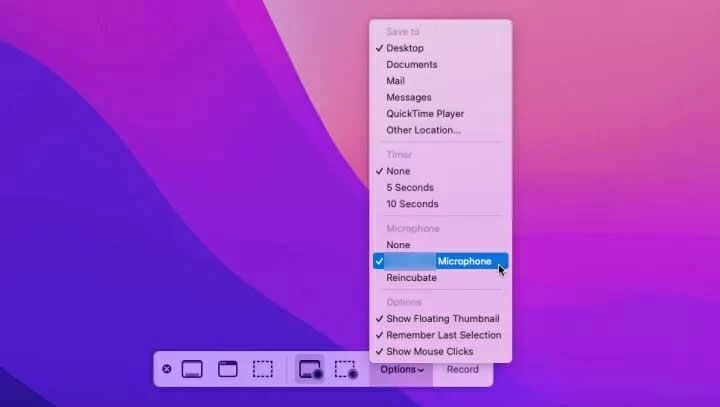
4. To record the audio form Zoom, click Options on the toolbar, then choose your MacBook's Microphone. You can specify desktop or other folder to save a captured Zoom meeting.
5. Use Record Entire Screen or Record Selected Portion option to screen record your Zoom meeting on MacBook.

6. Hit Record button to start recording what's happening on the Zoom screen, including the voiceover. After the recording kicks off, a recording icon appears in the top menu bar. There will be no sign in Zoom window whoever is recording.
7. To stop the recording when the meeting is completed, click the recording icon in the top bar. Or simply press Command + Control + ESC to end.
Now, a new Zoom screen recording has been created and placed on the MacBook desktop or your desired folder. Click the video thumbnail to open the video recording within the QuickTime Player. You're able to play, view, edit or share your recorded Zoom videos.
Another solution to record your Zoom meeting if you gain no permission from the host is to use Screen Recorder for macOS - a screen and audio recording tool that makes it pretty easy to capture both video and audio from a Zoom meeting on MacBook screen with a few simple clicks.
The software is available to anyone to record Zoom meeting on MacBook without the host or other participants knowing, and with no need for the in-built Record button that get others notified during a meeting recording. It comes with Video Recorder tool that is dedicated to record Zoom meetings with face-to-face video and audio in high quality. There is also a full video editor allowing to preview, trim, cut, edit and save the Zoom recording when the meeting ends.
To record Zoom on a MacBook Pro or MacBook Air when you conduct or attend the meeting, here are steps that can be implemented immediately with this efficient MacBook Zoom video recorder. You may run the software and make some changes before the Zoom meeting begins so you won't miss something important.
Step 1, Join in the meeting with Zoom on your MacBook.
Step 2, Once you launch the utility, choose Video Recorder.

Step 3, Select the Zoom meeting screen to record.
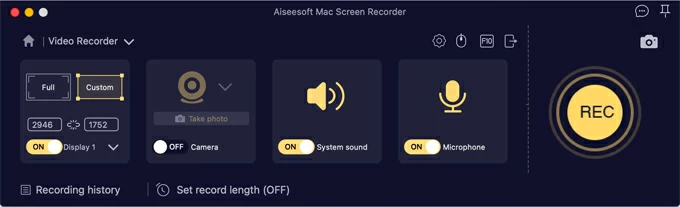
Step 4, Switch on System sound and the Microphone option to screen record Zoom with audio.
You can make some configurations on the recording by clicking the tiny gear icon right above the Microphone option, and then change the saving location, video format & quality, etc.
Step 5, As soon as the Zoom meeting begins, click REC button to begin Zoom recording with no host's permission needed on MacBook.
Step 6, When your Zoom meeting comes to an end, click Stop Recording button.
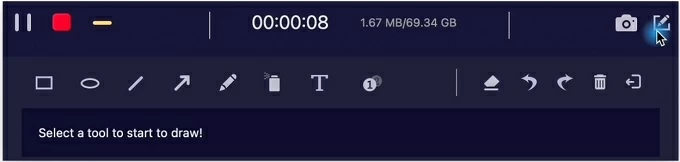
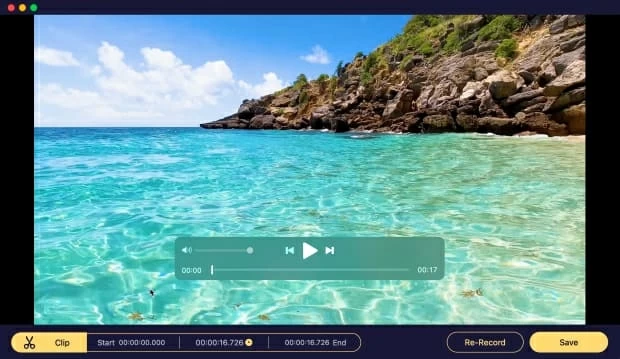
You can then edit the video file and save the Zoom recording onto your MacBook in MP4, MOV or another desired format. Play the recorded meeting and listen to all participants' audio contents.
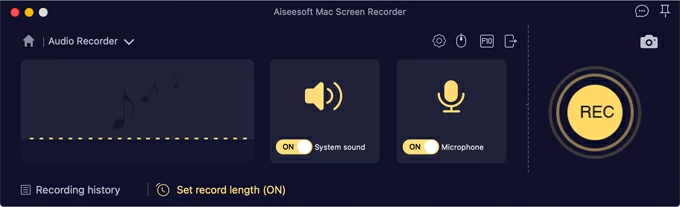
If you only expect to record internal sound on Mac to capture separate audio from Zoom meetings, the Audio Recorder on the main screen should streamline the recording process when you enable System sound and Microphone, and hit REC button.
Happy Zoom recording in your MacBook!
Video Guide:
One nice feature with Zoom meeting recorder is that host can capture audio coming from the Zoom calls and save to multiple audio files. That means Zoom meeting host can record and separate all participants' audio tracks and save the files in M4A sound format. See how to record Zoom on Mac or MacBook with audio-only files:
Zoom records audio of each participant during a session to multiple audio-only files. You need to enable this feature.