How to Import DVD to iTunes Library on Mac OS X


See more about: All-in-one Blu-ray Converter to convert Blu-ray & DVD & Video & Audio files
You may purchased a vast collection of DVD disks, and want to copy DVD movie to iMoive, a pre-install application on Mac which allows you to edit the films, make clips, add music/ narration/ photos, and create fun trailers from all that footage. iMovie for Mac enables you to import VOB files on homemade DVDs, but it lacks native support for importing commercial DVDs. You first have to convert the audio and video files from your DVD to iMovie friendly file format such as MPEG-4, H.264, DV and AIC, while a DVD to iMovie converter software app is required.
DVD Ripper for Mac is an all-in-one application that help you convert DVD from your media library. For DVD, you don't need to let another app do the DRM crack on a commercial DVD, this utility comes with a combination of decrypting DRM protected DVDs and converting DVD movie files to format which is compatible with iMovie on Mac. Best of all, it is simple, comprehensive, and has options to convert DVD for a wealth of portable devices.
If you are using Windows and want to rip DVDs, you can refer to DVD Ripper for Windows.
Step 1: Import DVD disc
First, put a DVD in your computer and run the program. Hit the "Load Disc" icon, the program will scan the disc to identify the titles to rip. Or you can drag-n-drop DVD files to the program window.
Take a note, the DVD to iMovie converter can also rip DVD folders and ISO files.
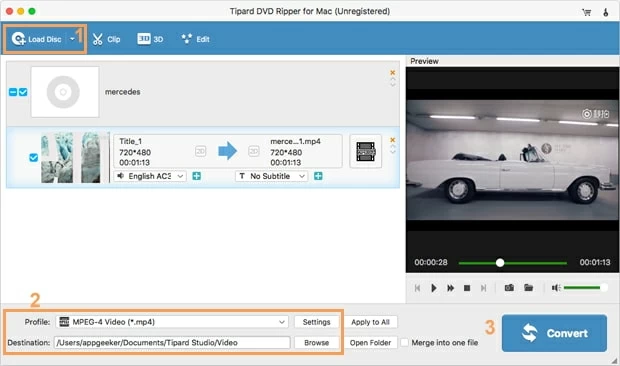
Step 2: Configure Output Profile
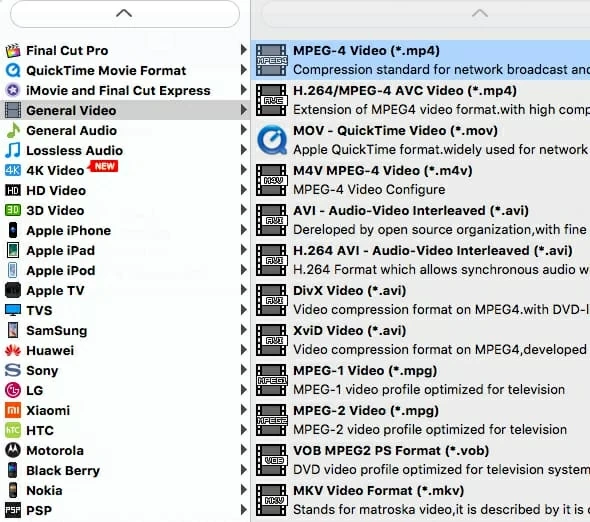
After the source imported, click on the "Profile" drop-down menu on the lower left side of the window to open the output file panel, then choose "Apple InterMediate Codec(AIC) (*.mov) " under "iMovie and Final Cut Express" category.

Alternatively, because iMovie (iMovie '11, iMovie '09, iMovie '08, iMovie HD) will accept the following file formats: Movie File Type, MPEG-2 and AVCHD, DV-Standard and HDV (High Definition Video), QuickTime Movie, MEPG-4. So here you can also choose MOV, M4V, MP4 related profile as output format from "General Video" category.
Step 3: Rip DVD to iMovie file on Mac OS X
Once you finish the output setting, hit the "Convert" button in the bottom-right of the screen to start the conversion process. you are allowed to convert the entire DVD movie, any number of chapters, or any custom segment of a DVD.
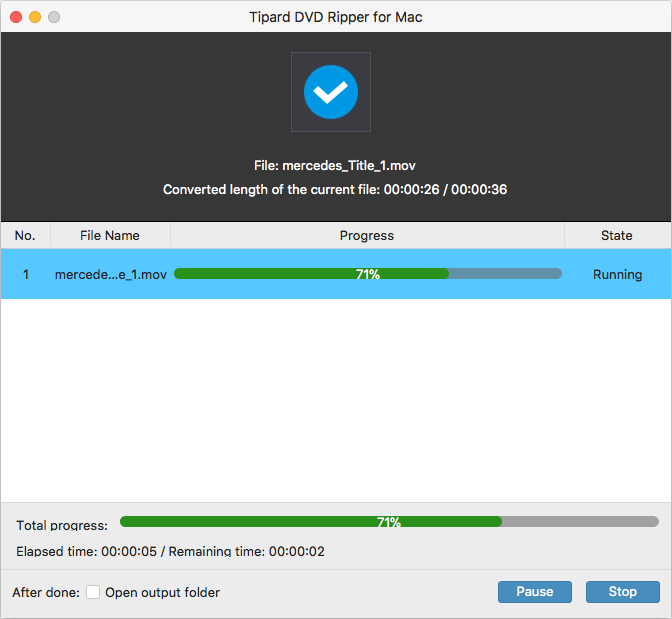
The amount of time it takes will depend on your computer's processing performance and the source DVD file, but it will take a while no matter what.
Step 4: Adding exported movie files to iMovie
To import converted DVD videos or others sources into iMovie, Choose File -> Import Movies. Either way, search for the location of the video in the Import window to import the file from DVD to iMovie, where it could be edited later.
Done!
More Related to DVD to iMovie Conversion