
How to Record Skype Calls on PC

The native recorder on Win10, the inbuilt recording feature of the webinar platform, and the third-party recorder have their pros in assisting you in recording webinars.

There might be a situation when you miss an important webinar or want to watch it again. You can record webinars on Windows 10 in several ways. Individuals and organizations use various webinar platforms like Zoom, Webex, Livestorm, and others to conduct live online sessions. These platforms usually feature screen recording, or you can use the native recorder Xbox Game Bar on Windows 10 computers to capture the webinar so there's no need to download an external screen recorder.
When you need to add some notes during the webinar process on a Win10 computer, try AppGeeker Screen Recorder, a multifunctional tool specifically designed for recording webinars. It offers services for adding annotation and editing the webinar recording.

Find a Win10 screen recorder that doesn't have a time limitation and can eliminate noise during the Webinar.
Webinars are becoming a popular standard for remote learning and delivering lectures to a virtual community. Participants in a webinar can discuss remotely and sparks new ideas to make them well-rounded. Some people miss the webinar because of schedule conflicts. This article will introduce three reliable ways in detail to record webinars on Windows 10 in case you miss it.
Table of Contents
AppGeeker Screen Recorder is a cross-platform tool for recording webinars. It works with Windows 11/10/8/7/XP and Mac machines. Using this tool can record all activities on the Win10 screen. Whether you are a presenter or an attendee, you can record the webinar with audio simultaneously using it. Moreover, many people are obsessed with the issue of external noise from the microphone. Using this tool, you can adjust the audio source from your Windows 10 computer and microphone during recording to get a better audio effect. It makes your recorded videos more customized and polished.
Key Features of AppGeeker ScreenRecorder
Step 1: Launch the Screen Recorder
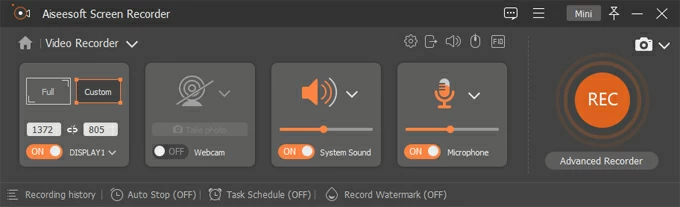
After joining the webinar, launch the AppGeeker Screen Recorder on your Windows 10 computer and select "Video Recorder" on the main panel.

Step 2: Select the area to record.
You can choose "Full" to record the entire screen or "Custom" to record the webinar portion of the screen. For partial screen recording, you can drag the cursor and highlight the specific part of the screen you wish to record.
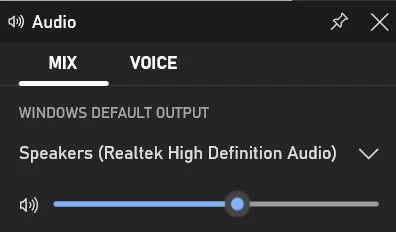
Step 3: Adjust the audio settings.
To capture webinar audio, switch on the "System Sound"; to add your voice, turn on the "Microphone". The desktop Screen Recorder will automatically eliminate the noise to optimize the audio quality.
Step 4: Start recording
When everything is ready, hit the "REC" button to begin recording after 3 seconds countdown.
Step 5: Stop recording
At last, click the "Stop" button once you are done.

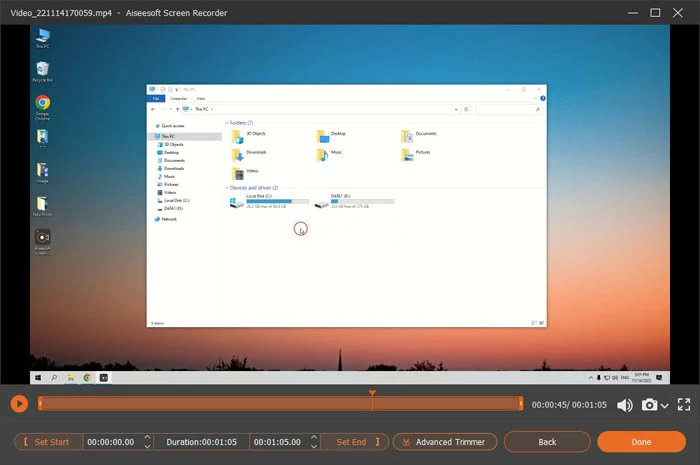
Step 6: Preview and Save
You can play the recording in the preview window and edit the recording. When you are satisfied with the recording, click on the "Export" option at the bottom, and the recording will be saved on your Windows 10 computer as a video file.
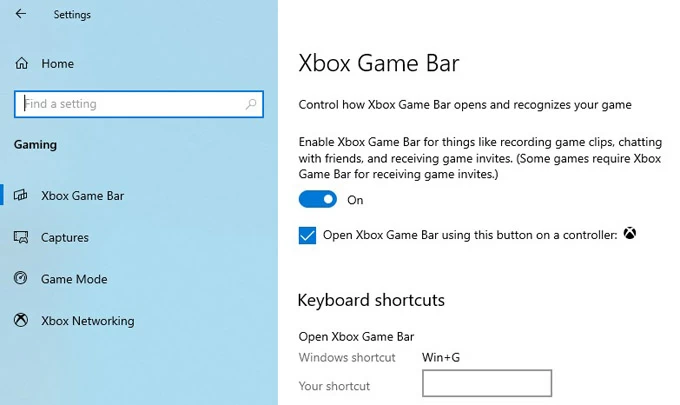
You can use Windows native recorder app, Xbox Game Bar, to record webinars on Win10 computers. It is designed to record gameplay on Windows 10 and later versions, but you can also use Game Bar to record your PC screen for free.
1. To enable Game Bar, press Windows + I to open Settings. Click Gaming. Click the Game bar in the left panel. Turn on the button
2. Open the webinar window and press Windows + G to open Windows Game Bar.

3. After that, press Windows + Alt + G. It will open the Capture window, and then you can select the webinar window.
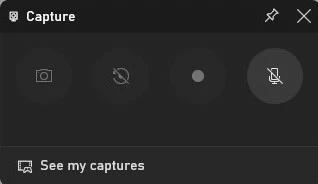
You can open the audio widget to adjust the audio setting.
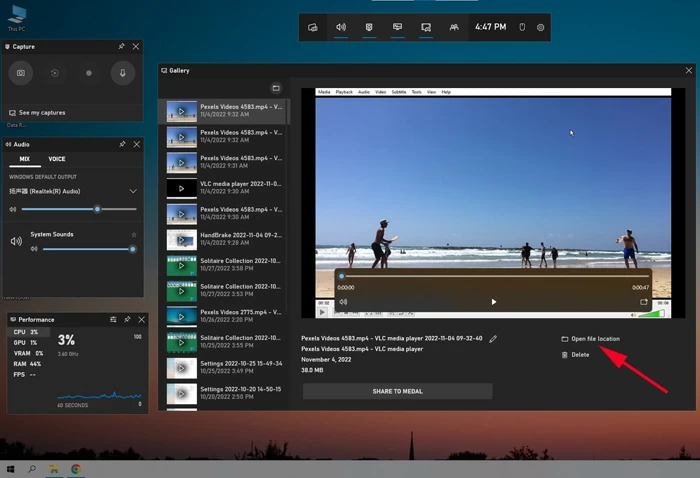
4. Click the Record button to start recording.
5. Click the Stop icon or Windows + Alt + R to terminate the recording. The recording will be saved within your user folder under Video > Captures. Or you can go to Gallery to check the webinar recording on your Windows 10 PC.
Xbox Game Bar doesn't support full-screen or specific region recording. Also, it cannot record desktop and File Explorer. If you want to add some notations during the webinar, Xbox Game Bar is not a good choice for you.
As we mentioned above, while conducting a webinar, you can use the platform's native recording feature for Windows 10 webinar recording. Let's take Zoom as an example.
Note
1. Start a Zoom meeting as the host, or join the meeting as the participant and get the recording permission.
2. Simply click the Record option. Hosts and the participants will see an indicator on the top-left while the recording is in progress. Also, the participants will hear a voice that the meeting is now being recorded.

3. When the webinar ends, Zoom will automatically convert the recording so you can access the files.
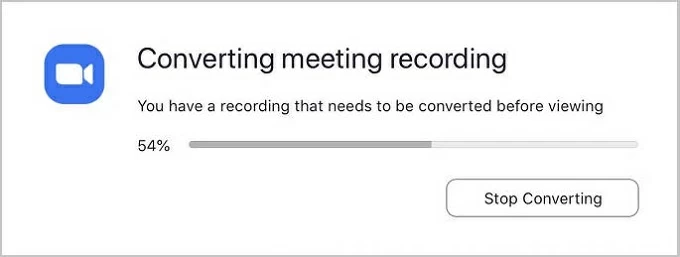
4. After conversion, you can view the recorded files folder.
Yes, various tools are available for screen recording on Mac. QuickTime Player is the most convenient native tool on Mac that allows webinar recording.
1. Join the webinar and run QuickTime Player on your Mac
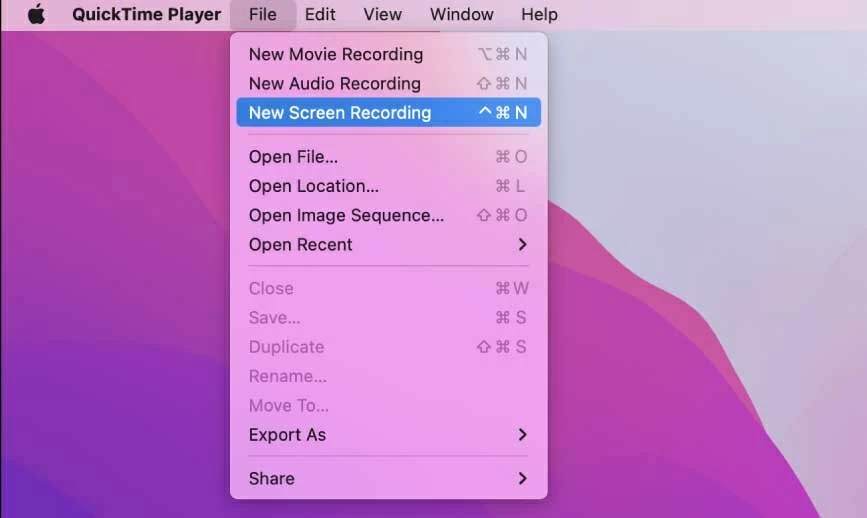
2. Locate and click File > New Screen Recording.
3. Click on the down arrow to select the audio source to be recorded.
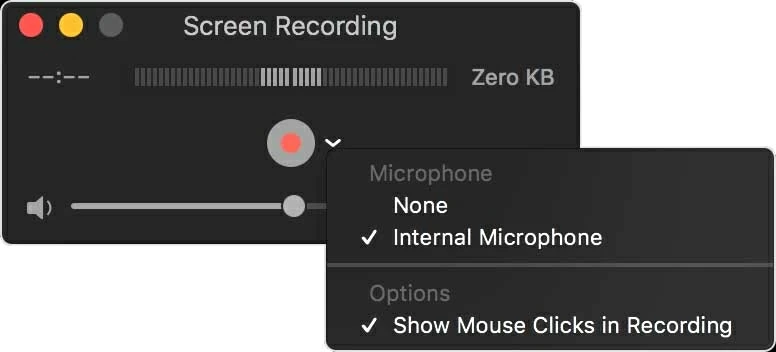
4. To begin recording, click on the red recording button in the middle and select the range of areas to capture.
5. In the end, click the Stop button on the taskbar at the top of the screen, and then you will get a copy of the recorded video file.
Note
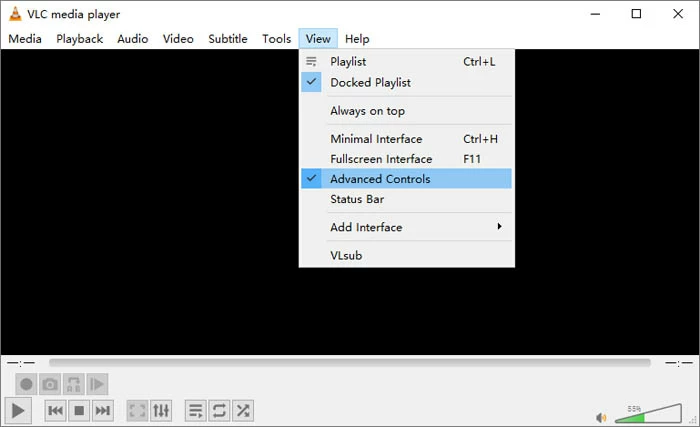
Yes, you can use VLC Media Player for Windows 10 webinar recording. Recording a video with VLC is straightforward.
1. Open VLC, click on the View menu, and select Advanced Controls.
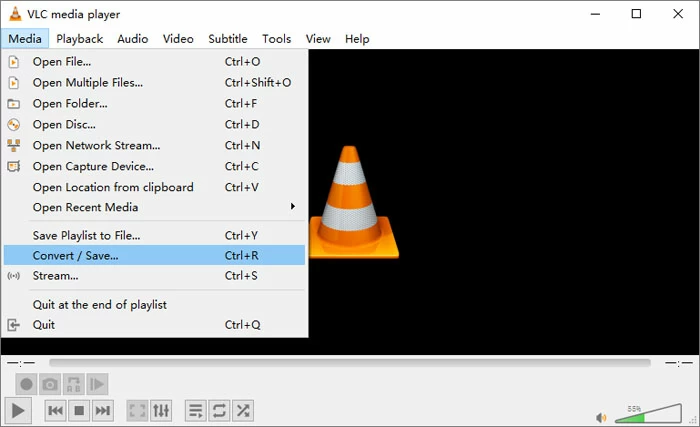
2. After that, hit the Media tab in the upper menu and click the Convert/Save option.
4. Select the Capture Device button at the top right and click the Capture mode. Then, select the Desktop option.
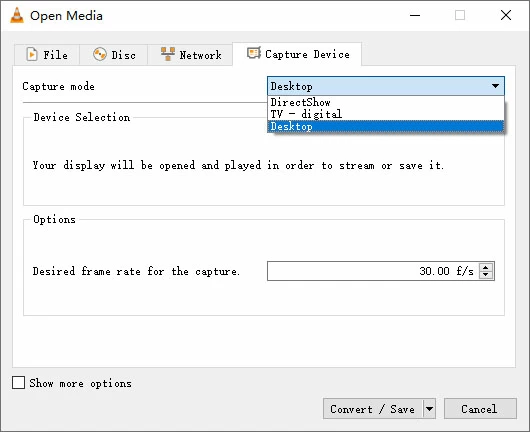
5. Adjust the frame rate from the available dropdown menu if you need.
6. Hit Convert /Save at the bottom right.
7. Name your file, specify the storage location and click Save.

8. Finally, click on Start to initiate recording.
A webinar is a web-based seminar, while a webcast is an online broadcast. In webinars, a presenter and virtual attendees from different locations connect online. They can interact via Q&A, live chat, screen sharing, and whiteboard. Webinars are most effective when you want to teach or demonstrate something to a group and need the audience's feedback.
In contrast to a webinar, presenters simply broadcast their content without any participation from the audience in webcasts. They are conferences, talks, or music events live-streamed on social platforms like Facebook, YouTube, etc. A wide interested audience can enjoy a webcast without interaction.
Conclusion
This article has elaborated on how to record a webinar running on windows 10. You can use various software for recording webinars on Windows 10. However, it's difficult to sync the video and audio during the webinar recording. AppGeeker Screen Recorder is designed to provide a streamlined recording process that covers all your requirements.
Without delay, let's try this wonderful feature to capture webinars on Windows 10 professionally!
How to factory reset a Windows 10 computer without a password


