
How to Screen Record on Windows 11

VLC adds a screen recorder to take recordings with you. Here's how to make most out of VLC to record your desktop, screen, video, live stream, webcam, etc.

Did you know you VLC Media Player is able to record a screen? You may be surprised at this. There's a screen record button comes as part of VLC, and with it enabled in View > Advanced Controls, you can use the VLC record button to record screen activity for desktop, tutorial, gameplay, online course & meeting, streaming video, disc, webcam, etc. Here's how to take a screen recording in VLC.
If you want a seamless & easier solution without any additional setting that you might need to do with VLC video record, consider trying Screen Recorder.
QUICK ANSWER
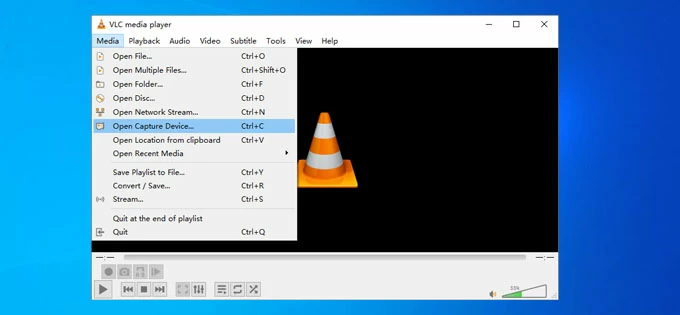
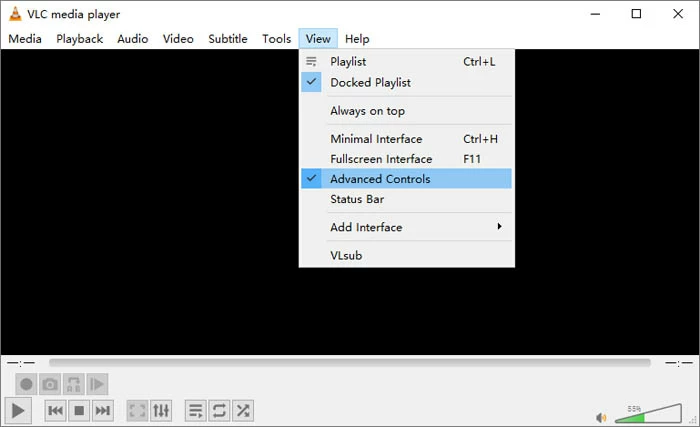
To screen record with VLC, click View and check Advanced Controls. Then navigate to Media > Open Capture Device (or Ctrl + C), select the Capture Device to Desktop, and then click Convert. Pick a location, name your file and click Start to begin recording the screen you want to capture.
Read more below for details and more screen recording functions within VLC.
As soon as the record button is enabled in VLC you can easily record a video on your Windows PC or Mac.
You want to record the screen of any activity and share the video on media platform like YouTube. In Windows, you can screen record with the Xbox Game Bar, and in macOS, you use the Screenshot Toolbar utility. But this article focuses on the VLC Media Play and shows you how to record screen using VLC to capture anything visible - maybe it's an interview, tutorial video for desktop or application, conversation, gaming process or many more. Read Also:
While VLC is often known as a media player that can handle any media you throw at it, it can also do so much more. Recording computer screen is one of them. Below are tips and tricks for VLC video record function you can take to screen record the video. We also cover an amazing alternative to VLC screen recorder if you want a flexible capturing experience.
Table of Contents
You should now be aware about the incredible VLC screen recording feature existing in the app, and with the VLC record button activated, you'll be able to quickly initiate a recording.
Before you can record a video from the screen, you'll need to know where to find the VLC REC and ensure it's enabled.
If you haven't used VLC to record screen activity before, activate this hidden feature this way.
Once VLC record button is on, head to the screen or app you wish to capture to begin recording.
Once you turn on the VLC screen capture feature from View tab, performing desktop video recording becomes so much easier. This also applies in recording actions happening on any screen or application on the computer.
Here're detailed instructions on how to record using VLC.
1- Open the app, window or desktop you're going to record.
2- Make sure VLC record button has been enabled.
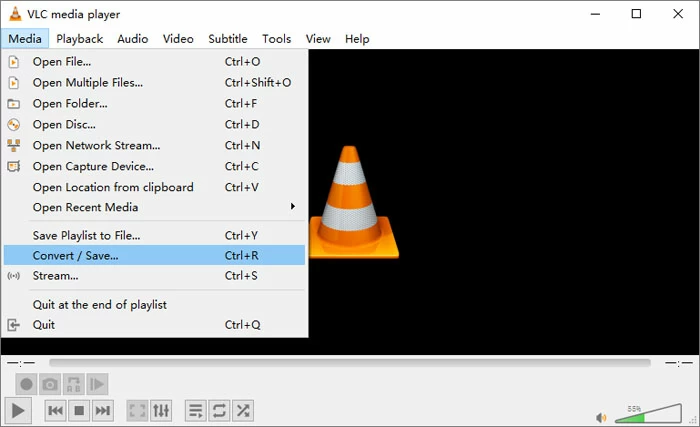
3- In VLC menu, click the Media tab, then choose Convert / Save from its pull-down list. Alternatively, hit Ctrl +R and head to Open Media panel.
You can also select Open Capture Device under Media, or press Ctrl + C to go straight to Capture Device mode.
4- Open Media window should open. Browse to Capture Device tab, choose Desktop from the dropdown menu to the right of Capture mode.
If necessary, pick a frame rate you desired. Then, click Convert / Save Button to move on.
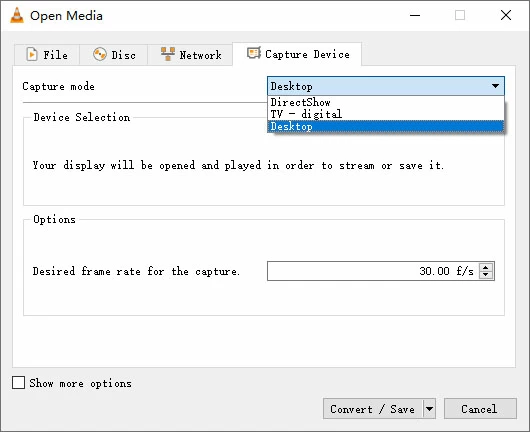
For desktop recording, you need to select Desktop from Capture mode dropdown.
5- On the next screen, you head to the "Profile" section where you can set the output format for the screen recording. Here, Video - H.264 + MP3 (MP4) is a nice option to choose from. If you're an advanced user, you can click the "Tool" icon (Edit selected profile option) to modify video codec and audio codec.

Under Profile, choose the format and container for your video file.
Move to "Destination" section. Right beneath it, there's a "Destination file" field. Click Browse button so you can choose the location to save your screen recording and give it a name as you wish. Click Save button to move on.

Give the video a name and location under Destination file box.
6- Hit Start button, and your screen recording will start by the VLC record feature. VLC window will minimize in the process of recording, so there's no indicator that you're still recording at the time.

The VLC playback controls does not float on your screen, but it will monitor the recording process.
The VLC record button turns RED while it's recording your screen. You will see the timer as well, counting how long the screen recording has been going. To stop recording, you need to bring back the VLC window and click the Stop playback button in the player controls - but the player could be captured. If you don't want this happens, just press the S key on your keyboard to end the screen recording.
The video you recorded will be saved to the location you just specified. VLC won't open the screen recording when ends, so you need to manually locate your screen recording to view, edit, share your screen recording any time.
Cons of VLC screen record:
When taking desktop screen recording in VLC, you may have noticed that your mouse pointer is suspiciously absent in the finished video.
That's true. By default, the mouse pointer related to the mouse movements or mouse clicks is not recorded when capturing your screen with VLC player. Sometimes you might want to use your pointer to highlight items on the display, so having it not captured isn't ideal.
Fortunately, it's possible to bring back your mouse cursor in the recorded video with an extra processing. You'll have to download a mouse pointer image in 20*20px with PNG format and set it to display on the screen while recording via VLC player.
Now, save the mouse pointer to your desktop or any location of your computer, and then follow the steps to configure the pointer to be displayed in VLC recording settings.
![]()
In VLC window, click Tools > Preferences. Under "Interface Settings" tab, check "All" in Show Settings section to view all advanced settings. The option is located at the bottom left corner of the screen. Then, from the left sidebar, browse to Input / Codecs > Access modules > Screen. Next, on the right panel of Screen Input, tick the box for "Follow the mouse", then add your mouse pointer image by clicking the Browse button. Once done, click the Save button.
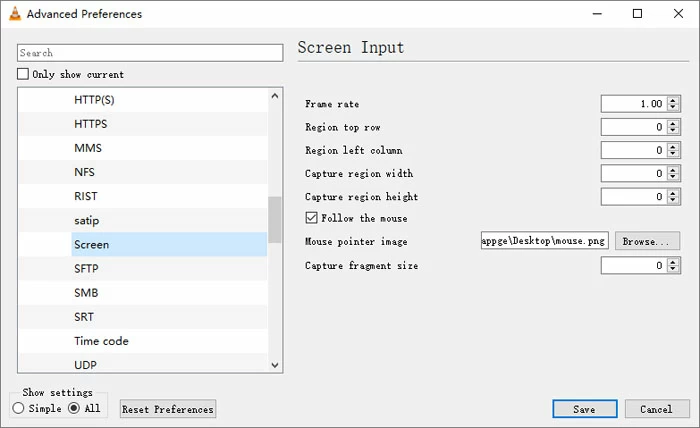
By enabling the mouse pointer, you're able to display mouse pointer in the recorded videos within VLC.
When you've done the steps, record your screen again and the mouse pointer will appear in the recording taken with VLC.
That's all it takes to record a video of your desktop or screen using VLC. The desktop recording tool built into VLC player does free you from downloading an extra software, but it lacks of simplicity & flexibility and doesn't offer advanced features like other dedicated recorders. If you looking for a flexible and easy way of recording screen activity without any complex technical settings, continue to read and learn how to screen record using an alternative to VLC screen recorder.
Screen Recorder is a solid alternative to VLC for your screen recording purpose. it's a full-featured recording utility for Windows and macOS, packed with the toolkits like Video Recorder, Audio Recorder, Game Recorder, Window Recorder, Webcam Recorder, Phone Recorder, as well as Screenshot - along with self-explained settings to be easily customized on your own way.
When it comes to recording a screen, the software can record anything happening on the computer without lag including users' actions, mouse pointer, video playing in VLC player, etc. Here're things that Screen Recorder can do much more things that VLC won't:
It's just a 3-step process.
Step 1: Download, install, and run Screen Recorder
Once you open Screen Recorder, you will get to see different options to choose from: Video Recorder, Audio Recorder, Game Recorder, Webcam, and a bunch of others tools. For video recording, select Video Recorder to continue.

Step 2: Select the recording area
Make sure you're landing on the screen you wish to record.
Decide whether you want to record the full screen or just a portion of it.
If you want to capture audio in the screen recording, just switch on the toggles respectively for "System Sound" and "Microphone" according to your needs.

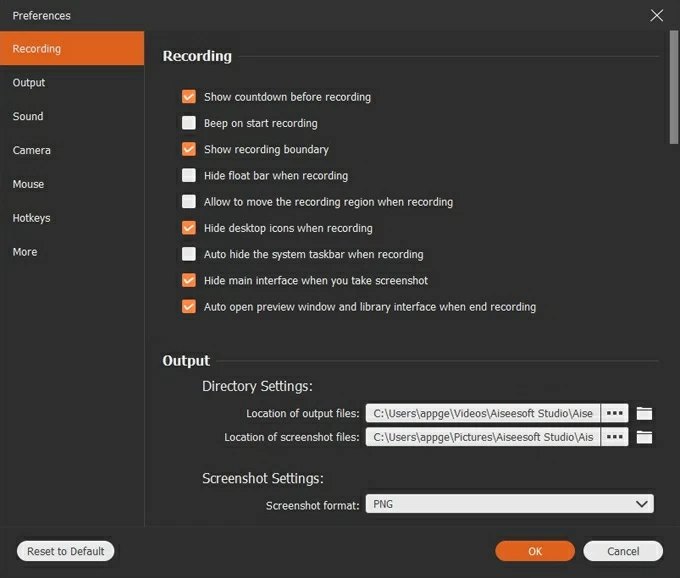
(Optional step) The software comes with a slew of settings you can tweak before recording on your screen.
Once you're done, make sure to click OK button so your changes take effect.
Step 3: Start recording your video
Click on REC button to start recording video. A floating bar would appear, showing the elapsed time and progress of video recording. Just perform the actions on the screen you want to capture for demonstrating.
Once you're done recording on your screen, click the Stop icon (the red square icon) on the taskbar. When a new window opens, you're able to preview the video, and trim the unwanted part from the beginning and the end. You can also use the "Advanced Trimmer" to polish the recorded video.
The video recording will save to the location you specified on your computer, outputting to MP4 format with H.264 + AAC code.
![]()
You can also find your recorded video in "Recording history" at the lower left of Screen Recorder window.
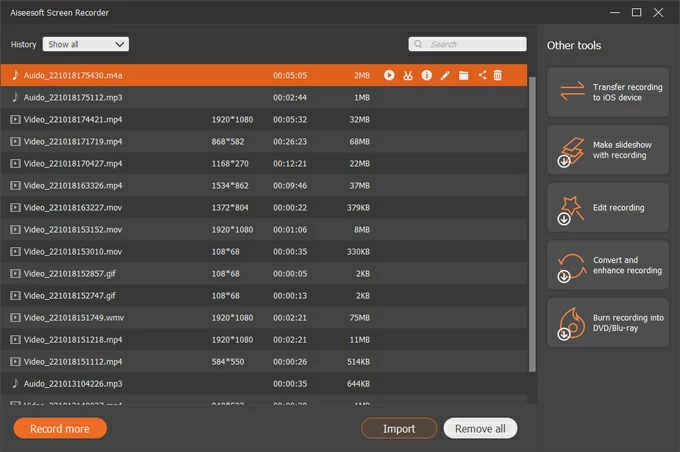
The Screen Recorder software also comes with a File Converter tool that enables you to convert any recorded screen video to another for a smooth playback on the players or devices. Select the recording you made from the "Recording history" panel, then click File Converter tab in the right column, and then you're ready to convert the recording from one format to another. MP4, MOV, WMV, AVI, MKV, GIF formats are supported. Once you're done converting, the video will be saved to the new format you designated and displayed on the "Recording history" panel.
With the record button being activated in VLC, you can also record network stream online over like YouTube platform, record video clips, and record video from webcam.
[Don't Miss: How to Record a YouTube Video on Windows PC]
You will need to first drag you video to VLC player, and hit Pause if it plays automatically. Right-click the video and then from the menu that appears, choose View, and select Advanced Controls. The red Record button will show up on the player, which means that VLC record feature is enabled now.
You're readily record a part of video with VLC record ability. To do this, start playing your video, and press the red Record button. If you would like to record a part of the video, drag the timeline slider to the point for start time of the video you want to record, and then record the specified clip of the video.
When you reach to the end time for the video that you record, hit the Stop Playback icon to end your video recording.
Go find the video you captured and created. It will be saved into Videos folders with the name: vlc-record-[exact date & time you take the recording].mp4.
Ever thought of recording your livestream and capture activity? With VLC's record function, it's possible! Most streamers often find themselves in a situation where they want to save a streaming video for later use. Or maybe a portion of a video fascinates you, and you want to watch it on a loop. You can easily do that by importing the video into the VLC and recording the portion you like. To record a streaming video online, you need to follow the following steps.
1. Copy the URL of your stream from your browser.
2. Open VLC. Click on Media and select Open Network Stream.
3. Paste the stream URL into the "Please Enter a Network URL" box under Network. Click Play button to let VLC start streaming the video.
4. If the stream can play successfully within VLC player, you can record the video.
However, there are some challenges that one would face while recording streaming video over VLC.
First, the problem with streaming a video on VLC is that most of the time, it undergoes lengthy processing and takes a lot of time to load the video, and when it starts, it starts to buffer.
Second. streaming an online video through VLC isn't always effective. You might get an error right after pasting the link and clicking Play. It's one of the most common issues with VLC and it happens with most of the videos.
If you're in a need to capture a video of livestream, you can take advantage of the VLC's record ability to record the stream playing on the web browser.
What I want to do is record certain clips of a DVD movie in VLC. How do I do that?
This could be a popular question if you have a large amount of Blu-ray or DVD discs and video & audio files and want to rip a video clip to a playable format on common media player.
Getting a right ripper and converter is not that easy, and with VLC, extracting the video file from a DVD or BD disc for offline playback becomes a pretty simple affair. The in-built record function grants users to have a video capture from a disc.
The process of recording a disc is basically the same when recording desktop using VLC.
The very first step is to ensure VLC record button is ON. If you can't find it on the VLC player, you need to go to View tab and make sure Advanced Controls is checked. Then do the following:
1. Insert your DVD or Blu-ray disc into your computer and play it with VLC.
2. As soon as you begin playing the disc, click the Record button to start the recording.
3. To end the recording of the disc video, hit the Stop Playback button. VLC will save the captured video to Videos folder locally.
You'll also appreciated the ability of VLC for recording video from webcam, in addition to video capture of desktop, video, computer screen, online streaming video, and more. To record your webcam with VLC in an effort to capture your activities in the gaming process or in a presentation or whatever, follow the steps mentioned below.
1. In VLC, click on Media > Open Capture Device (shortcut keys: Ctrl + C.)
2. Under the Capture Device tab, select DirectShow in the Capture mode.
3. For "Video device name", choose your webcam from the drop-down list.
4. For "Audio device name", select your microphone. It can be your webcam as well.
5. (Optional) Tweak the frame rate as required. Click on Advanced Options button to open a new dialog box. In the "Video input frame rate", set it to 30 fps for a smooth video in general. You can also check the Device properties box to allow VLC use the control input settings that come with your webcam. Hit OK button when you're finished.
6. Head down and click the Play button.
7. You will now see your yourself or whatever you have your webcam pointed at in the VLC main window. To start recording webcam video, hit the Record button. The counter runs telling you that you're recording.
8. Hit the Stop button in VLC to close out the webcam recording session. You will find your recording in the local Videos folder.
Now you know how to use VLC to record a video of your desktop, screen activity (application, web browser, gameplay, etc.), segment of a video playing on media player or Blu-ray / DVD, online stream. Have fun recording your videos!
If you need your recordings in another format, you can use VLC to convert video as well. Converting between video file formats is another function that VLC ships with in order to get your media played smoothly on any of your devices, whether it be a computer, phone, tablet, TV, or any other device.
Follow these steps to convert a recorded video file with VLC.
Run VLC on your computer, choose Media > Convert / Save. In the Open Media window, click the File tab and then click Add button. You'll be guided to File Explorer for locating your recorded video. Select the video you want to convert and click Open to put the file to VLC for conversion. Then click Convert / Save button at the bottom.
The Convert window is brought up. There, you need to select the video or audio codec and container to which you want to convert. For example, to convert a video to a reasonably standard MP4 format, choose "Video – H.264 + MP3 (MP4)." There're also presets for certain devices or platforms.
Click Browse button to choose a path and name for the output file. When done, hit the Start button to let VLC perform the conversion for the screen recording you've taken.
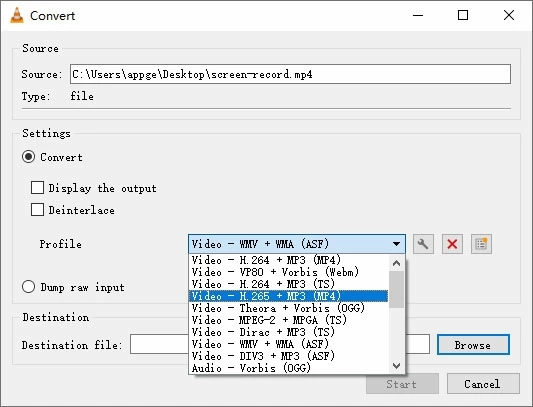
After recording a video in VLC, you can also convert it to another video or audio format.
Q1. Can VLC record a video?
Yes, VLC comes preinstalled with a RECORD function that makes recording the feed of desktop possible.
Before you can record your desktop or anything else, you have to have the RECORD button enabled. It's a simple matter of checking Advanced Controls under View within VLC. The recording controls will appear at the bottom of the VLC window.
Q2. Can you record screen and audio with VLC?
It's difficult but possible.
VLC natively has a screen record option to capture the desktop. Unfortunately, you may find that it doesn't record audio when capturing desktop. This is a long-existing issue and VLC team has been giving up fix the problem with the feedback of WONTFIX, meaning that the bug will never be fixed. So, currently, VLC can only record video.
To achieve VLC screen capture with audio, try to run a piece of VLC desktop recorder software called Screen Recorder. It includes the ability to record video and sound either coming in through computer or microphone, and making a screen recording requires just a few simple clicks on an intuitive interface.
Q3. Where are VLC screen recordings saved?
All the screen record VLC files are saved in the VLC's Video folder. On Windows 10, you can find the VLC screen recordings from C:\Users\[username]\Videos. On Mac, you can locate the recordings from the Video in the Spotlight Search. However, you do get an option to manually set your preferred destination folder before starting screen recording.
Q4. How to record screen with VLC on Mac?
Steps of VLC recording screen for Mac.
Once you launch VLC on your Mac, navigate to the menu bar and click File, followed by Open Capture Device to set the video source.
When Open Source window opens, choose Capture tab and select Screen as input. Head down and click Settings button and then you can set the frame rate to your preferred level. Basically, 10-15 fps is suitable for any standard recording unless something moves so fast on your screen. Click Open button and minimize VLC screen.
The last step is to go to Playback menu at the top, select Record from the list, and VLC will then kick off recording your screen. Bring up the screens on your Mac that you want to capture. When you're finished recording, go to Playback menu in VLC and hit Record again.
Q5. VLC screen capture with audio Windows 10. How to do?
It's worth noting that VLC recorder is made without the audio recording feature in the first place. Furthermore, any audio playing on the screen cannot be recorded by VLC.
Here's how to screen capture with audio on Windows 10 via VLC player. If you're interested in recording only audio on your computer, visit this link for the tricks.
1. Open VLC. Enable the Advanced Controls from the View tab.
2. Press Ctrl + C to open the Capture Device.
3. Select Desktop from the drop-down next to the Capture mode.
4. Click on the Convert button and then follow the prompts to choose a video format, and choose a destination folder, name the recording.
5. Hit Start button to start recording the screen. The recording can be accessed in the Videos folder. There will be no sound captured.
To get VLC record screen with audio, the solution is to use DirectShow as the capture mode. You'll have options to choose your video and audio input device separately so both sources are captured. So first you need to download the direct show screen capture input filter from here, and then set up your sound card to make it available to capture audio.
Now in VLC, choose Media > Open Capture Device. Set Capture mode to Direct show, select "screen-capture-recorder" from the dropdown of Video device name, and "virtual-audio-capturer" from the dropdown of Audio device name. Finally, press Stream button and follow instructions.


