How to Find iPhone Backup on Mac

Looking to backup iPhone photos to Google Drive? This post provides you with the simplest and most convenient options to upload photos to Google Drive from iPhone.

Backing up iPhone photos to Google Drive is a great idea to free up some space on your iPhone.
As a cloud storage service provided by Google, Google Drive enables users to back up iPhone photos, videos, and more with an internet connection. As long as you backup iPhone photos to Google Drive, you can access them from any device with your Google account, allowing you to view or download your photos whenever and wherever you need them.
Below, we'll show you step-by-step how to backup iPhone photos to Google Drive automatically and manually. Since Google Drive only provides 15 GB of free storage, in case you're out of storage and trying to find a more secure way of backing up iPhone photos, you may resort to a professional backup application - iOS Data Backup & Restore.
Table of Contents
By regularly backing up your iPhone photos to Google Drive, you create a secure and reliable backup solution that enables you to preserve your cherished memories, retrieve data if needed, and ensure that no valuable photos are lost due to unforeseen circumstances.
Also see: How to fix if your iPhone is unavailable
With the Google Photos app's backup & sync feature, you can back up all your iPhone photos to Google Drive. Once you have turned on the backup feature, the Google Photos app will automatically synchronize any changes made to your photos. Furthermore, you can access the backed-up photos on any device as long as you sign in with the same Google account.
Note:
Here are the steps to backup photos from iPhone to Google Drive automatically:
Step 1: Install the Google Photos app and then open it.
Install the Google Photos app from the App Store on your iPhone. Then launch the app from your iPhone's home screen and sign in to your Google Account.
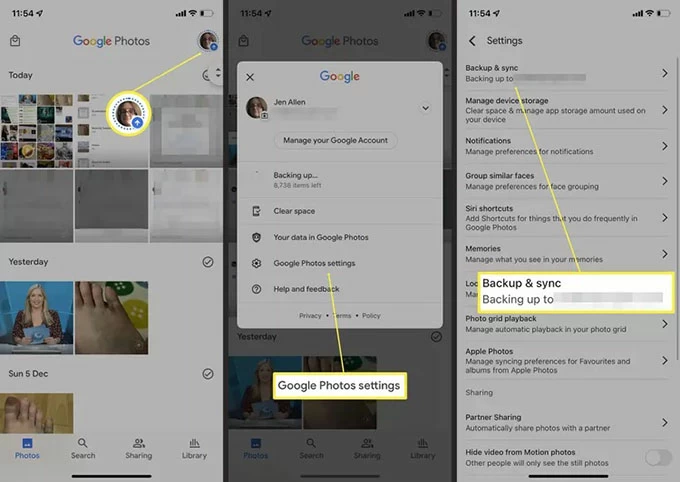
Step 2: Access the Google Photos settings.
Firstly, locate the profile picture of yours in the Google Photos app. Then, tap on the Google Photos settings.
Step 3: Enable Backup & Sync.
Find the Backup & Sync option within the Google Photos settings menu. Turn it on. You may get a prompt asking you to allow the Google Photos app to access your iPhone's photos.
Tip: To allow the Google Photos app to access your photos on iPhone, open the Settings app, go to Privacy, select Photos, and enable access for Google Photos by turning it on.
And now the Google Photos app will automatically sync and upload all your iPhone photos to your Google Account. The process takes some time depending on the size of your iPhone photos backup, network connection speed, and stability.
Also read: How to fix if iPhone screen is flickering
Manually backing up photos from iPhone to Google Drive enables selective backup of individual images or specific batches. This flexibility allows users to prioritize the backup of meaningful pictures while leaving out less important ones. Moreover, it's advantageous in situations with limited Google Drive storage.
To back up iPhone photos to Google Drive manually, follow these steps:
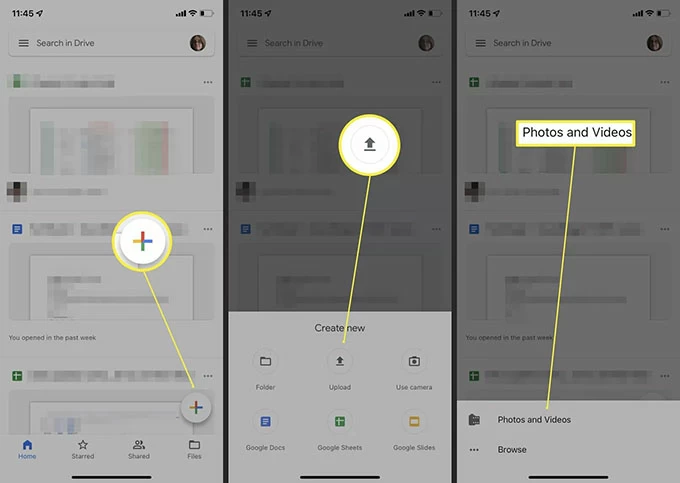
Step 1. Open the Google Drive app and sign in to your Google account. If you don't have the Google Drive app installed on iPhone, go download and install it from the App Store.
Step 2. Tap the + icon located at the bottom right corner. So that you can create a new folder to store your photos.
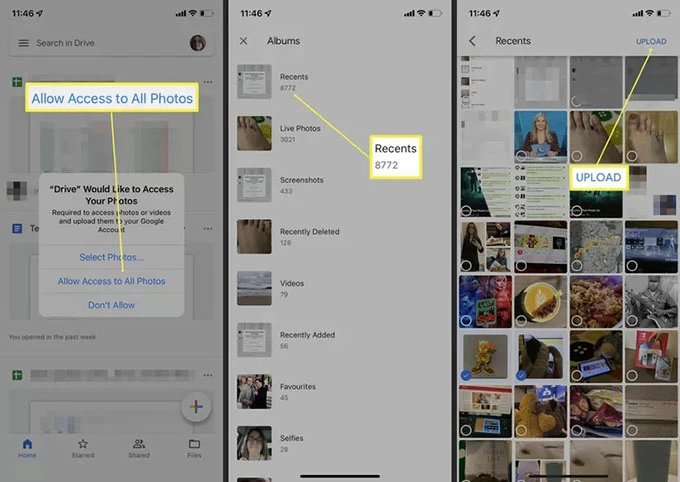
Step 3. Tap the Upload option to upload your photos > Select Photos and Videos > Tap Allow access to all photos when prompted. Then you'll have access to choose the iPhone photos you like to back up to Google Drive.
Step 4. Tap the photos you want to back up from iPhone to Google Drive, and then tap the Upload button to start the backup process. If your iPhone photo is successfully chosen, you'll see a checkmark appearing in the bottom left corner of the photo.
To check if the photo backup from iPhone to Google Drive is complete, open the Google Drive app on your iPhone, navigate to the folder where you uploaded the photos, and check if the photos are visible and accessible.
Where your iPhone photo backup is stored in Google Drive?
In Google Drive, stored iPhone photos backup can be found in the folder where you backed them up. Open Google Drive and sign in to your Google account. Navigate to My Drive and locate the folder that you designated for iPhone photo backup. Open the folder, and you will find your stored iPhone photos listed within it.
Related: How to recover photos on iPhone without backup
It's a great idea to back up iPhone photos to Google Drive. By using the same Google account on any device, you can conveniently access your photos anytime, anywhere.
However, with Google Drive's limited free storage space of 15GB, shared across all Google services, it may not be enough for many users. Additionally, there is a risk of information theft and potential leaks when uploading data to the cloud. For a secure backup alternative that doesn't rely on cloud services like Google Drive or iCloud, you can use iOS Data Backup & Restore, a multi-file backup software.
It allows you to back up your iPhone's photos, along with text messages, contacts, notes, reminders, videos, call logs, Safari bookmarks and history, and voice memos, to your computer. Unlike Google Drive, this backup process is not affected by network connectivity issues.
Key features:
To back up iPhone photos without Google Drive, follow these steps:
1. First, download iOS Data Backup & Restore app on your PC or Mac. Launch it.
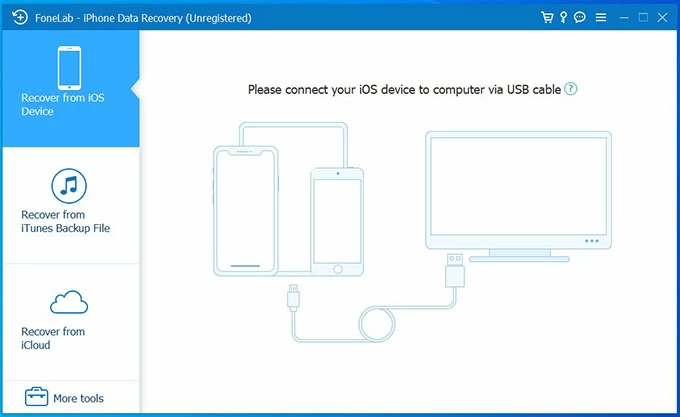
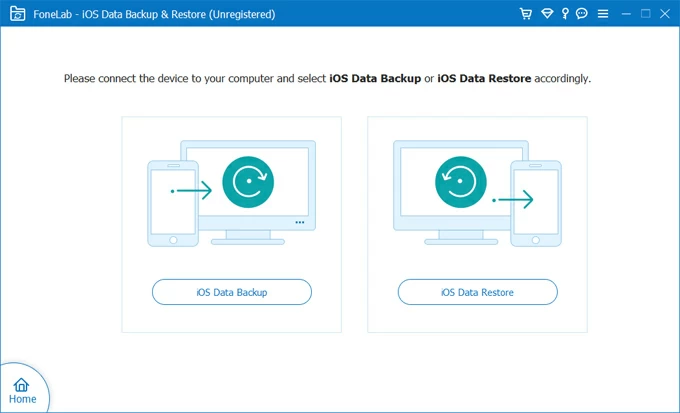
2. Then, go to More tools > Click on iOS Data Backup & Restore.

3. Use a cable to connect your iPhone to computer and choose iOS Data Backup.
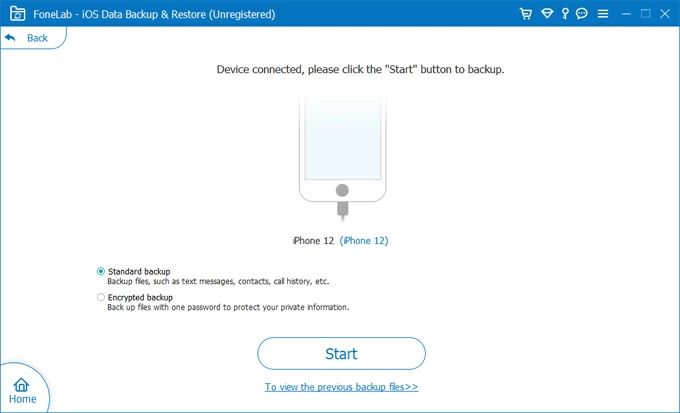
4. Select Standard backup > Click on the Start button. You can also choose Encrypted backup if you want to backup your photos with a password.
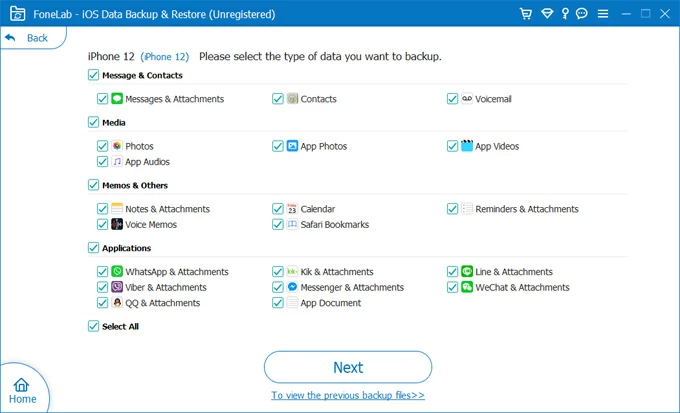
5. Tick the checkbox next to Photos below the Media section > Click Next.
There'll be a progress bar indicating the backup status of your iPhone photos. Wait till the backup process is complete.
Read next: How to Transfer Photos from Windows PC to iPhone