
How to Update Your iPhone through iTunes

Seeking guidance on how to back up your photos to iCloud on an iPhone? This guide covers all the necessary details about photo backups to iCloud on iPhone.

You can back up photos to iCloud on iPhone with ease in just several taps. However, all your iPhone photos may fail to get backed up to iCloud if you have too many pictures, as iCloud offers only 5GB of free storage. To accommodate more storage, a monthly fee is required.
Instead of iCloud, you can also try an efficient third-party software, iOS Data Backup & Restore. It can help you easily back up a large amount of iPhone photos to your computer without any storage limitations.

It would be just a breeze to back up your pictures to iCloud from iPhone.
The significance of backing up photos to iCloud on your iPhone becomes evident when unexpected events like losing your phone or factory resetting it occur. With an iCloud photo backup on iPhone, you can easily restore the photos to the device and get your cherished memories back. Within this article, you will discover step-by-step instructions on how to back up your photos to iCloud on iPhone, along with important notes to remember.
Table of contents
Related: how to delete photos from iPhone but not iCloud
Once you've backed up your pictures to iCloud on your iPhone, you can access the photos on other Apple devices wherever and whenever you like. As long as your iPhone is connected with WIFI and plugged in for charging, the photos would be automatically backed up to iCloud.
1. Open Settings on your iPhone.
2. Tap Your name at the top of the screen.
3. Select iCloud, and then Photos.
4. Switch on the toggle of Sync this iPhone. Now the iPhone photos backup to iCloud will start.
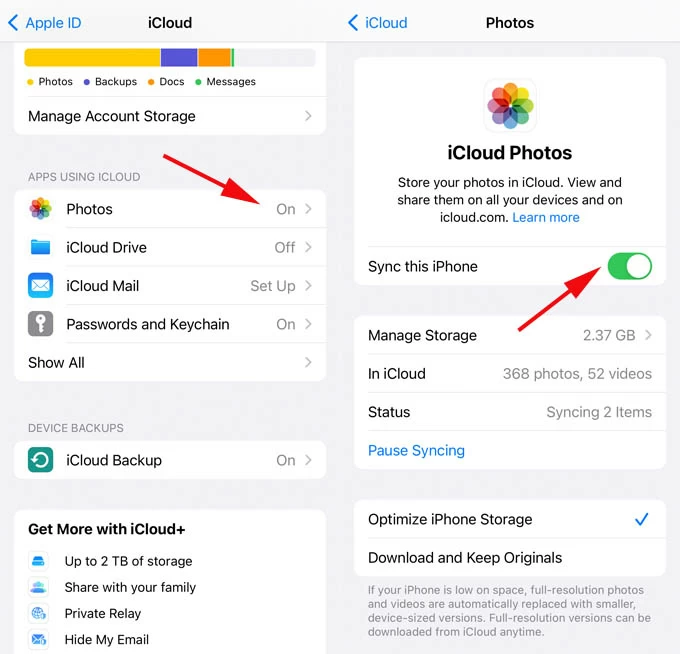
iCloud stores your iPhone photos in full resolution, covering various formats like HEIF, PNG, RAW, JPEG and even Live Photos. If you edit your photos on your iPhone, the changes can also be seen on any other device. Plus, the removal of the photos on iPhone will occur across other devices, too.
Tip:
If you don't want to use iCloud to back up your iPhone photos any longer, you can opt to turn off iCloud photos on your iPhone.
Sometimes when you log into iCloud, you may find that part of your iPhone photos is not backed up properly. The reason could be that your iCloud storage is full, and it cannot sync more photos unless you delete some data or upgrade your iCloud storage plan.
To free up iCloud storage, you can select and remove some files that seem useless. In this way can you make room for more important and precious photos.
Alternatively, you can pay for an upgrade to get more iCloud storage every month. Different storage plans are available for you to choose from, which include 50 GB for $0.99/month, 200 GB for $2.99/month and 2 TB for $9.99/month. It's also feasible to share the storage with your family members if you subscribe the latter two plans.
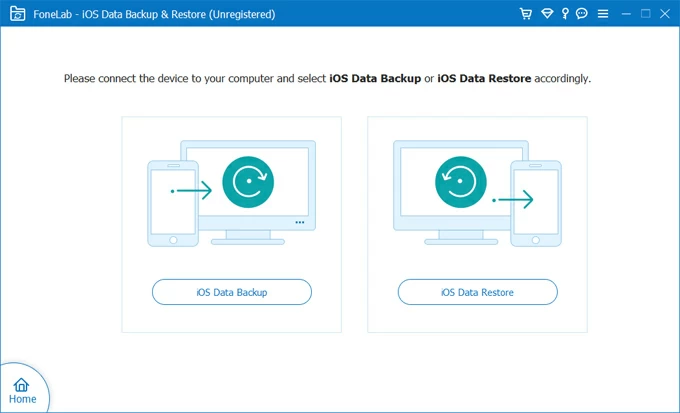
If you're seeking to break free from the confines of iCloud storage restrictions and avoid monthly charges for expanded space, the robust third-party software iOS Data Backup & Restore could be an excellent choice for you.
This program can back up a large amount of photos efficiently to your computer, as long as there is enough storage space. And you can even preview the photos in your larger computer screen after the backup. Moreover, like using iCloud, other types of data on your iPhone can also be backed up in this way, including videos, contacts, notes, text messages, reminders and so on.
Here's how to back up your photos from iPhone to PC with this software.
1. Launch the program on your computer, and click More tools in the bottom left corner.
2. Select iOS Data Backup & Restore from the right 3 options.

3. Select iOS Data Backup on the left in the next page.
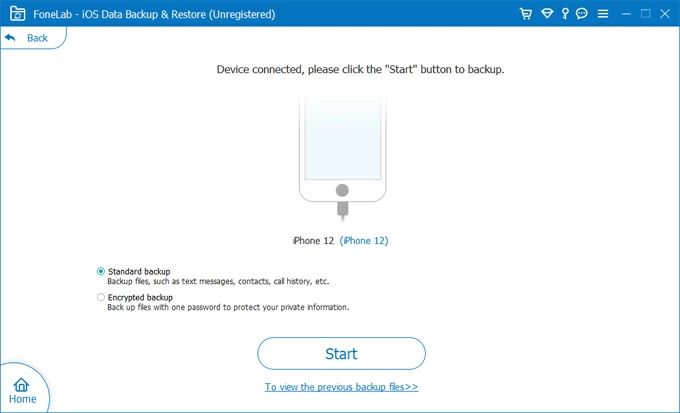
4. Click the circle next to Standard backup, and hit the Start button below.
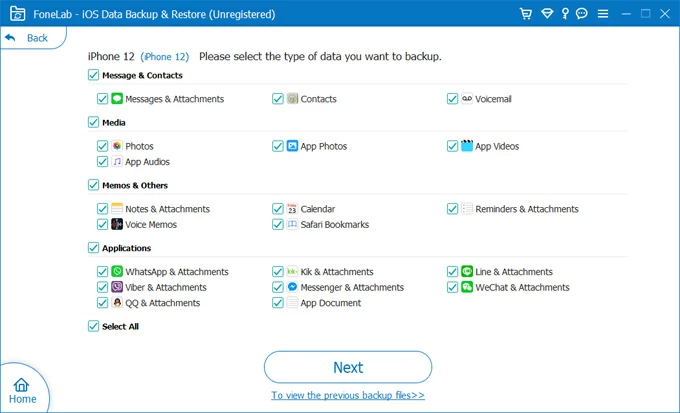
5. Tick the Photos checkbox under the Media section, and hit Next to start the photos backup.
Tip: During the backup process, you may need to enter the lock screen passcode on your iPhone to make it trust your computer. And if your iPhone data has been backed up with iTunes encryption, you'll also need to validate your iTunes backup password.
See also: How to transfer photos to new iPhone
1. How to download photos from iCloud to iPhone?
If you have turned on iCloud Photos on your iPhone, then you can take the following steps to download the photos backed up to iCloud on the iPhone:
Here's a more detailed guide: How to download iCloud photos to iPhone
2. Why the photos on my iPhone aren't backing up to iCloud?
Firstly, make sure you've enabled iCloud Photos on your iPhone with this route: Settings > Your name > iCloud > Photos > Sync this iPhone.
If iCloud is still not backing up the photos on your iPhone, your iCloud storage could be filled in and you need to upgrade for more space at a monthly cost. Or you can back up your iPhone photos to your computer rather than iCloud, with a program like iOS Data Backup & Restore.
3. How long does it take to back up photos to iCloud on iPhone?
The time it takes to back up photos to iCloud on your iPhone can vary depending on various factors, like the size of your photo library and the speed of your internet connection.


