Forgot iPhone 16 passcode. How to unlock it - Top 5 ways


Platforms
Developed for both Windows & Mac users

This guide explains different ways for transferring photos from a PC to an iPhone 16 device, letting you keep and manage all your precious pictures in one place!

There are multiple ways for iPhone users to transfer photos from their Windows PC, even without iTunes.
Switch to a new iPhone 16 and want to get your old photos from a PC? This guide will show you how to transfer photos from PC to iPhone 16, bringing along all your cherished memories easily!
From cable-based transfer to wireless cloud syncing, you can use various methods to transfer your PC photos to an iPhone 16 while preserving their original quality. Here's a quick overview:
Whether you prefer to move just a few pictures or initiate a bulk transfer, these easy and quick ways can get your PC photos transferred to iPhone 16 seamlessly, with or without a cable.
Table of Contents
Without using iTunes or iCloud, Appgeeker iPhone Data Transfer is a powerful tool for Apple users to select and transfer their full-quality photos from PC to iPhone/iPad, and vice versa.
The PC-to-iPhone photo transfer methods in this guide apply to Windows 11, Windows 10, and earlier Windows OS, working for iPhone 16, iPhone 16 Plus, iPhone 16 Pro & Pro Max.
If you have many old photos on your Windows PC that you want to transfer to your iPhone 16, iTunes can be a useful way to get the job done easily. The process requires a USB cable. To make things easier, you may manage your photos and sort them into folders or albums in advance.
If you don't have iTunes on your computer, get it from Apple official site or download from Microsoft App Store. Once ready, here's how to transfer photos to iPhone 16 from PC with iTunes:
1. Connect your iPhone 16 and PC with a USB cable.
TIP: If it's the first time you're adding photos to your iPhone, unlock the device and tap Trust on the Trust This Computer prompt.
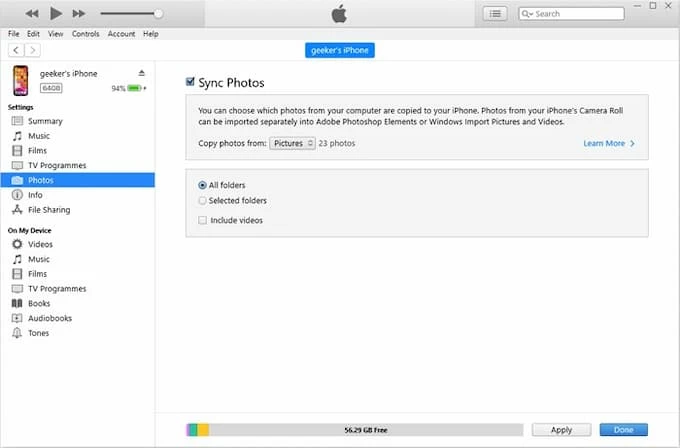
2. Open the latest iTunes on your desktop.
3. Click the Device icon from the top left of iTunes window.
4. To transfer photos to your iPhone 16, select Photos from the left sidebar.
5. Check Sync Photos and choose a local album or folder from Copy photos from menu.
6. Choose to sync with All folders or Selected folders, then decide Include videos or not.
7. Hit Apply button to sync photos from your PC to iPhone 16.
It may take a short while, depending on how many photos you're moving. Once done, click Eject button to disconnect your iPhone and access your PC pictures and videos in Photos app. For an easier transfer, keep reading for more options to add photos from PC to iPhone without iTunes.
Whether you're transferring individual photos or moving an entire picture folder from PC to iPhone 16, the cross-platform file transfer tool — Appgeeker iPhone Data Transfer provides an all-in-one solution, letting you transfer photos between Windows and iOS/iPadOS without any quality loss.
By simple clicks, this iPhone photo transfer tool enables you to preview and select any photos and videos on your PC before adding them to your iPhone 16's Photos Library directly. Moreover, it can automatically recognize the incompatible pictures and convert them into iOS-supported formats for seamless use on your Apple device.
Available for all Windows and iOS versions, the following steps enable lossless photo transfer from PC to iPhone 16, with no need for iTunes or iCloud:
Step 1. Launch Appgeeker iPhone Data Transfer on Windows PC. It's compatible with all Windows OS and a wide range of PC & laptop brands.
Step 2. Connect your iPhone 16 to computer via a USB cable. If needed, enter your iPhone passcode and tap Trust to allow for photo transfer.

Step 3. Add photos from Windows PC to iPhone 16.
Click Photos tab on the left side to access your current iPhone Photos Library.

Then hit the Add + button at the top toolbar and select Add File(s) or Add Folder. In the opening window, select the specific pictures or folders that you want to transfer to your iPhone 16.

Keep your device connected until the transfer process completes. After that, open the Photos app on your iPhone 16, where the photos from your PC should appear in Library now. In addition to getting photos from PC to iPhone, this tool can also help add music to iPhone without iTunes.
Aside from the cable-based transfers, there are several options that enable wireless photo transfer from PC to iPhone 16 without using a cable.
Offering multi-device access, iCloud Photos makes it easy for iPhone 16 users to transfer photos from their PC wirelessly. By signing in with the same Apple ID, you can directly upload PC photos to iCloud and automatically sync them to your iPhone 16 and all devices over the network.
To make it, iCloud offers each account 5 GB of free cloud storage. If your pictures and videos are over 5 GB, considering upgrade to iCloud + for more available space. Then, you can download iCloud for Windows or visit iCloud.com to wirelessly transfer PC photos to iPhone 16:
Step 1. Upload photos from PC to iCloud.
If you have iCloud for Windows app on your PC, open it and sign in with the same Apple ID; then check Photos option and turn on iCloud Photos toggle. This will automatically upload and store your PC photo library on iCloud, allowing access from all your devices, including the iPhone 16.
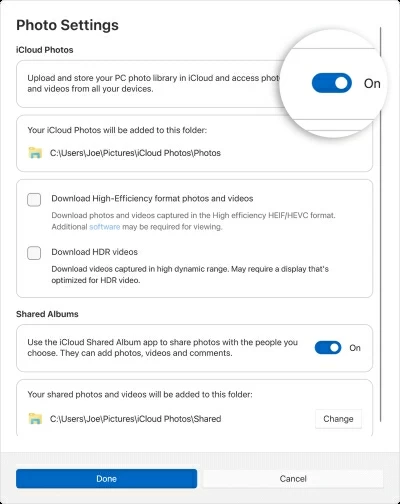
If you don't have iCloud for Windows app, open a browser and go to iCloud.com; log in with the same Apple account and choose Photos option when you're in. Then, in iCloud Photos screen, click the Upload button in the top right and select any photos you want from your PC.
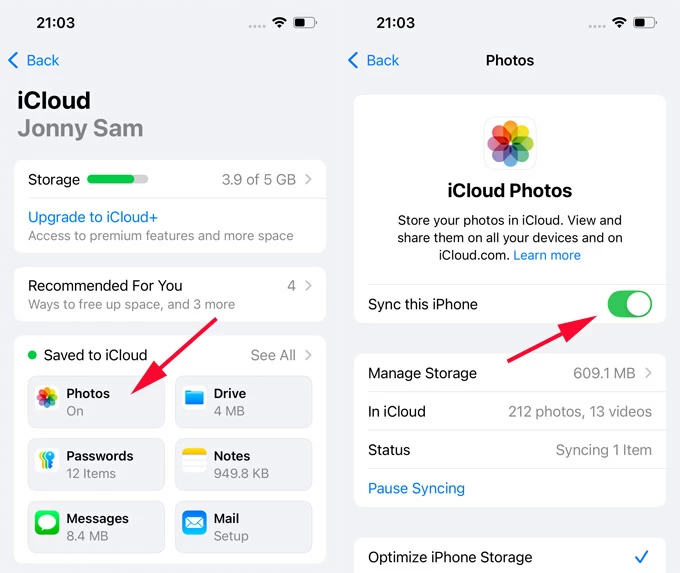
Step 2. Enable iCloud Photos on your iPhone 16.
Unlock your iPhone 16 and move to Settings > your Apple ID > iCloud; select Photos option and turn on the toggle next to Sync this iPhone.
Now, both your Windows PC and iOS device are connected to iCloud ecosystem and has access to all iCloud photos.
Step 3. Download PC photos on iPhone 16.
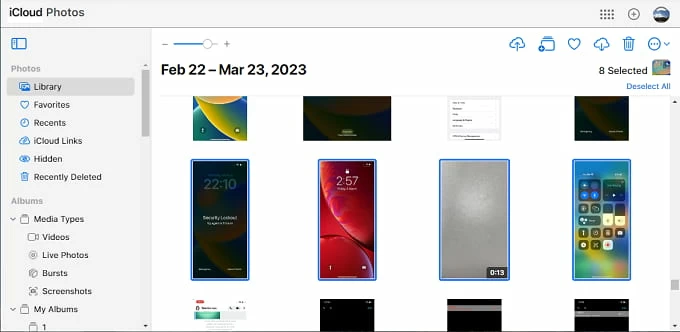
Open the Photos app your iPhone; the photos and videos synced from your Windows PC should now appear in the Library.
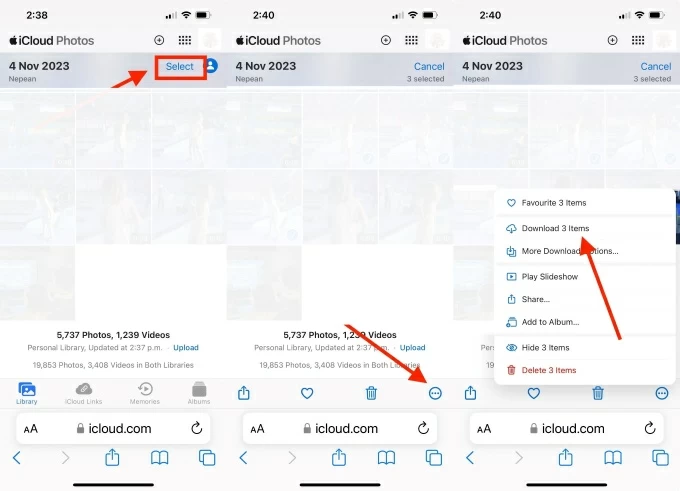
Alternatively, you may sign in to iCloud.com on iPhone and select Photos to view all uploaded PC pictures; then choose whichever images you want, and tap the three-dot icon > Download items to save PC photos on your iPhone 16 in their full quality.
This method doesn't transfer your PC photos directly to your iPhone 16. Instead, the pictures and videos will be stored in iCloud and synced with all associated devices. If you have a large photo library to move, ensure there's enough iCloud storage or switch to a wired method above.
While iCloud auto-syncs photos across devices, it updates deletions and changes as well. If you've accidentally removed some images, click here to recover deleted photos on iPhone 16.
Another cloud-based service — Google Photos offers 15 GB of free cloud storage, letting you transfer more photos from your PC to your iPhone 16 at a time. This process requires a stable Wi-Fi network and you should be logged in with the same Google account on your computer and iPhone. Steps to wirelessly transfer photos from Windows PC to iPhone 16 by Google Photos:
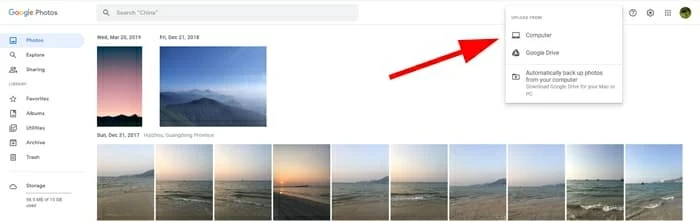
1. Head to Google Photos on your PC and sign in with your Google account credentials.
2. Click Upload button from the upper-right corner > select the Computer icon.
3. In the pop-up PC folder, choose the photos you want to get to your iPhone.
4. On your iPhone, download and open Google Photos from Apple App Store.
5. Sign in with the same Google account.
6. Go to Photos tab to preview the pictures uploaded from your computer.
7. Select the pictures you desire and download them on your iPhone 16 for local access.
Afterward, open the Photos app on your iPhone 16 to access the pictures transferred from your Windows PC. Similarly, other cloud services like OneDrive and Dropbox are also capable of transferring photos from your computer to iPhone wirelessly.
Alternatively, using email is also a quick way for transferring a small number of photos from Windows PC to iPhone. The process requires no cloud storage. The only thing you need to do is to attach the PC photos to an email and then send it to yourself. Here's how you can download PC photos to your iPhone 16 wirelessly using email:
The downloaded PC photos will be saved to the Photos app on your iPhone, allowing for future viewing, editing, and sharing.
With these wired and wireless photo transfer solutions, it's not hard to move photos from your PC to your iPhone 16 device, taking them anywhere you go. If your pictures or videos are unable to transfer to your iOS device, the following FAQs may be of help:
Q1 - Why can't I transfer my photos from my PC to my iPhone 16?
When transferring PC photos to iPhone with a cable-based method, such iTunes or Appgeeker iPhone Data Transfer tool, make sure you're using a rightful USB or Lightning cable. If Trust This Computer notification pops up, tap Trust and enter your iPhone passcode to allow photo access. See how to fix if you forgot your iPhone passcode.
Alternatively, the cloud-based services like iCloud or Google Photos usually require sufficient cloud storage and stable network to initiate photo transfer across Windows and iOS. If you're running out of cloud space, the photo transfer may fail unless the available cloud storage is expanded.
Q2 - Can I transfer photos from a PC to an iPhone 16 without iTunes?
Yes, here are several non-iTunes options for transferring photos from your PC to iPhone 16:
Q3 - How do I wirelessly transfer photos from Windows to iPhone 16 without a cable?
To make wireless transfer of photos, Apple's iCloud Photos can be a top choice. It offers 5 GB of free cloud storage, allowing your photos to auto-sync from a Windows computer to an iPhone 16, without a USB cable.
Additionally, other cloud-based services like Google Photos, OneDrive, and Dropbox are also capable of transferring the pictures on PC to an iPhone wirelessly. To transfer just a couple of pictures and videos, using email would be the simplest way.

