How to Record Internal Audio on Windows 10

Sick of hearing unwanted noise in your audio? Look no further! This article will help you remove background noise and level up your listening experience instantly with Audacity.


This article will teach you how to use Audacity to remove noise from your audio.
Are you tired of dealing with unwanted background noise in your audio recordings? Whether you're a podcaster, musician, or content creator, it's crucial to record high-quality audio without background noise.
Luckily, with Audacity, a free and powerful audio recording and editing software, you can easily remove noise and enhance the clarity of your audio. In this article, we'll show you how to reduce noise when recording audio and how to remove background noise in Audacity step by step.
No doubt you get frustrated when you hear your audio recording and find out so much noise in it. Relax! In addition to recording audio on your Windows or Mac, Audacity offers a noise reduction feature that effectively removes background noise from your recordings.
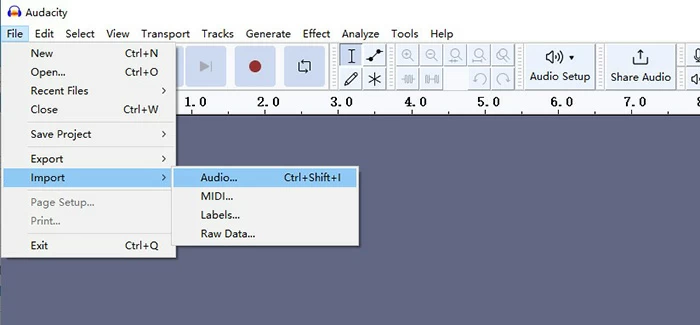
Launch Audacity on your computer and navigate to the File > Import > Audio to import your audio file in Audacity. Or you can create an audio recording in Audacity.
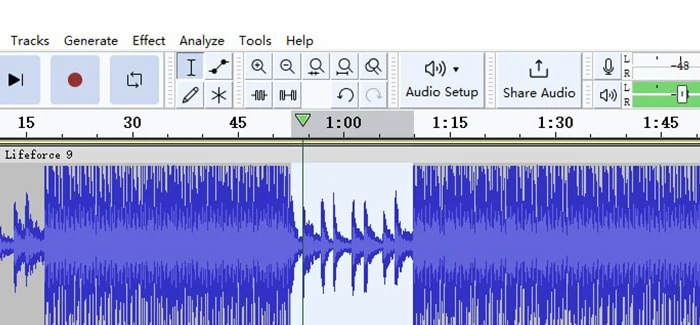
Identify a portion of the audio that contains the background noise you want to remove. Highlight this section by clicking and dragging your mouse over it or pressing Ctrl + A on your keyboard to select all.
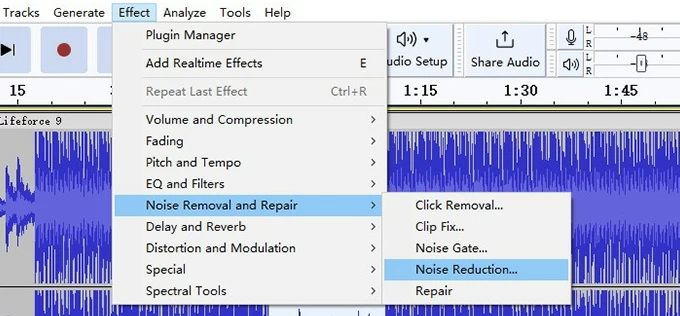
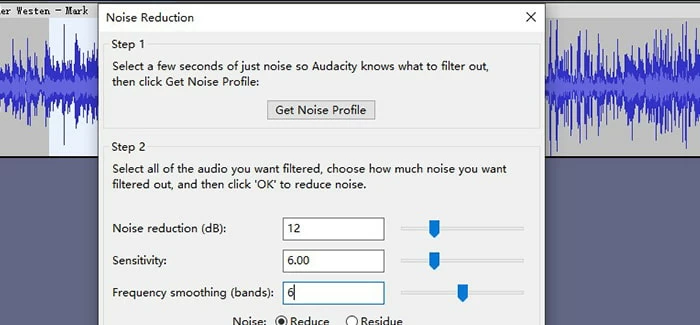
Go to the top menu and click on Effect to expand the drop-down menu. Then choose Noise Removal and Repair > Noise Reduction. From the Noise Reduction dialog box, hit Get Noise Profile.
In the Noise Reduction dialog box, adjust the sliders for controls such as Noise Reduction, Sensitivity, and Frequency Smoothing to achieve the desired noise reduction effect.
Once you are satisfied with the settings, click OK to apply the noise reduction effect to the entire audio file. You can then listen to the modified audio and make further adjustments if needed.
Above are the steps how to remove background noise in Audacity. Apart from this, here are some tips that will allow you to reduce unwanted noise and improve the overall clarity of your recordings when recording computer audio with audacity on Mac or Windows.
1. Choose a quiet recording environment
Prior to recording, select a room or area with minimal background noise. Ensure that doors are closed and consider turning off appliances or electronics to avoid potential noise interference.
2. Opt for a dynamic microphone
Dynamic microphones often have internal damping materials that help reduce resonances and minimize the pickup of unwanted noise. By using a dynamic microphone, you can effectively avoid noise during the recording process.
3. Use a pop filter or windscreen
Another way to avoid noise is that attach a pop filter or windscreen to the microphone to reduce plosive sounds and wind interference. These accessories act as a barrier, minimizing unwanted noise during the recording.
If you need to record a flawless and noise-free audio file that may be used for music compositions or uploading to YouTube podcasts, then you can take the help of a professional recording software, Appgeeker Screen Recorder to record lossless audio. Not only does it offer noise reduction and microphone enhancement, but it also enables you to output your audio file in a variety of formats.
Conclusion
Whether you're recording vocals, podcasts, music, or any other type of audio, mastering the skill of removing background noise in Audacity based on the information above will undoubtedly help improve the quality of your recordings!
1. How do I normalize audio in Audacity?
To highlight the entire track and go to Normalize, head to Effect > Volume and Compression > Normalize, then set the db setting to -1.0, and click Apply.
2. How to record audio with Audacity?
As an open-source recording program, Audacity can record your computer sound and microphone voice. If you want to record your own voice, just click the red Record button on the main page of Audacity to record.
To record audio from your computer, you need to click Audio Setup > Host and select Windows WASAPI to record system sound. Then select your output device in Recording Device section and click the Record icon to start recording.
If your Audacity won't record audio on your computer, you can try using the Appgeeker Screen Recorder as an alternative method.
3. Is Audacity a real digital audio workstation?
Yes, while it may not have the extensive features and capabilities of some paid DAWs, Audacity provides a range of tools for basic audio editing and production. It is widely used by individuals, hobbyists, and even professionals in various audio-related fields.