
How to Screen Record on Windows 10

Being able to record any audio on your Windows 10 computer is a wonderful experience. Windows 10 Voice Recorder app and 3rd-party apps are for you to take a recording.

There are multiple apps that you can use on a Windows PC to record audio.

Voice Recorder app integrated in Windows 10 makes it rather easy to record your voice on your PC.
There will come a time when you'll want to record audio on your Windows 10 computer. This may be for an important lecture, an interview, a beloved song or many more sound events.
Voice Recorder app comes included as part of Windows 10 for the audio recording purposes, with added benefits from a suit of editing tools. To get the audio recorded, you need to open the software together with a microphone being set to active.
In this article, we'll discuss how to record audio in Windows 10 using the free Microsoft Voice Recorder app and save the file as .m4a soundtrack. If you want to do more recording work for capturing audio coming out from both microphone and computer itself, you can opt to use other sound recording programs
Table of Contents:
Windows 10 has the Voice Recorder app pre-installed, and here are easy steps guiding you through how to record audio from microphone. We'll start with bringing up the Voice Recorder on your PC, and then use it to take audio recordings through the built-in microphone or an external mic connected to your computer like webcam, headset mic.
By default, Microsoft Voice Recorder is natively staying in Windows 10 and you can access it via the Start menu. If not, you need to install the app manually through Microsoft Store application or website. It's free to download. Note that, on some previous computers, it's called Windows Sound Recorder.
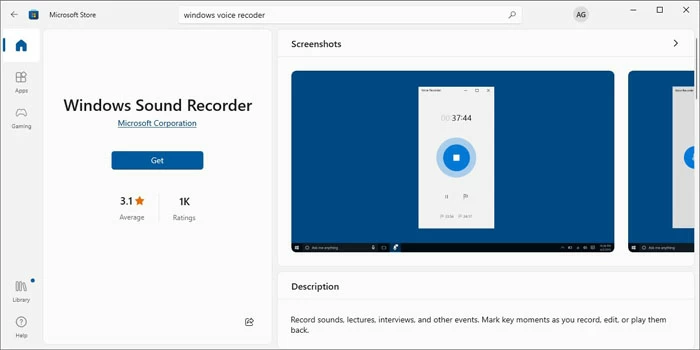
Install Windows Voice Recorder on your Win 10 PC or laptop if you can't find it in the Start Menu.
Step 1. Open Voice Recorder. Tap Windows key (or click the Start button) to invoke the search bar, type voice or recorder, click Voice Recorder from the best matched result to launch it.
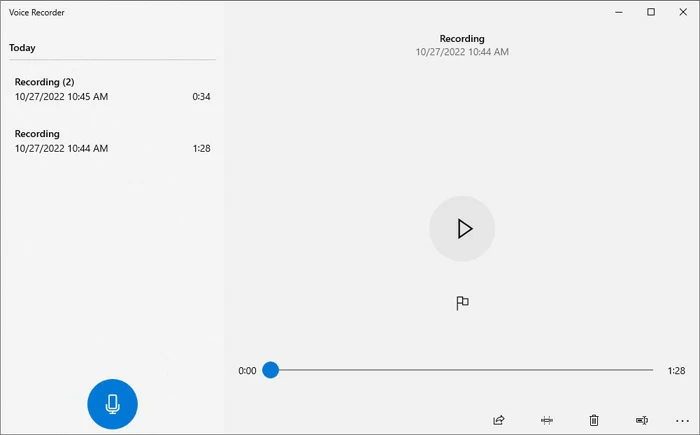
Step 2. Press the large blue microphone icon on the screen to start a recording. Or use Ctrl + R key combinations on your keyboard to trigger a sound recording. As you record, you will see a timer that lets you precisely track the recording length, along with a few buttons to pause or resume, stop the voice recording at any time (Alt + P shortcut), or add a marker on the important moment.
Step 3. Talk yourself closer into your microphone so the Audio Recorder captures your voice.
Step 4. Hit the blue Stop button at the middle to end the audio recording when you're completely. The new audio recording will be auto-saved and displayed on the left of the Voice Recorder app screen. You are able to playback, share, trim, rename, or flag the audio file you recorded.
The recorded clips via Voice Recorder in Windows 10 are outputting as M4A sound files, and can be accessible in Documents\Sound Recordings.
In Windows 10, recording audio is an easy task thanks to the Voice Recorder software.
In case you're having problems with the microphone input while recording on Windows 10 PC - maybe you do not record through the correct microphone, or perhaps the microphone is not connected correctly, then do the following to set up your microphone as the recording device in Windows 10 Sound Settings page.
Navigate to Windows Start menu, click Settings > System > Sound. Under the Input section, choose Microphone as your default input device for audio recordings, be the built-in microphone, or any other mic plugged into your computer.
Once done, you could use Voice Recorder app to record an audio file again and test the sound when the recording is finished.
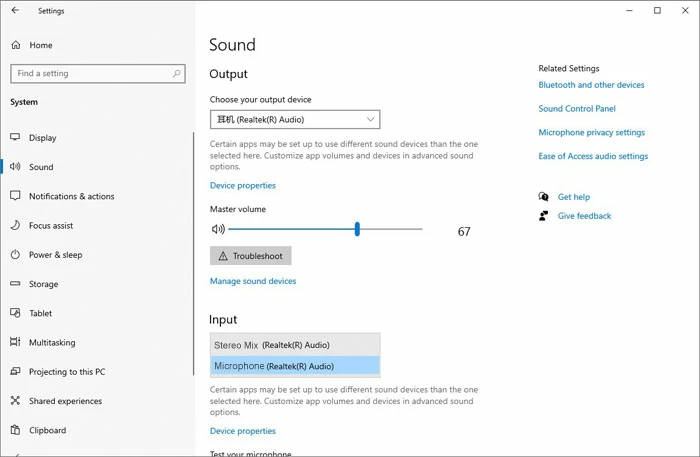
Set up your Microphone as an active input device so that Voice Recorder software could record your voice.
Since Microsoft Voice Recorder restricts to use the microphone to record audio or sound, you'll find the inability to record computer audio in Windows 10 - video playing onto web browser or music from coming in through the streaming site will not be picked up - only your voice or surrounding sounds through the microphone input device.
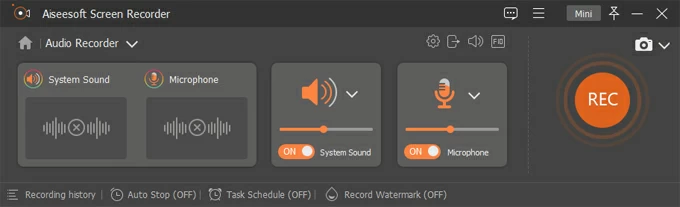
If you're concerned with audio recordings from mic and computer, consider using a comprehensive yet easy-to-use utility. Audio Recorder is regarded as a full-featured recording tool that makes recording mic's audio and system audio easier and efficient.
With intuitive options of enabling audio record for microphone and Windows 10 computer, screen recording of all activities along with all sounds, webcam & game recording, screenshot, multiple output format selections from MP3, M4A, WMA, AAC, and simple editing tools to trim, split, merge, convert audio recording file, and the ability to cancel microphone noise and enhance microphone audio quality, Audio Recorder has all of your record needs covered — and more.
Here's how to record any Windows 10 audio - both system sound and microphone audio at the same time. You'll also learn to record only computer audio, excluded the sound from mic.
1. Open the software after installation.
2. Choose Audio Recorder on the main screen. If you need to screen record on Windows 10 computer, click into this page.

3. Determine if want to record Microphone, System Sound, or both simultaneously. This isn't the case in Voice Recorder bundled in Windows 10.
You're able to record any kind of audio that comes from microphone, and that you can hear from system, apps, online video & audio streaming platforms, etc.
3. Hit the Rec button to start audio recording.

4. To stop the recording of an audio file, hit the Stop button. You can then preview the audio file you've recorded. You can use the trimer to cut the file here.
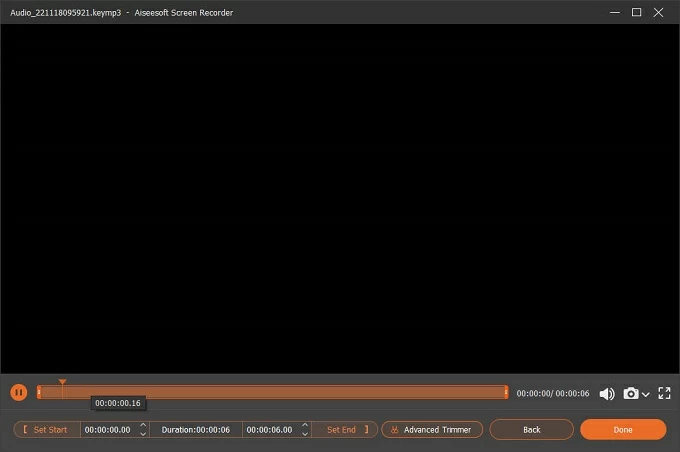
5. Click the Done button to save your sound recording. This takes you to the Browsing history page where you can locate and access the sound tracks on the PC.
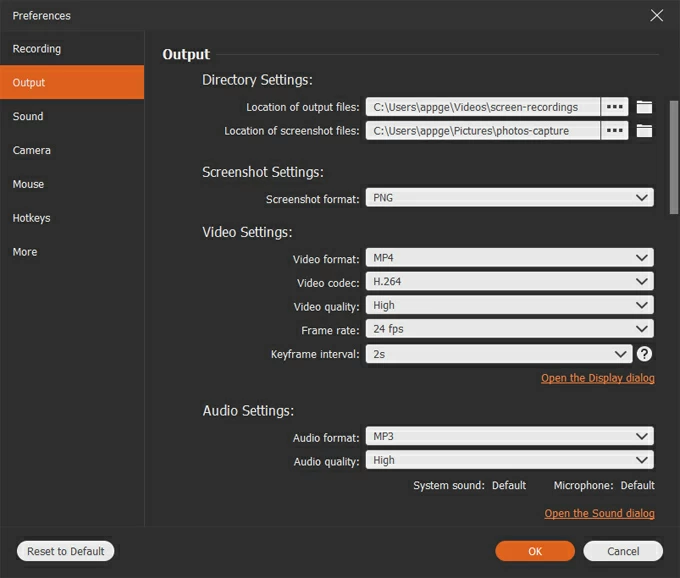
While Windows 10 Voice Recorder limits to output the recoding in M4A format, the AppGeeker Audio Recorder gives you the option to customize the output you wish: M4A, MP3, FLAC, AAC, WMA, WAV, OPUS. Do this by clicking the tiny gear icon at the top of the Microphone tab. Microphone noise cancellation and enhancement can also be found under Sound.
If you do not want to use the built-in Windows 10 Voice Recorder app, you can also go for Audacity, another free audio recording program for multiple tracks and multiple input devices.
After you get Audacity from audacityteam.org, open it and hit the red Record button to begin capturing Windows 10 audio. The interface may look a little daunting that recording audio may be a tough learning curve for the beginners to master the controls: start, stop and pause the recording, change the input device to microphone, and switch to output device for playback the soundtrack.
It works in much the same way as you can record audio in Windows Voice Recorder. You'll have to configure the audio inputs before recording, like your microphone or the computer playback (called Loopback, Stereo Mix, or other names depending on your sound devices.)
Audacity records audio in multiple formats, whereas audio files in Voice Recorder in Windows 10 are in .m4a.
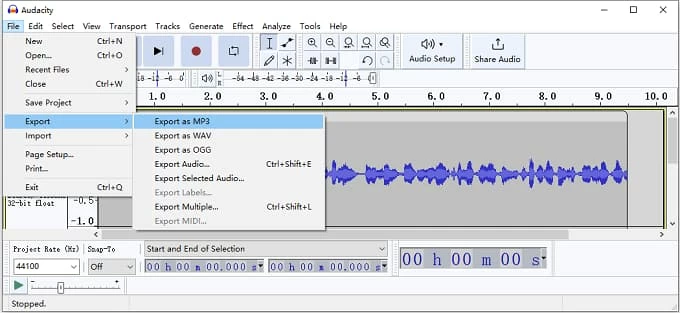
After ending the recording, you can edit the audio clip as needed. To export the audio recording, you must click File > Export - since Audacity saves whatever you recorded as a project file, and then choose whatever audio format you want: Export as MP3, Export as WAV, Export as OGG.
To recording high-quality audio, in general, you should be in room with lots of soft furnishings which helps dampening the echo and absorb some of the extra sounds.
Second, getting a proper USB microphone to be added to your audio recording setup is essential - rather than relying on the microphone built into the computer, laptop, webcam or headset.
Does Windows 10 have audio recorder?
Windows 10 has a hidden audio recorder called Voice Recorder that is connected with the microphone to record the sound easily and quickly. Go to Windows search field, search for "voice" or "recorder", and once you see the Voice Recorder, click to open it.
Upon launching the Voice Recorder app, click the large blue dot with a microphone inside to start a recording on Windows 10.
Can Windows 10 Voice Recorder save sound recordings as MP3?
Unfortunately, the built-in Voice Recorder of windows 10 cannot save the recordings in MP3 format. Instead, it keeps the voice recordings in the M4A form.
For something with excellent selection of supported audio file formats, AppGeeker Audio Recorder certainly doesn't disappoint. It's designed for recording any soundtrack from the computer system or the microphone, and saving voice recordings in various formats like MP3, WMA, and M4A with moderate quality.
If you're interested in converting audio from .m4a to .mp3 without quality loss, consider trying a robust audio converter.
How can I record audio on Windows 10 from YouTube?
Voice Recorder is included with Windows 10 computers that you can take it to record audio through the connected microphone, not the audio from the computer or apps. If you're ready to record audio from YouTube, try AppGeeker Audio Recorder program. You can also take a look at YouTube downloader for help.


