How to Play a MKV 1080p Movie File on an iPad


The call ringtone says something about your personality. Want an awesome ringtone to personalize your iPhone? You can also allocate some specific music to some people so that you know who's calling without fumbling your iPhone in your pocket.
M4R is a special audio format used exclusively by iPhone users to create their own ringtone. If any of you have your own MP3 songs and want to make custom ringtone, the prerequisite is to convert the MP3 music files to M4R ringtone format which are to be synced to iPhone. The process doesn't need any technical skills but Video Converter for Mac.
With it, you are able to make your own ringtone by converting MP3 music tracks to M4R files. It also allows you to choose a part of a MP3 song and convert the segment to M4R. Want to acquire the stunning songs from the YouTube MP4 video rather than the entire video and transfer the sound tracks to iPhone as M4R ringtone? This program is also capable of converting videos directly to M4R ringtone.
Step 1: Add MP3 Audio Files
Click "Add File" (top-left position) to import MP3 music files to the software.
Adding MP3 audio files in bulk is possible. Just click the downward arrow and click "Add Folder".

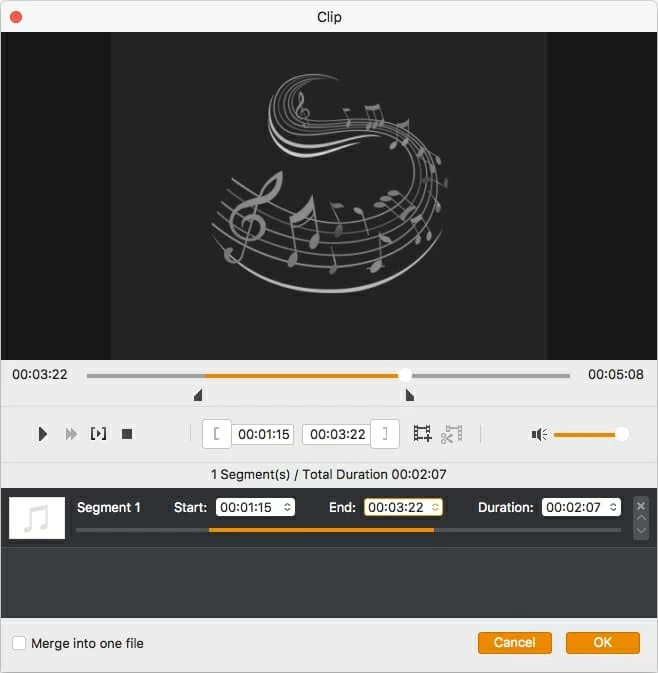
Since the length of M4R ringtone should be less than 40 seconds, so it is better to trim the MP3 audio file to an appropriate segment that you want to convert to M4R. Just click "Clip" in the toolbar and a window opens as below.
Just set the exact Start and End time in the timeline or fill in the specific Start/End time in the box.
After you have finished set the Start/End time, click OK and come back to main window. You can click the thumbnail to pre-listen the MP3 music clips.
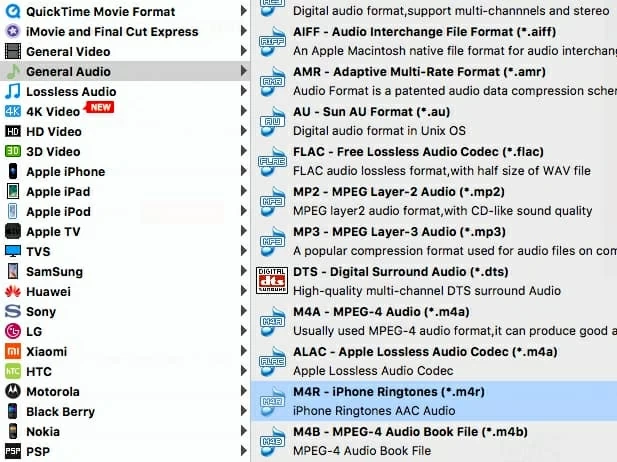
Step 2: Choose M4R Ringtone as Output Format
Click "Profile" (move the cursor towards bottom side) and head to "General Audio" in the dropdown list from which to select "M4R – iPhone Ringtones (*.m4r)".
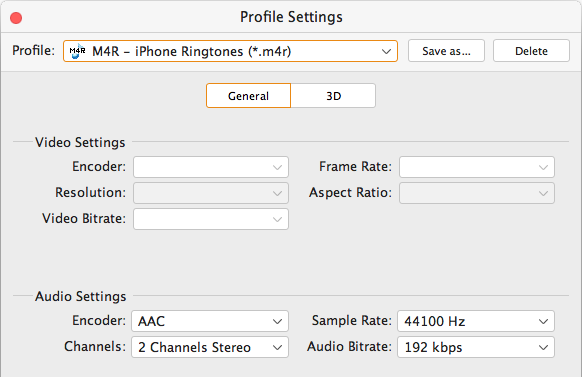
Audio Settings as below (click "Settings" next to "Profile") help you choose the optimal encoding property in terms of Encoder, Channels, Bitrate and Sample Rate.
Please note: The encoder for M4R ringtone should be AAC.
Step 3: Start Converting MP3 to M4R on Mac
Click "Browse" (below "Settings")and choose a location where the results will be saved and give it name.
Once you get everything ready, click "Convert" and get it started. What matters to the conversion speed includes source audio, its output settings and the Mac's performance. Since the first two factors are already fixed, you can speed up the conversion by shutting down some running programs to donate more ram or CPU resources to the process.
This way, you can create your own iPhone Ringtone.

Step 4: Transfer Converted M4R Ringtone to iPhone via iTunes
Open up iTunes and transfer the M4R ringtone files to iTunes library in the ringtone area. Then connect your iPhone and iTunes will detect it. After the ringtones have been synced, enable them in your iPhone.
That's it!