How to Convert a MP4 File from 1080p to 720p on Computer


The world is full of video formats and can be confusing from time to time. Ideally, if you download or rip a video in a common file type, you won't have to worry about playback of it in media player on your computer. But if you're stuck with a movie file ended with a uncommon extension, then things get tricky. Unfortunately, Matroska .mkv format belongs to the latter. When you're trying to open an MKV file in the Apple QuickTime player, you should get an error message "Error -2048: the file is not a movie file" or something like that.
When you sit down at your computer and do a Google search on how to play MKV file in QuickTime Player on Mac or PC, there are various of solutions on the results page. Here, we'll introduce one of the most practical way—using a utility named Video Converter, which helps you convert MKV to a file playable in QuickTime without interruption.
We've also shown you how to use it to convert MKV to edit in iMovie before, but it is about much more than that. It is a full converting suite that can be used to work with a large variety of videos and music in all popular formats, including MTS, AVI, MKV, MP4, WebM, MPEG, WMV, MOV, MP3, M4A, WMA, AAC, APE, FLAC, ALAC, and can extract your favorite sound track off the movie to save in audio format you like. The utility also includes a number of options that you can tweak, such as video bitrate, aspect ratio, resolution and codec, as well as the ability to change the value toward audio sample rate and channel.
How to play MKV files on QuickTime
Step 1: Import MKV files to the program
Fire up the utility on your Mac desktop and you will find it's organized into a slew of different options, which is pretty nice and self-explanatory, offering you the chance to use conveniently.
Let's start it up! Load your MKV vidoe files you've preciously saved on your computer to the program using the "Add File" button on the upper-left tool bar. Pick the files, open it, and then you should see your raw MKV files in the center of the program's workflow. Or just drag-and-drop the files to be converted into place. You can add as many videos as needed.
When you click on the thumbnail of .mkv video you imported, it will automatically play on the "Preview" window on the right-hand side of the program.

Thanks to its beginner-familiar video editing tools, this MKV to QuickTime converter brings you a great way of making your own movie clips distinctive. Then you need to get cracking with the options on the top tool bar including "Video Enhance", "Clip", "3D", "Edit" for stunning viideo clip output.
Step 2: Select QuickTime-friendly format as output format
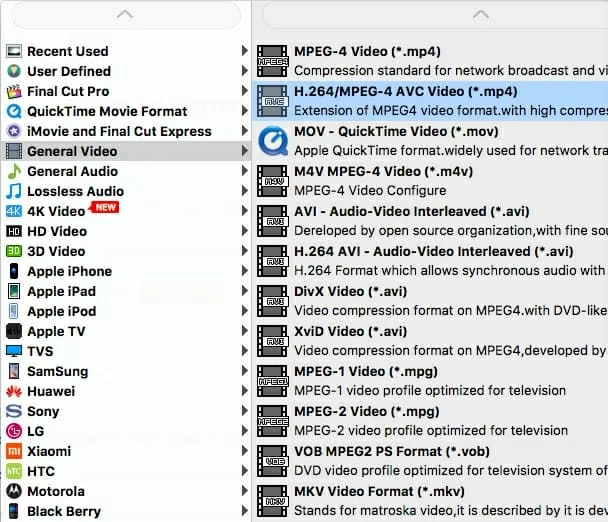
After customizing your video, in this point, you need to pick an appropriate format for QuickTime to make MKV video playable. To get the job done, here you're required to click on the "Profile" pull-down menu on the lower left side. Now a new panel will appear where all the available format profiles are listed, among which pick up "MOV – QuickTime Video (*.mov)", "MPEG-4 Video (*.mp4)" or "M4V MPEG-4 Video (*.m4v)" from the "General Video" category.
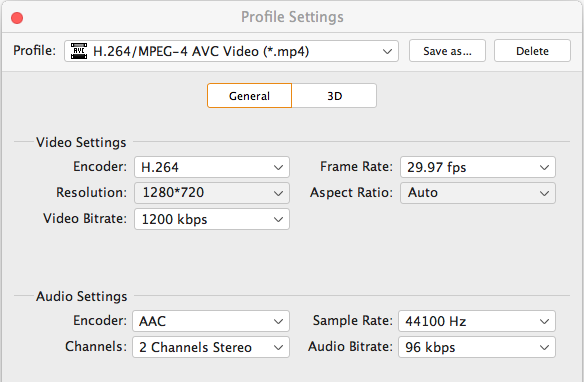
At the advaced level, you can use "Settings" option (right beside "Profile") to make quality adjustment for you video in a good look before converting it to a format of your choice. Many different video and audio encoding parameters become avaiable on "Profile Settings" window including frame rate, resolution, sample rate, bitrate and more. Everything tweaked can determine the output video quality.
For a beginner, however, you can leave this alone without tinkering around with the strange profiles since the pre-configured presets can all work well with the defaults.
To export the converted files effectively, pressing "Browse" icon underneath "Settings" will allow you to output to a defined file destination. Here we recommend saving the converted video on Mac desktop or the folder as often used as possible.
Step 3: Start converting MKV to QuickTime playable video file on Mac OS
Now hit the orange "Convert" button to begin the conversion process on Mac. You may track the conversion status and the remaining time via progressing bars attached on the pop-up window.
The process it takes depends on the power of your computer (CPU and sometimes also GPU), the size of your source MKV files (resolution, duration and FPS), and conversion quality settings.
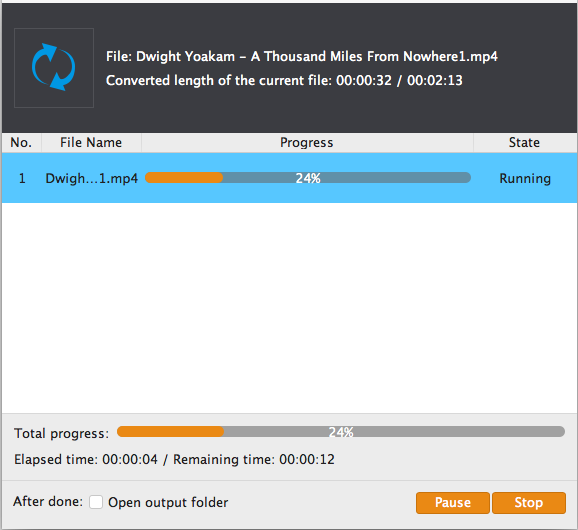
BTW, you can check "Open output folder" option (at the bottom of the processing window) to tell this MKV converter to open the destination folder where the resulting files are saved in once the process is complete.
That's it! Now you can open up the newly created video in QuickTime on your Mac machine or if needed, stream it to smart Apple TV with wide screen for better visual experience. Please check out the detailed tutorial: How to Stream MKV video clip to Apple TV. Enjoy yourself.
Conclusion
Overall, the small guide that are shown above in fact performs well in converteing MKV to be playable with QuickTime, and I sure that you may also benefit a lot from it. You can also use this converter to get your WMV videos accessible to QuickTime player in a similar way. You can try yourself.