
How to Convert Your FLAC Collection to ALAC (m4a) for Mac


I am sure some of you must have encountered one of the following situations.
"I just switch from an old MP3 player to a brand-new shiny iPod Touch lately. However, when I start to move my entire music collection in Microsoft WMA format to iPod through iTunes, it just doesn't work."
"I got a library of WMA songs online last year. Now, I have a new iPad. When I complete the process of transferring all the songs to iPad, it just can't play the audio files. I heard AAC is the best way to go, any method?"
"I just purchased a new iPod touch. I know I cannot get the WMA audios which I rip from CD before to play on the iPod. But I don't want to rip the CD again, any ways to convert the WMA audio tracks to iPod format, AAC for example?"
How to Fix It?
Actually, iTunes and other Apple devices like iPod and iPad don't support WMA developed by Microsoft, which is the biggest rival for Apple Inc. In this instance, you have to convert WMA music tracks to something more accessible, AAC for example, before use on your iTunes or other Apple products.
When it comes to audio conversion, Video Converter for Mac makes things as easy and stress-free as possible. Despite the name, it converts pretty much any audio file like wma to aac, m4a to mp3, wav to alac, aac to mp3 and the like, wherever you get it. The same goes for video conversion such mov to mp4, , wmv to mov, AVI to mp4, to name a few. Additionally, it house a group of options to edit your WMA audios. For example, you can use "Clip" in the toolbar to break down the large WMA audio files into several more manageable parts by removing the unwanted sections.
Step 1: Import WMA audio tracks
From the top-left corner, click "Add File" button and it opens a dialog box where you can select the WMA audio files from your computer. This also can be done by drag-n-drop.
This WMA to AAC converter supports batch processing, which is convenient when you have to deal with a bunch of WMA songs.

Step 2: Set the output format to AAC in "Profile" pull-down menu
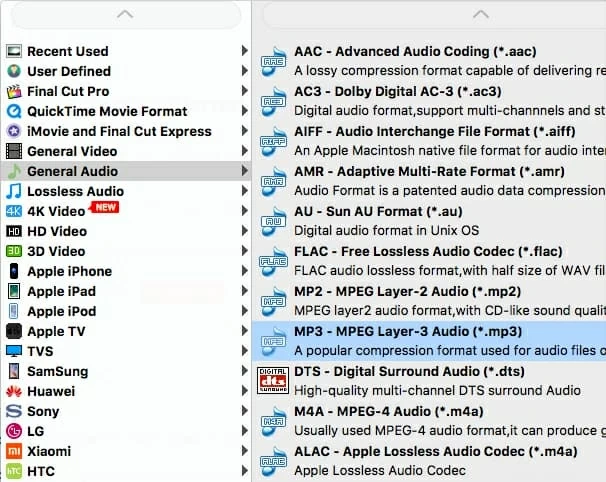
Move to the bottom left-hand side of the interface, click "Profile" drop-down menu, and you should see a screen just like the screenshot you see below. Head to "General Audio" category on the left side, and then pick "AAC – Advanced Audio Coding (*.aac)".
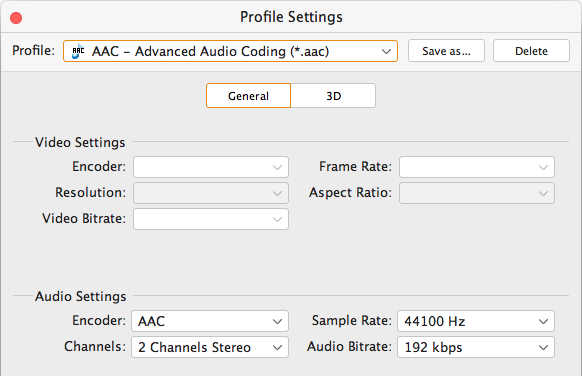
Certain parameters like Bitrate and Sample Rate are open to you through just a click of "Settings" (near "Profile" menu) button. You can check your device's specifications to see what it can play and then make a tweaking for AAC audio files.
However, if you are not an expert in this field, you might leave them untouched.
Step 3: Start converting WMA to AAC in MacOS
Before you press the "Convert" button at the bottom right corner of the interface, click "Browse" button in the "Destination" box (see bottom center) to specify an output directory for saving the resulting AAC audio files.
Go ahead and click the "Convert" button to initialize WMA to AAC conversion on Mac computer. It will open a window where you are able to monitor the progress of every conversion task. Be patient.

That's it! If you tick the "Open output folder" box in the bottom of the window, no need to click the "Open folder" button in the main interface; the program does it for you automatically.