
How to Back up iPhone Notes

Looking to backup iMessages on iPhone? Here, we will show you how to backup iMessage to iCloud, and your own Mac or Windows computer effortlessly.

People love to use iMessages since its introduction in 2011. And there're so many reasons for its popularity: seamless integration, security, Wi-Fi messaging, cost savings, etc. What's bothering iOS users increasingly is how to backup their iMessages then, since they're using iMessages so often, some important data generated just can't bear the risk of being lost.

There are features and apps you can use to complete an easy iMessage backup task.
So, if you've been wondering how to back up your iMessage, this article is for you. Here, you'll learn everything you need to know about backing up iPhone iMessages. We'll show you how to backup iMessages using iCloud, iOS Data Backup & Restore app, and iTunes. If you're looking for a reliable iMessage backup tool that ensures seamless and secure local backup, iOS Data Backup & Restore app is the best to go.
Also read: How to do when iPhone text messages and iMessages disappeared
Table of Contents
iCloud is an excellent cloud storage service that enables users to upload and store various files, including iMessages, photos, videos, and more. It also serves as a convenient backup solution for future use on new devices. Once iMessages are backed up to iCloud, users can access their backed-up iMessages on any iDevice using the same Apple ID.
For iOS 11.4 and later versions, users are allowed to sync specific apps rather than backing up the entire iPhone, thereby reducing the storage space occupied by iPhone backups on iCloud.
Note: During the process of backing up iPhone messages to iCloud, please ensure a stable Wi-Fi connection. Once completed, your iMessages will be backed up to the cloud.
To backup iMessages to iCloud, follow these steps:
Step 1. Open the Settings app on your iPhone. The app looks like a gray icon with gears, which locates on the home page of your iPhone by default.
Step 2. Tap [your name] on top of the Settings menu.
Step 3. Tap on iCloud to access the iCloud settings. In the iCloud settings, you will see a list of apps and services that can be backed up to iCloud.
Tip:
Step 4. Choose Show All to view the complete list of available apps.
Step 5. Go to Messages > Turn on Sync this iPhone. This enables iCloud backup for your messages. You can also check the Manage Storage of Messages from here, which indicates how much storage your messages on iPhone are going to consume on iCloud.
Once you set up iCloud for Messages on iPhone, all newly received messages including text messages and iMessages will be backed up to iCloud automatically.
Since every new iCloud user will be offered 5GB of free storage space by Apple, it's essential to make sure that iPhone messages backup doesn't exceed this limit so that we can back up iMessages successfully.
Also see: How to restore photos from iCloud backup
Bonus: How to back up iPhone including iMessages to iCloud?
The feature of syncing iPhone Messages to iCloud is introduced in iOS 11.4 and later. For those users whose iOS is earlier but still want to back up their iMessages to iCloud, you can create a full iPhone backup to iCloud, including iMessages.
Backing up iMessages to iCloud on iOS earlier than 11.4:
iOS Data Backup & Restore software is a professional backup tool to back up iMessage to your computer instead of a cloud server. It allows you to backup your iMessages, SMS, MMS, Line, and WhatsApp conversation. Not only that, you're able to restore them to new devices.
Key features:
Now, let's start to backup iMessage using iOS Data Backup & Restore app:
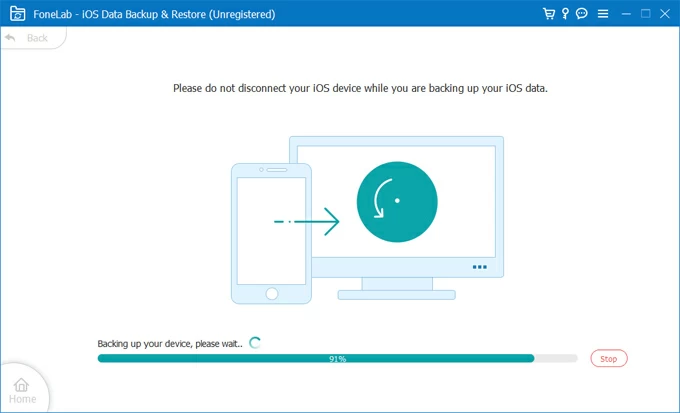
Step 1: Launch the iMessage backup app and enable backup function.
After downloading and installing iOS Data Backup & Restore app, launch the app on your Windows or Mac PC.
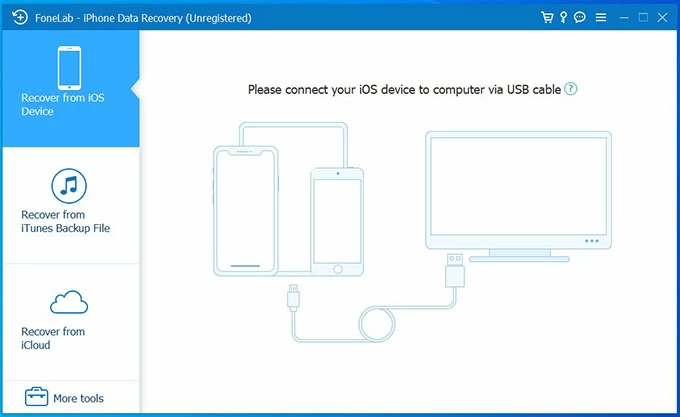
Then go to More tools > Choose the iOS Data Backup & Restore mode.

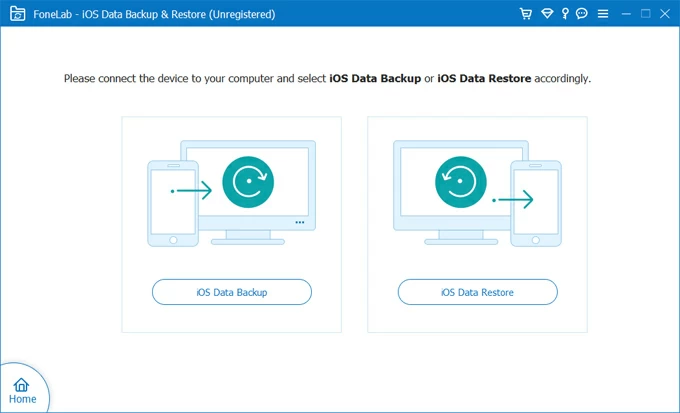
Step 2: Connect iPhone to PC and choose iOS Data Backup.
Connecting your iPhone to PC by using a suitable USB cable. Tap Trust on your iPhone if prompted. Then Click on iOS Data Backup from the left side of the interface.
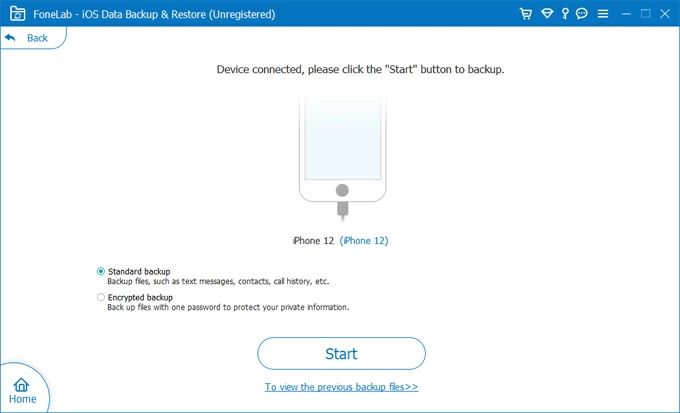
On the next page that pops up, choose Standard backup, which contains iMessages backup. Then click on the Start button at the bottom of the page.
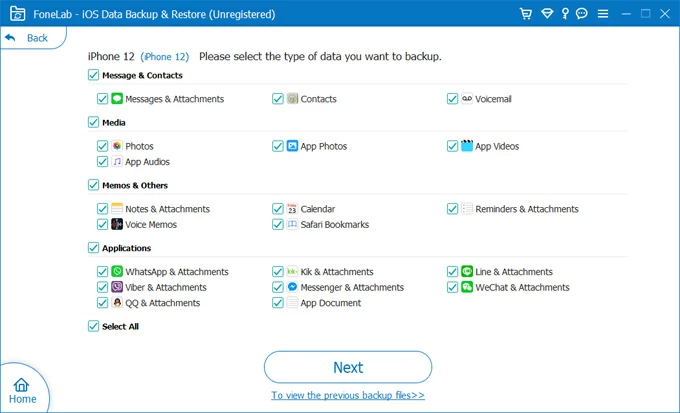
Step 3: Select the type of data that contains iMessages to backup.
Select the Messages & Attachments check box, so that you can back up all messages from iPhone, including the backup of iMessages and SMS. Once selected, click on Next to start backing up iMessage.
Wait for the backup process to finish, then open to view the local iMessage backup file.
Also: How to recover photos on iPhone without backup
Backing up iMessages with iTunes is beneficial for users who prefer having a local backup of their iMessages or who have limited iCloud storage space and want to make a full backup of iPhone. The backup includes SMS messages, iMessages, and even WhatsApp messages, providing comprehensive coverage for your conversations.
Note:
iTunes can be used for Windows and Mac computers running iOS 10.14 or earlier. For Mac users with macOS Catalina (iOS 10.15) or later, iTunes has been replaced by Finder for device management and backups. But the backup process in iTunes and Finder are likewise.
Here are the steps to backup iMessages with iTunes:
1. Launch iTunes, and then connect your iPhone to computer using a USB cable.
2. Locate and click on the Device icon from the left-side corner. It looks like a small iPhone.
3. In the next window, click the Summary tab > Select This Computer option under the Backups section > Click on Back Up Now. Wait for iTunes to complete the backup, and ensure that you keep your iPhone connected until the backup is finished.
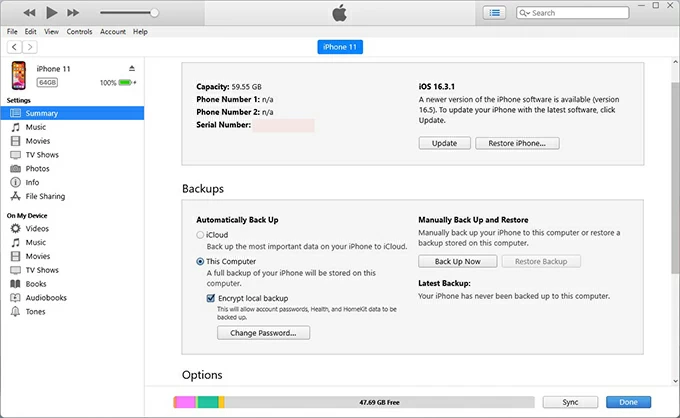
Once your iMessages are securely backed up, this iMessage backup will be stored on your computer for future restoration. And you can only read the iTunes backup for text messages when you perform a complete backup on a new phone or a device that has had its data erased.
Related: How to unlock iPad if it says 'iPad is disabled connect to iTunes'