How to back up iPhone notes

Accidentally lost data on your iPhone but have a backup stored on your iPad? Find out how to restore your iPhone from an iPad backup, using iCloud and iTunes.

Whether you acquire a new iPhone or encounter an unexpected issue with your existing one, restoring your iPhone from your iPad backup is a great solution to recover your valuable data, including photos, messages, contacts, music, and so on.

Restoring important data from an iPad backup can save you time and effort in setting up your new iPhone.
Thanks to Apple's ecosystem, you can easily restore an iPhone from an iPad backup using iCloud or iTunes. However, if your iCloud storage is full or your iTunes is not working, then you can try a third-party tool iOS Data Backup & Restore, which allows you to selectively back up data on your iPad / iPhone, and check them any time on your computer.
Table of Contents
Restoring your iPhone from your iPad backup using iCloud is a straightforward process that allows you to effortlessly transfer your data from one device to another. To do that, you need to first back up your iPad data on iCloud, then sync them to your iPhone.
Ensure a Stable Internet Connection
Before initiating the process, make sure your iPad is connected to a stable Wi-Fi network.
Enable iCloud Backup
Open the "Settings" app on your iPad and tap on your name at the top. From there, select "iCloud" and then "iCloud Backup." Next, tap on "Back Up Now."
Also read: How to back up photos to iCloud on iPhone
First of all, ensure that your iPhone is powered on and that you have enough storage space to accommodate the backup.
1. Erase All Content and Settings
To begin, go to the Settings app on your iPhone and navigate to "General" > "Reset" > "Erase All Content and Settings." This action will erase all the existing data on your iPhone, preparing it for the restoration.
If your iPhone is totally new, you can ignore this step, and jump to the next.
2. Set up Your iPhone
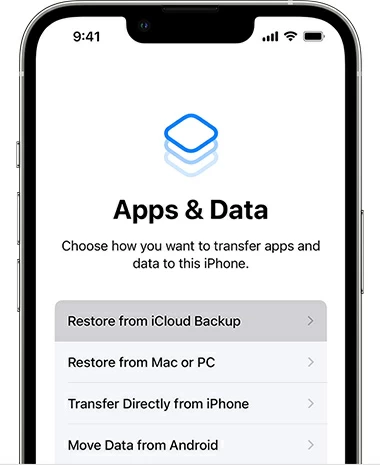
After erasing your iPhone, your iPhone will ask to set it up as a new device. Follow the on-screen instructions until you reach the "Apps & Data" screen.
3. Choose "Restore from iCloud Backup"
On the "Apps & Data" screen, select the option labeled "Restore from iCloud Backup." You will be prompted to sign in to your iCloud account.
4. Select the iPad Backup
Once signed in, you will see a list of available iCloud backups. Choose the backup associated with your iPad that contains the data you wish to restore onto your iPhone. Select the most recent backup or the one that best suits your needs.
5. Wait for the process finishes
After selecting the backup, the restoration process will begin. This may take some time, depending on the size of the backup and your Internet speed. Make sure your iPhone remains connected to Wi-Fi and has sufficient battery life during this time.
6. Complete the Setup
Once completed, your iPhone will reboot, and you will be guided through the remaining setup steps. After completing the setup, explore your iPhone to ensure that all your data, including photos, contacts, and messages, has been successfully restored from your iPad backup.
If you fail to restore iPhone from iPad with iCloud, you can use iTunes as an alternative method. Ensure that you have the latest version of iTunes installed on computer.
Learn more: How to back up text messages on iPhone without iCloud
This method only support for PC or Mac with macOS Mojave or earlier.
1. Using a USB cable, connect your iPad to the computer that has iTunes installed. Launch iTunes if it doesn't open automatically. You may need to unlock your iPad and tap "Trust This Computer" to move on.
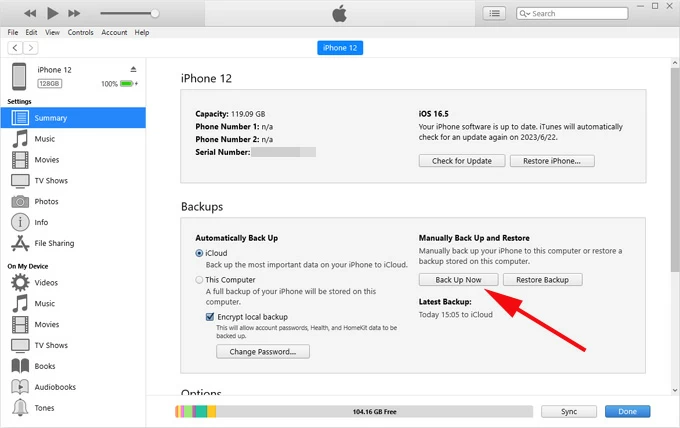
2. In iTunes, locate your iPad icon, which should appear in the upper-left corner of the iTunes window. Click on it to access the device's summary page.
3. On the summary page, under the "Backups" section, click on "Back Up Now" to start.
4. After the backup is complete and verified, you can safely disconnect your iPad from the computer by unplugging the USB cable.
After you finish backing up iPad data to iTunes, you need to connect your iPhone to the same computer, then follow the steps below to restore your iPhone.
With iCloud and iTunes, you typically have limited control over what data to include in the backup. By default, they sync and back up most of your device's data. If you only want to choose specific types of data to back up, then iOS Data Backup & Restore offers a more tailored solution.
It allows you to selectively back up certain data types, such as contacts, messages, photos, videos, or app data. Furthermore, this software provides flexibility in viewing data after the backup process. You can browse and restore the backup files locally on your computer with just a few clicks.
Key Features
Below are the steps on how to back up iOS device using the software.
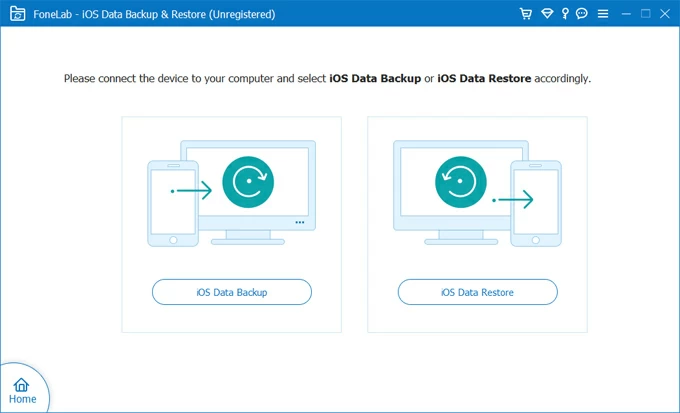
1. Install and launch the software on your computer, then plug your iPad/ iPhone to the computer. Unlock your device, tap on "Trust This Computer," and enter your screen passcode if asked.
2. Within the software, select "More Tools" in the lower left corner. Then choose "iOS Data Backup & Restore" from the right three tabs.

3. Select the left "iOS Data Backup" option, and click "Start" to move on.
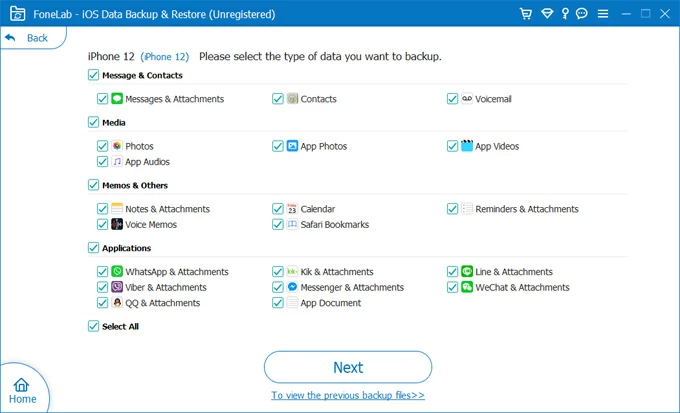
4. Next, you can select the data types you want to include in the iPhone/ iPad backup, such as photos, messages, contacts, and more. Choose the desired options based on your preferences. Then Click "Next" to start backing up your device data to your computer.
5. Once the backup process is finished, you can go back to the Backup & Restore interface, then choose iOS Data Restore to check or restore them to your computer.