
How to Sync Music from iTunes to iPhone

Whether you cannot record Skype audio with Audacity? Anxious to find guidance? Look no further! Here are some steps and tips that will help solve this issue quickly.


This article will teach you how to record Skype audio with Audacity by 4 steps.
As a communication platform that allows users to make voice and video calls, send instant messages, Skype allows users to start a conversation all the time. And Audacity is a convenient tool to edit and record Skype audio. Sometimes many users eager to record the Skype audio in Audacity for memory or editing but fail.
Whatever the reason, it's simple to solve it! In this article, we will show you how to record Skype audio with Audacity step by step and provide alternative to help you record Skype audio in a quicker way.
Stereo Mix is a feature that allows the computer's audio output to be used as an input source for recording. Enabling Stereo Mix lets Audacity record any audio playing on your computer, including the audio from the Skype call. If you do not enable Stereo Mix, Audacity cannot capture the voice from the Skype application.
To enable Stereo Mix, right-click the Speaker icon from the right corner of your computer and select sound. Then click on "recording" tab and right-click the "Stereo Mix" to enable it. Please note that Stereo Mix may be hidden. Just right-click on panel and select "Show Disabled Devices".
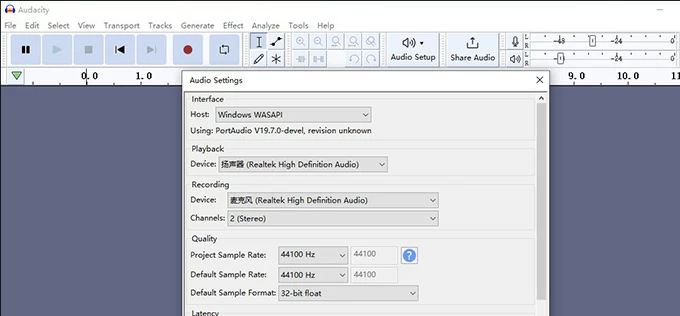
Without specifying an audio source, Audacity would default to recording audio from the primary input device, such as a microphone. So, select an audio source in Audacity to record internal audio from the Skype call itself. Open Audacity and go to "Audio Setup" > " Audio Settings" >"Host". Then choose "Windows WASAPI" from the drop down menu.
Open Skype and make a call or conversation. To record Skype audio, just click the red "Record" button on the main page of Audacity or press the hotkey R on the keyboard.
Once you are done recording, click on the square "Stop" icon in Audacity to end the recording. Then you can edit your recording in Audacity, add effects, or export it to a desired audio format (e.g., WAV, MP3) by going to "File" > "Export".

From the steps above, you must know that how to record Skype audio with Audacity. Although Audacity is good at editing audio and recording. But it has limitations for Skype audio recording.
1. No support for video recording
Audacity is designed for audio recording and editing. It does not have built-in features for capturing video along with audio. If you need to record both video and audio in Skype, you will need to use a screen recording software or other specialized video recording tools.
2. No recording more audio sources at one time
As an open-source platform, Audacity can only handle one audio input at a time. Consequently, capturing high-quality audio files from Skype conversations becomes challenging because Skype has users and other participants audio sources. Audacity is hard to effectively capture both sides of the conversation in Skype, resulting in inferior recording quality.
3. Stereo Mix is not available in Mac
The setting "Stereo Mix" is built-in sound source settings in Windows, which is not available on Mac. So, you can't use Audacity to record on mac with Stereo Mix. You have to install a virtual audio routing software to record computer audio on Mac with Audacity.
Knowing the limitations of Audacity recording, you must be wondering if there are other better ways to record Skype call audio. Don't worry, another way to record Skype audio is to use Appgeeker Screen Recorder, a specialized screen recording tool that let you efficiently record sound from a variety of sources, including the microphone and the sound coming from computer.

You can use it to record Skype call on Mac and Windows and edit the audio based on your needs without extra applications. Besides, it allows you to customize the quality of the audio as well as the output format.
The Benefits of Skype audio recording with Appgeeker Screen Recorder
Conclusion
More and more conversations and meetings we want to record nowadays, it is important to learn how to record Skype audio with Audacity. But if you are desired to a better Skype audio recording experience, Appgeeker Screen Recorder is your best choice!
1. Is there an app to record Skype calls?
Appgeeker Screen Recorder offers high-quality Skype call recording with customizable options, additional features, and easy sharing/exporting capabilities. Its flexibility and functionality make it a valuable tool for Skype audio recording.
2. How to record audio with Audacity?
If you want to record your own voice, just click the red Record button on the main page of Audacity to record. To record audio from your computer, you need to enable Stereo Mix, right-click the Speaker icon from the right corner of your computer and select sound. Then click on "recording" tab and right-click the "Stereo Mix" to enable it.
Then open Audacity, click "Audio Setup" > "Host" and select "Windows WASAPI" to record system sound. Then select your output device in Recording Device section and click the Record icon to start recording.
3. Is Audacity a real digital audio workstation?
Yes, Audacity provides a range of tools for basic audio editing and production. It is widely used by individuals, hobbyists, and even professionals in various audio-related fields.


