
How to Undelete Contacts on iPhone

Even if you've deleted your iMessages, restoration to your iPhone / iPad is feasible provided they were previously backed up to iCloud.

In the digital age, every conversation holds a piece of our lives—memories, plans, and laughter encapsulated in text bubbles. Losing these precious iMessages on your iPhone can be frustrating. But fear not! This comprehensive guide is your trusty compass, leading you through the seamless process of restoring iMessages from iCloud.
You can recover iMessages from iCloud if they are gone and aren't in your iPhone Recently Deleted folder.
Whether you've accidentally deleted some of your iMessages or found yourself setting up a new device, this guide will show you different ways on how to restore iMessages from iCloud and get back all your cherished conversations, photos and videos.
Additionally, using the dedicated tool like Appgeeker iPhone Data Recovery, you'll be able to recover deleted iMessages from iPhone even without a backup after a deep scan of the device storage. This can be a lifesaver when you fail to restore iMessage conversations from iCloud or any other place.
Now, let's take a closer look at these quick steps to restore iMessage from iCloud:
To recover deleted iMessages on iPhone, the standard procedure includes restoring from an iCloud backup. You'll need to back your iPhone up to iCloud before the iMessages are gone.
However, before you start, it's important to note that retrieve iMessages from iCloud will factory reset your iPhone/iPad and erase all your current data and settings. Consequently, your iPhone will be restored to a state when the backup was made — Apple Account and password are required during the setup process. So , be sure to back up your iPhone first.
Here's how to restore iMessages from iCloud backup without computer.
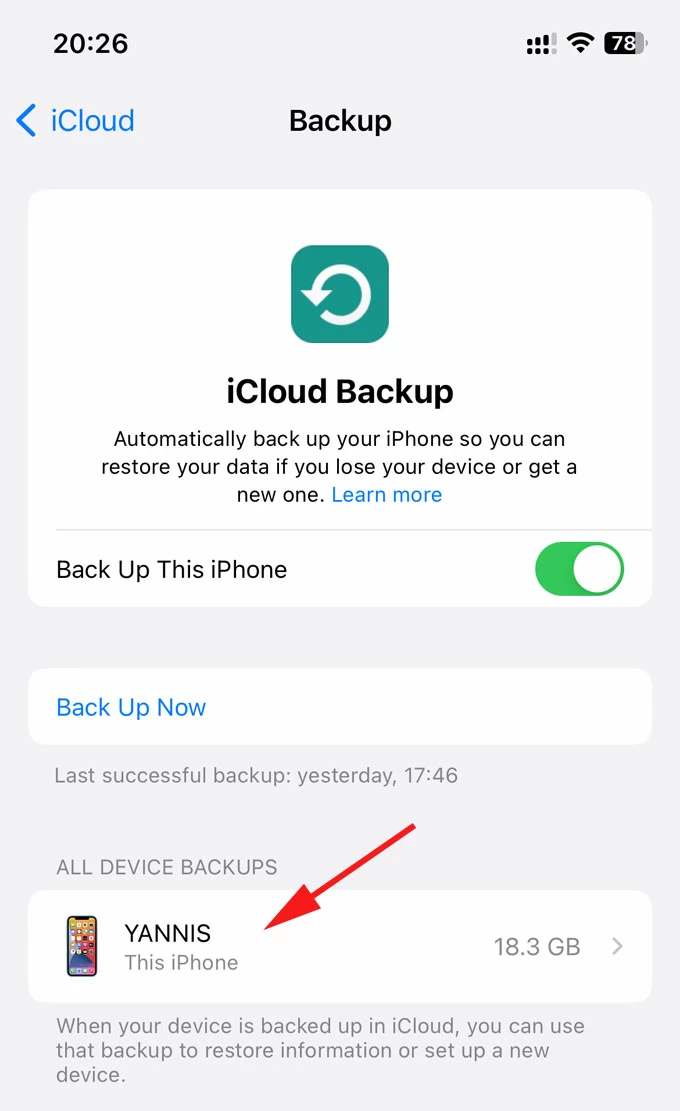
1. Check available iCloud backups
Ensure that there are recent iCloud backups existing on your iPhone; check it by going to Settings > [your Apple ID] > iCloud > Manage Storage > Backup. You'll see all iCloud backups here.
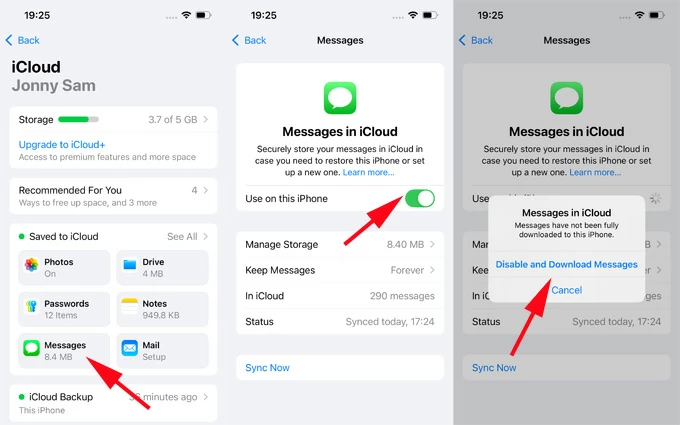
It's worth noting that if you have turned on Messages in iCloud (Settings > [your name] > iCloud > See All (or Show All) > Messages in iCloud, then Turn on Use on this iPhone (for iOS 17.1 and later) or Sync this iPhone), your iMessage conversations are not part of iCloud daily backup. Instead, iMessages automatically sync with iCloud and keep update across devices.
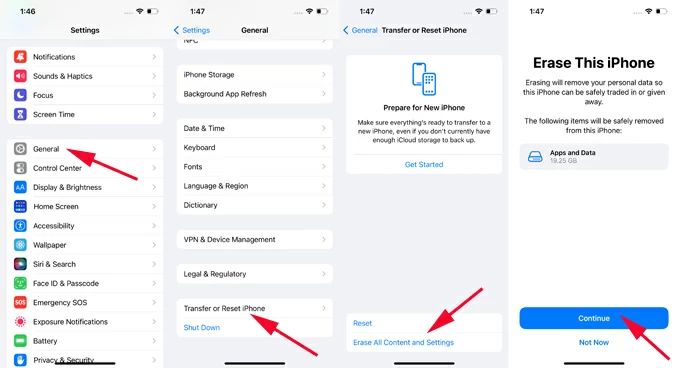
2. Erase and reset iPhone
Move to Settings > General > your name > Transfer or Reset iPhone > Erase All Content and Settings. Enter your Apple ID password and follow the prompts to reset your iPhone to factory defaults.
Also: How to fix a security lockout iPhone
3. Set up the iPhone
When the iPhone restarts with Hello screen, tap Set Up Without Another Device, then follow the onscreen setup prompts.
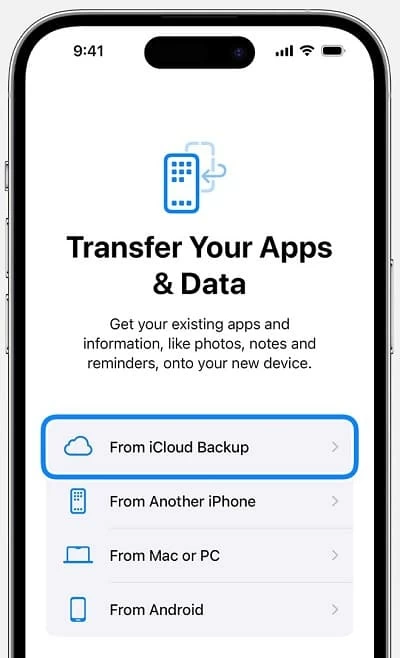
4. Select From iCloud Backup
When your iPhone reaches the Transfer Your Apps & Data screen, tap From iCloud Backup.
5. Sign in to iCloud with Apple Account
At this point, you will be asked enter to Apple ID and password. Make sure you sign in with the same iCloud credential used to back up your iPhone iMessages before.
6. Choose iCloud backup to restore iMessages
Select the most relevant iCloud backup that includes your iMessages, and wait for restoration to complete.
Once done, your iPhone will download all backed-up data from iCloud and automatically restore your iMessages along with other content.
Remember, restoring from an iCloud backup will replace the existing data on your iPhone with the content from the backup.
That's it! Your lost iMessages should appear on your Messages app now.
Also: How to transfer photos from laptop to iPhone
In the event that you enable Messages in iCloud, there's a slight chance that you can restore the deleted iMessages if the deletion hasn't been synced across other devices yet.
Note, if you use Messages in iCloud, recovering an iMessage conversation on your iPhone will recover it on all your devices sharing the same Apple ID soon.
Erasing your iPhone and restoring it from iCloud always restores your deleted iMessages if you have enabled iCloud Backup feature and choose to back up the iMessages to iCloud beforehand. What to do if you find no backup available to use? No worries, there is still a possible that you can recover deleted iMessages without backup.
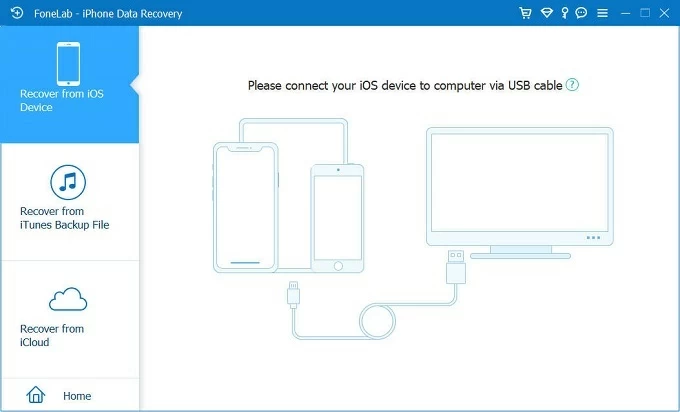
We're going to use a solution named Appgeeker iPhone Data Recovery, which allows you to recover messages from an iPhone without needing a backup, including iMessages, texts, SMS messages, attached photos, videos, and other files. It supports recovery of other types of data, such as photos, videos, contacts, call history, notes, and more.
To proceed, simply connect your iPhone to computer and start data scanning. It will automatically scan your device deeply and find all deleted messages, letting you preview your iMessage conversations before recovery. See how to
Here's how to recover deleted iMessages without backup, you may follow the same steps to recover your photos, videos, contacts, and more:
1. Install and open iPhone Data Recovery on your computer.
2. Choose Recover from iOS Device and connect your iPhone / iPad via a USB cable. If prompted, enter your device passcode and trust this computer.
Get further instance if you forgot passcode on iPad or iPhone.
3. Click Start Scan. Let the application dig in the internal storage deeply to search for all deleted and lost files on the device.
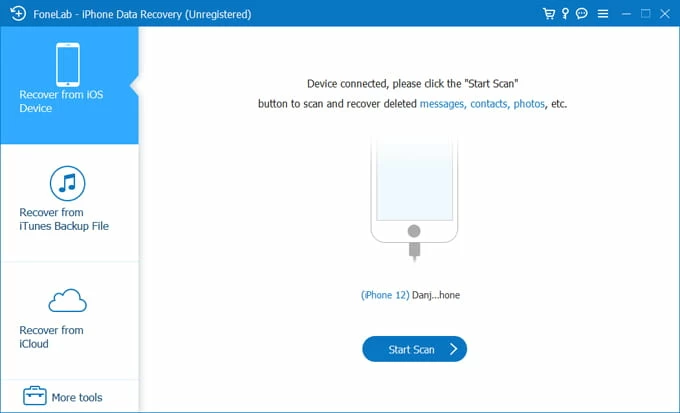
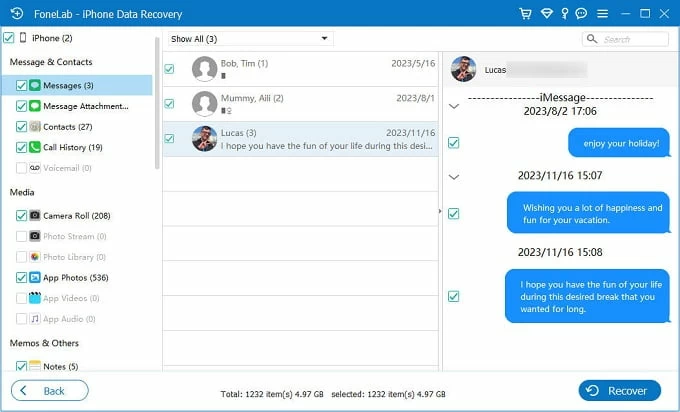
4. When the scan completes, select Messages option on the left side and preview the iMessages.
5. Choose the messages you want to retrieve and click the Recover button.
That's it! In addition to restoring messages from iPhone storage, you can also choose to recover iMessages from an iTunes backup if there are any previous backups stored on your computer.
These steps can also apply to recovering disappeared iPhone photos, contacts, call logs, phone numbers, notes, etc.
An iCloud backup enables you to restore your iMessages as well as other data files if you accidentally delete them from your iPhone or iPad. To prevent data loss, it's a good idea to back up your data to iCloud or iTunes regularly.
If there are no backups available in iCloud or your computer, try using the iPhone Data Recovery software in this guide for iMessage recovery.
Q1. Can I recover only iMessages from an iCloud backup?
No. When restoring iCloud backup to recover iMessages, it is an all-or-nothing process, requiring you to replace all current data with the backup files. You'll get back all backed-up iMessages from iCloud but lose everything added and changed after that backup.
Q2. How to recover deleted iMessages if I don't have an iCloud backup?
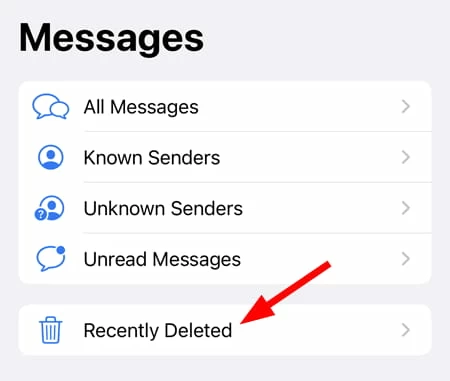
To recover iMessages deleted from an iPhone without iCloud backup, check the Recently Deleted folder in Messages app:
Note that this method can only recover the messages and conversations that you've deleted in the last 30 days. After that, the iMessages are permanently deleted from your iPhone. But you may use Appgeeker iPhone Data Recovery to scan your device memory for restoring iMessages without any backups.
Q3. Why didn't my iMessages restore from iCloud backup?
If you are unable to restoring iMessages from iCloud because there isn't backup available, it's likely that you turned on "Messages in iCloud," which syncs your messages across over all your devices rather than making a backup with iCloud. At a result, any iMessage threads you delete from iPhone are also deleted from your other Apple devices.
Q4. How can I back iMessages up to iCloud?
To back up your iMessages to iCloud rather than a synchronization, make sure do following:
Turn off Messages in iCloud:
Settings > [Your name] > iCloud, tap "See All" (or "Show All" in iOS 17.1 or earlier), then toggle "Use on this iPhone" OFF (or "Sync this iPhone" in older version).
Next, enabled iCloud Backup:
Settings > [Your name] > iCloud > iCloud Backup, then toggle "Back Up This iPhone" ON.
Q5. How can I recover old iMessages from iCloud?
You would erase all content and settings on your iPhone and then set it up until you see the Transfer Your Apps & Data, then you sign in your Apple ID and password to choose a recent iCloud backup that includes your old iMessages to restore.
If you can't find your old iMessages from iCloud, the only option left is resort to the third-party data recovery utilities, something like Appgeeker iPhone Data Recovery, which enables you to search for the device storage thoroughly for old deleted files.
Q6. How do I view my iCloud iMessages?
If you have turned on Messages in iCloud, you may see iMessages stored in iCloud through the Messages app on your iPhone, iPad, or Mac. Alternatively, sign in to iCloud website and find Messages menu to check all your conversations.


