How Do You Transfer Text Messages from Google Pixel to iPhone


Backup iPhone photos to get them onto a new phone? You may be interested in iTransfer and Phone Transfer.
Imaging having a way to back up photos from your iPhone that is easy to use, makes your photos available on all your Apple devices, iCloud.com or even a PC, keeps your photo library organized, preserves the precious photos before deleting them or in case something goes wrong with the device. That's iCloud Photos, formerly known as iCloud Photo Library.
In addition to the automatic sync capability for backing up the photos taken on iPhone camera, it also lets you seamlessly manage and organize your entire collection from any iOS device or Mac. It's free to use—though you're likely need to buy extra iCloud storage to store the photos in full resolution. I'll explain how iCloud Photos works exactly for getting images off iPhone. Once that's done, you could restore photos from your old phone to the new phone without using a computer.
Indeed, if you're passing on using iCloud Photos, we highly recommend applying a different cloud service like Google Photos, OneDrive or Dropbox to back up photos from the Camera Roll of iPhone, as well as using a local backup and storage utility to transfer the photos to a Mac or PC, lest you lose your treasured memories.
1. Set Up iCloud Photos
First, the obvious choice is to turn on iCloud Photos in Settings. Backing up and syncing photos on the iPhone grants you to access your collection from your iOS devices or computers where you're logged into your account. Whenever you edit (or delete) a photo in Photos app on one device, the photo will automatically update (or delete) across your other devices.
The photo-syncing process will happen when you're connected to Wi-Fi and charging. Before you can continue with the iPhone photos backup process, update your device to the latest version of iOS, and make sure you have enough space in iCloud.
If you want to do a manual backup of everything and transfer photos from iPhone to PC using iTunes, you need to turn off iCloud Photos to stop backing up photos to iCloud.
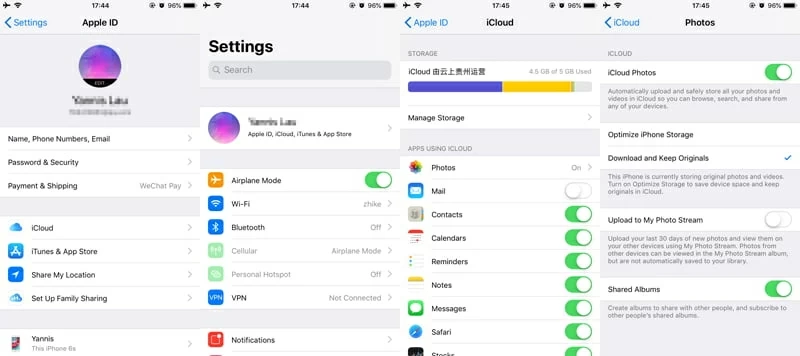
Your photo library uploaded to iCloud should give you the same view as it is in iPhone Photos app, with all photos organized into Years, Months, Days, and All Photos. You could then view the backed-up photos and download a copy of original images to save them locally.
[Useful Guide: How to Back Up iPhone 7 (Plus) without Using iCloud]
Don't just rely solely on iCloud for photos, and always back them up to a computer for archiving! Your iCloud back-up storage is almost full and you do not wish to purchase additional storage.
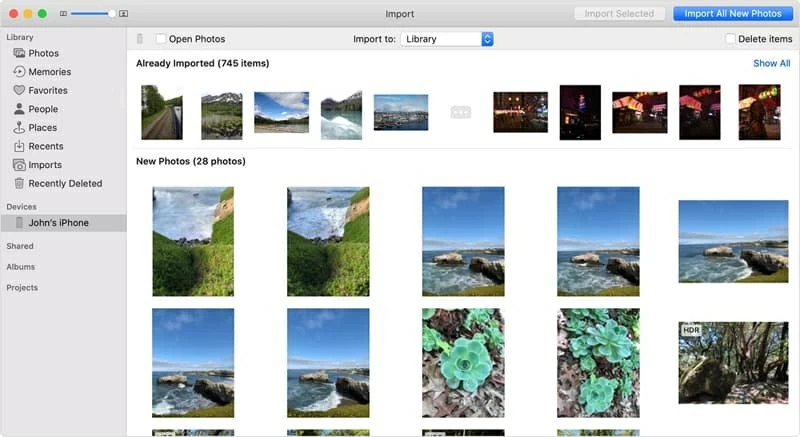
2. Import to a Mac
It's incredibly simple to transfer photos from iPhone to Mac machine, by using the Photos app. Connect your device, select which photos you'd like to import and you're good to go.
Now all photos from the Photos app on iPhone are transferring to the Photos application on Mac.
3. Import to a PC
If you use a Windows 10 computer and are ready to do the photos transfer from iPhone for archiving, try the built-in Photos app. It's free, and makes it easy to back up iPhone photos to the PC and store all your digital memories in one place locally. To get started:
This will create a directory on your computer, C:\Users\appge\Pictures, from which you can access your library and manage the pictures you've backed up. The Photos works with OneDrive, allowing you to sync and get photos from any of your devices.
If you're on Windows 8.1, see Import photos and videos in Windows 8.1. For those who is working on a Windows 7 PC, use Windows Explorer and your phone is recognized as a removable device.
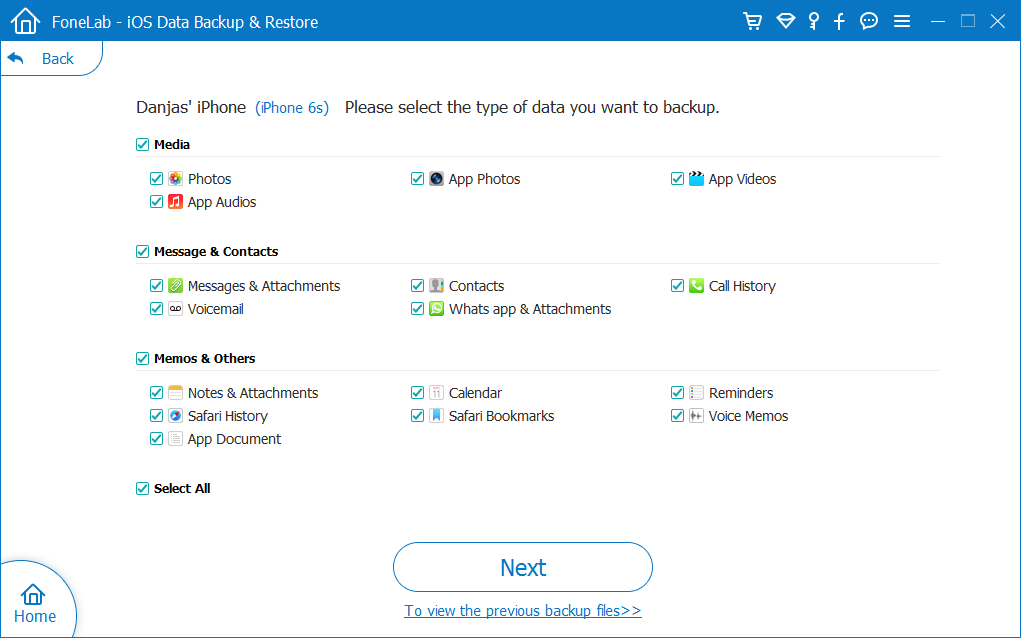
4. Transfer Photos to Computer from iPhone
This route can be used no matter you're on a Mac or a PC. The cross-platform iOS Data Backup & Restore is a solid traditional backup tool that makes backing up photos from an iPhone Photos to computer a breeze. It just involves scanning the all photos stored in Camera Roll on iPhone, and then backing them up in one click. The utility does a comprehensive job so you don't worry about some photos do not transfer from iPhone to MacBook. If you're security conscious, the 'Encrypted backup' is portable, which makes it an excellent backup and storage service to your photos.
Whether you're using MacOS or Windows, the instructions are exactly the same. When the backup is in place, you could download the images you've backed up to the computer.
That's it: You're done! With your photo library backed up to a folder on the computer, you could delete them all from your device to free space - so you can do updates or install new apps, and you don't need to buy a larger capacity iPhone.
However, if the photos you added to iPhone since after the backup, try to use these tricks and methods to recover deleted photos on iPhone memory.
5. Use a Cloud Service
Google Photos, Dropbox and Microsoft OneDrive are the fantastic backup and syncing services for backing up iPhone photos. The process is almost the same - download the app on your phone, create an account, sign in and find out the backup option Back up & sync in Google Photos, Camera Uploads in Dropbox and OneDrive, and you're ready to go. We now focus on saving photos from iPhone to Google Photos library by turning on the Back up & sync feature, then you could delete them on the device.
The photos upload to Google library will not count against the 15GB free storage if you accept a reduced resolution. Dropbox and OneDrive both can read the Camera Roll and upload your photos to their servers, but that will probably take forever, and the phone has to be on, unlocked, and the app open for the process to work. Read how to get an automatic copy of your pics: