Getting iPhone Out of Recovery Mode

Ready to back up your text messages on your iPhone? Here's what you need to know of how to backup iPhone messages, iMessages, WhatsApp, etc. easily and safely.

Nobody likes to hear the words "I told you so," especially when text messages were disappeared from iPhone. This is why it's important to backup iPhone messages, ensuring to prevent your texts, photos and other information within the conversations from being gone permanently in case your iPhone is lost, stolen, damaged or replaced.
The post is all about how to backup text messages on iPhone, and has gathered 4 feasible ways for iPhone message backup based on your situations. This is also works for backing up iMessages, WhatsApp messages, Messenger conversations, Line chats, etc.
Looking for an option to back up messages and view them freely? You may be interested in the clever tools - iOS Data Backup & Restore and iPhone Data Transfer.

You can use iTunes, iCloud or other data backup software to back iPhone messages up.
Table of Contents
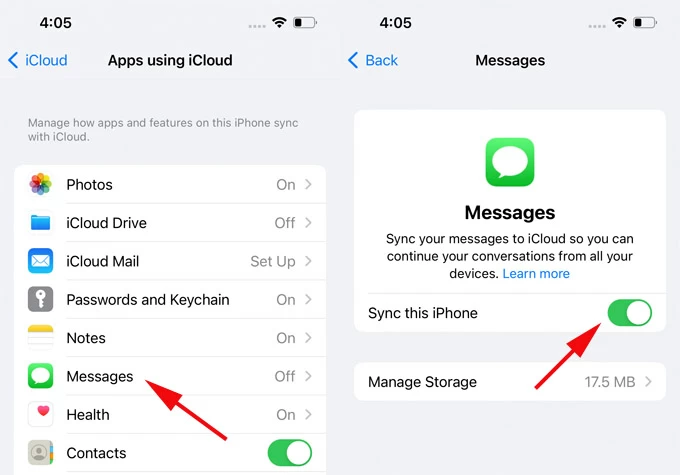
Use if: You have a Wi-Fi network to back up or sync your iPhone messages to iCloud.
With iOS 11.4 and higher iOS versions, Apple introduces an ultra-simple way of syncing iPhone messages with iCloud over Wi-Fi or 5G cellular-data network - which will always have your messages backed up, and keep the messages viewable and up-to-date across all Apple devices using the SAME Apple ID. For earlier versions of iOS, you'll need to take a full backup of iPhone including the text messages. This might be taking so long for an iCloud backup.
The catch is that you need to backup all messages, lacking the ability of backing up the messages on the iPhone that you want only. Indeed, no option is provided to use to view the messages backed up on iCloud until you restore the backup.
Depending on which iOS you have, the process of how to back up iPhone messages with iCloud is slightly different - but the very first step is to connect your iPhone to Wi-Fi network.
Create an iCloud backup on iPhone to back up messages and all other data.
The time to back up your entire iPhone to iCloud will depend on how much data you have on your device. Make sure to upgrade to iCloud+ if the free plan of 5GB storage space is not enough for the backup.
Use if: You just need to backup all your iPhone messages and view the backed-up message conversations on your computer with no limitations.
Chances are you really appreciate Apple's iTunes or iCloud to back up iPhone messages; However, it may become slouched when it comes to accessing and viewing the messages from the backup.
To help make backing up the message on your iPhone as smooth as possible, and to ensure that you can see and read the messages in the backup directly, try iOS Data Backup & Restore.
iOS Data Backup & Restore is simple to use, and here's what it does:
1. Backup iPhone messages only, unlike iTunes or iCloud backing up the whole device.
2. Gain full access to the iPhone text messages backup. No overwrite for multiple backups.
3. View your saved messages on computer without restoring your iPhone.
4. Export messages in CSV and HTML files.
5. Backup messages such as SMS, MMS, iMessages, WhatsApp, Line, Messenger, etc.
Simply download and install the program on your PC or Mac, and then follow the simple five-step guide to backup text messages on iPhone to PC or Mac computer.
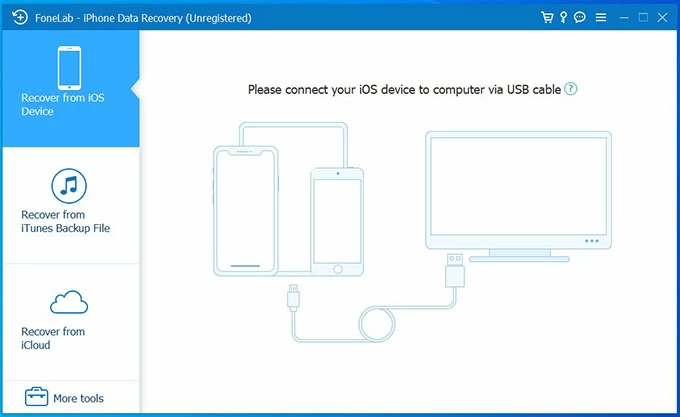
Step 1: Fire up iPhone data backup tool
Launch the software, and click on "More tools" option at the bottom of the interface.
Tip: The "Recover from iTunes Backup File" function allows you to retrieve only text messages on iPhone from iTunes backup (if you have one.) This won't restore your device.
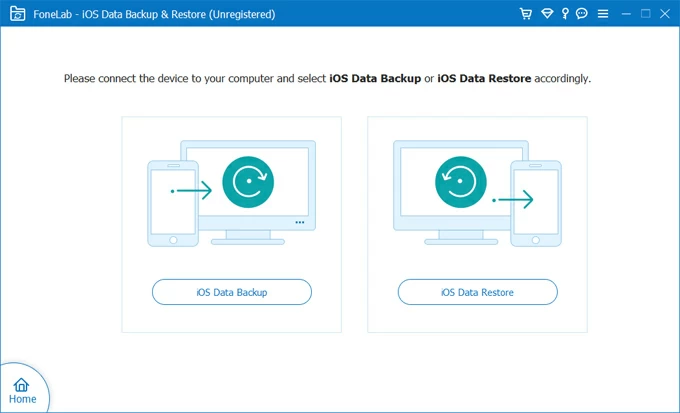
Step 2: Choose "iOS Data Backup" mode
Select "iOS Data Backup & Restore" tab for the purpose of backing up messages.

Then click on "iOS Data Backup" mode.
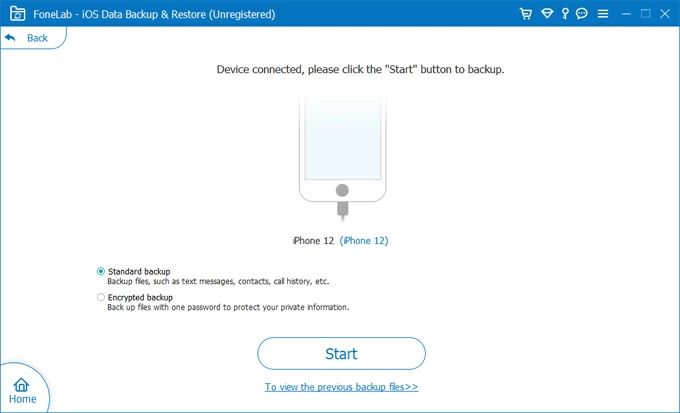
Step 3: Connect your iPhone to your computer via a USB cable
In this stage, plug your iPhone to your machine.
When the software detects your phone, choose your backup mode and click Start button to proceed.
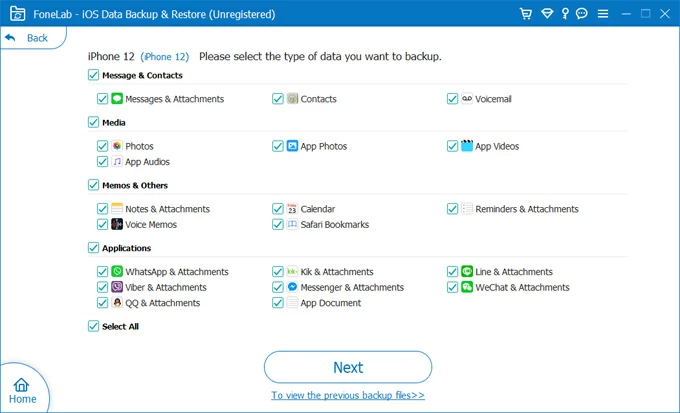
Step 4: Select "Text Messages" and start backing up iPhone messages to PC or Mac
Next, pick "Messages & Attachments" option so you can back up messages on the iPhone.
Hit the Next button. The application will start backing up your messages right away.
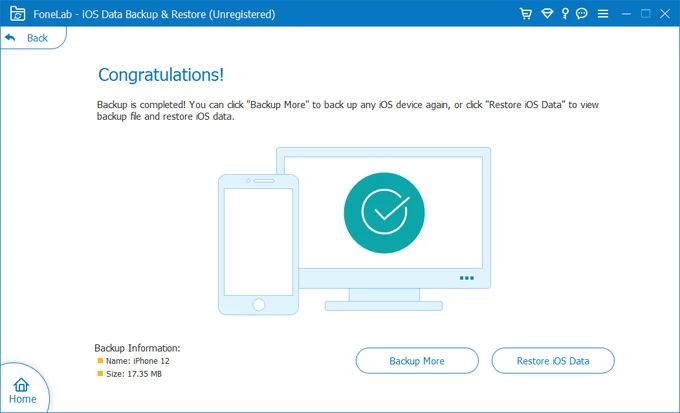
Step 5: Viewing the messages
When the backup has been made, you should get a Congratulations window, informing you that all your messages are backed up peacefully.
To view every message without restoring the backup to iPhone, click Restore iOS Data button.
Select the backup you just made and click View Now button.

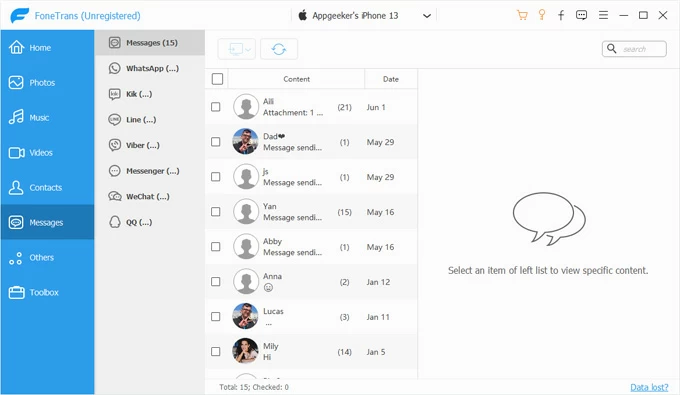
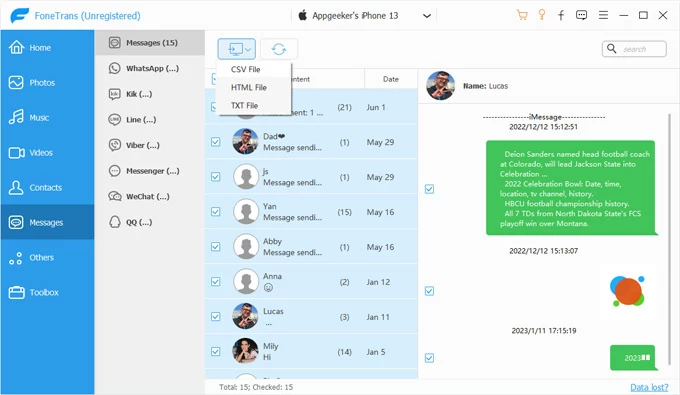
Click on "Messages" from the sidebar to access your back-up messages. You're able to export the desired messages on computer within a CSV file and HTML file by clicking Restore to PC button.

Use if: You need to manage, selectively backup, as well as access and view iPhone messages on computer in the formats of CSV, HTML, TXT.
iPhone Data Transfer also brings in exciting features that lets you to view and selectively backup your iPhone messages. This means that you're able to view each message on your iPhone before backing up, and then select which message backs up to computer and which does not.
Use these steps to get iPhone backup text message hassle-free:
1. Open iPhone Data Transfer utility and attach your iPhone with your computer.
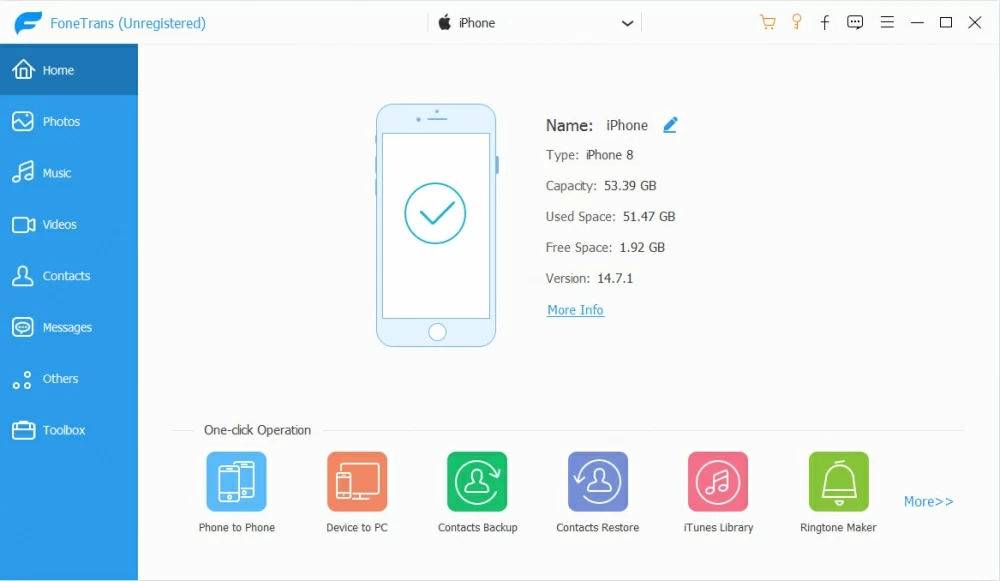
2. Choose "Messages" option from the left list to access iPhone messages.
3. Check the messages you want to backup.
4. Click Export to Computer icon from the toolbar at the top to backup your iPhone text messages. Choose a format to save your messages as CSV, HTML, or TXT.
Use if: You back up entire iPhone including messages and any other data on computer for a local backup. No option except a restore to access and view your messages in iTunes backup.
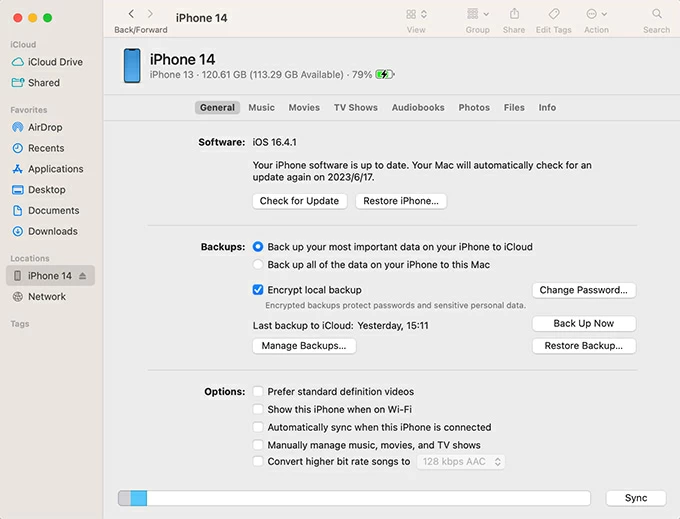
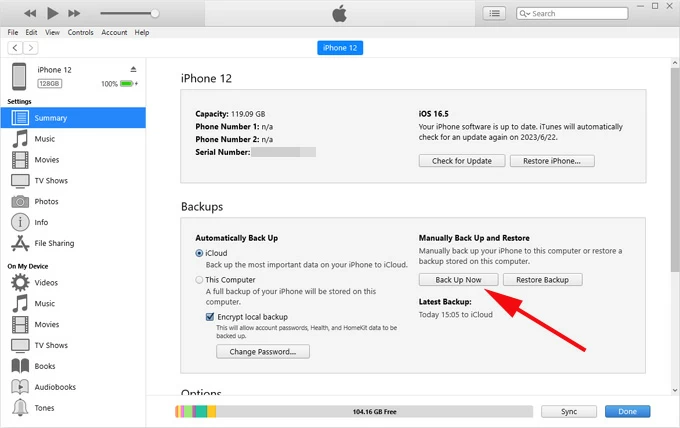
Backing up text messages on iPhone through iTunes or Finder requires you to backup the whole iPhone. To kick off the full backup, connect your iPhone to the computer. Then open iTunes, choose Summary from the sidebar on the left. Finally, hit Back Up Now.
1. Connect your iPhone to your computer using the USB cable.
2. Start up iTunes. Make sure it's running the latest version.
3. Click on the tiny device icon on the upper-left corner of the window.
4. Choose Summary from the left sidebar.
5. Click Back Up Now button. Remember that iTunes does not allow you to back up the messages or certain data you want.
The process is super easy, but there's something about iTunes you may dislike. Either before or after you back up messages on iPhone, you cannot read the messages - you have to restore your device using the backup.
Mac users who have macOS Catalina 10.15 or later need to use Finder to back up the whole phone with iPhone messages saved in.
1. Open Finder and plug your iPhone into your Mac computer.
2. Choose your iPhone from the left column.
3. Under General tab, click Back Up Now button to initiate a full iTunes backup on iPhone.