How to back up your iPhone with Windows 10 [3 proven ways]
Backing up your iPhone to a Windows PC can be tricky, but don't sweat; following the right steps will make it quick and easy.

Robin Swift Updated on Oct 9, 2025 4:14 PM
What to know
- To keep your iPhone backed up on the Windows 10 computer, you can use Apple's application: iTunes.
- As an alternative to iTunes, Appgeeker iPhone Data Transfer offers even more features to help you back up your iPhone with Windows 10 PC.
- You can turn on the iCloud Photos feature on your iPhone if you want to take backups of iPhone's photos on Windows 10 wirelessly.
Step-by-step instructions on how to back up your iPhone with Windows 10, using 3 different ways.
It is not uncommon to come across an event of phone data loss, which may be due to phone malfunction or improper operation. Therefore, regularly backing up your iPhone on the computer is important.
However, being an iPhone user who owning a Windows 10 PC, backing up your iPhone with your computer can be tricky because Windows 10 and iOS don't fully support each other. The good news is that you've landed at the right place. In this guide, we'll show you three simple but useful methods to back up your iPhone with Windows 10.
Use iTunes to back up iPhone to Windows 10
This is an official method. Apple offers a media player that allows you to back up your iPhone on Windows 10. Note that iTunes requires you to perform a full backup, which means that using iTunes, you can't choose what you want to backup, all the data from your phone will be backed up to your computer.
What Does an iTunes Backup Include?
An iTunes backup contains almost all of your iPhone's data, including, photos, messages, local files of apps, call logs, contacts, and phone settings.
Follow these steps to back iPhone up on your Windows 10:
First of all, you need to install iTunes from Microsoft on your PC. Once the downloading is complete, let it run.
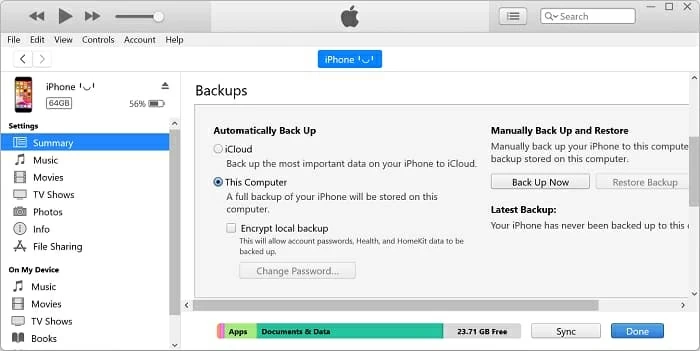
Now, connect your iPhone to computer through a USB cable. You may need to enter the passcode to unlock your iPhone and trust your computer. On the interface of iTunes, click on the phone icon. Then click on the "Summary" tab from the left sidebar. Under the "Automatically Back Up" section, click on the "This Computer" button.
To start the backup process, click "Back Up Now" under "Manually Back Up and Restore." How long it takes for iTunes to back up your iPhone data to your computer will depend upon various factors particularly include the amount of data to be backed up.
By default, iTunes will generate a folder on your computer to store the backed-up data. You can go to "User's name" > "AppData" > "Roaming" > "Apple Computer" > "MobileSync" > "BackUp" to find it.
Back up iPhone on Windows 10 via iPhone Data Transfer
As mentioned above, iTunes is not perfect. To bypass iTunes's limitations like the requirement of performing a full back up, you may be looking for an alternative to iTunes. With many powerful features and an easy-to-use interface, Appgeeker iPhone Data Transfer can be your best bet.
iPhone Data Transfer is an all-in-one application which transfers files from iPhone to Windows, iPhone to Mac and vice versa. Whether you want to prevent your iPhone from data loss or just access its data on your Windows 10, iPhone Data Transfer is worth a try. Download it by clicking on the green button below.
Here's how to back up your iPhone to Windows 10 via iPhone Data Transfer:
Step 1: Connect iPhone to PC
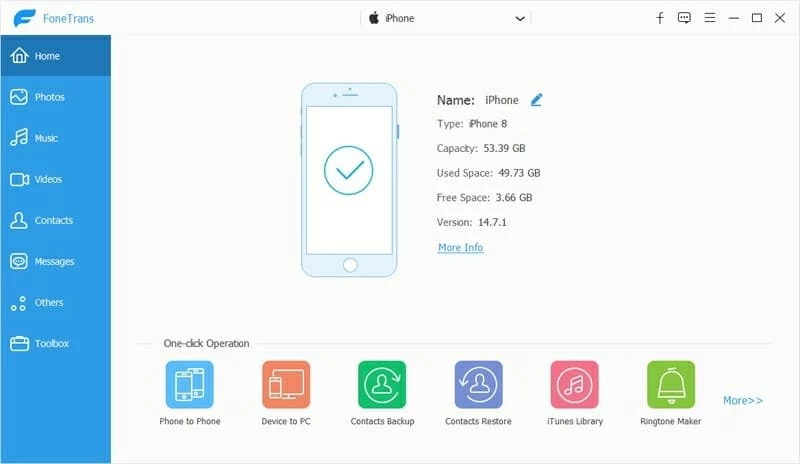
Use a USB cable to connect your iPhone to your PC and launch iPhone Data Transfer on your PC. Enter the passcode to confirm the connection if required. Once connected, iPhone Data Transfer will show you the details about your device.
Step 2: Select data you want to back up
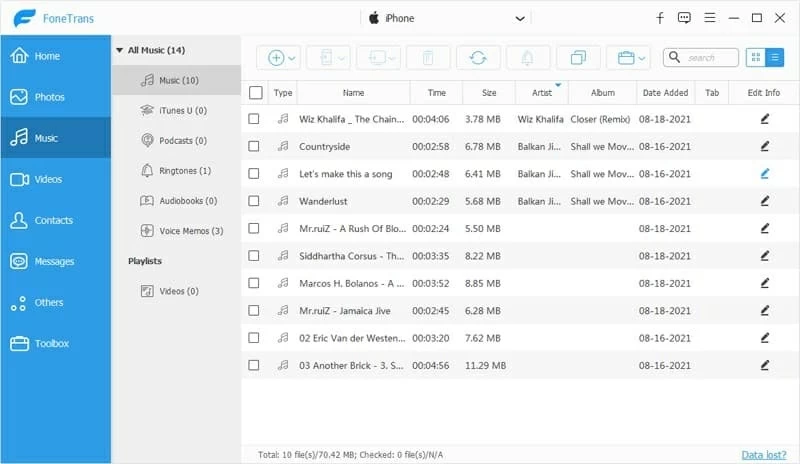
On the left sidebar of iPhone Data Transfer, you'll see the tabs like Photos, Music, Videos, Contacts, Messages, etc. When you click on a tab, iPhone Data Transfer lists down the relevant files from your iPhone.
In the screenshot below we use music as an example.
Step 3: Back up your data to the computer
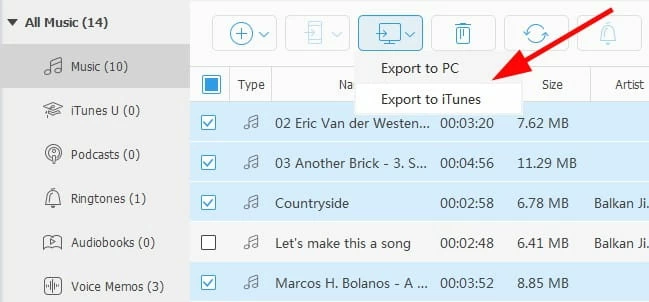
Once you've chosen the files you want to back up to your Windows 10, click the "Export" icon on the top to start the backup process. iPhone Data Transfer will ask for a folder destination, you can select a folder to save files or create a new one. On top of that, iPhone Data Transfer lets you change the format of files during data back up as well.
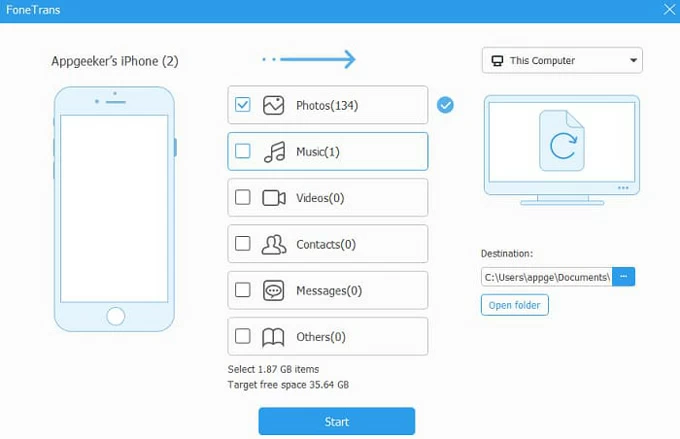
Shortcut to back up your iPhone with Windows 10
iPhone Data Transfer also provides an option for one-click data back up from your iPhone to the computer: after connecting your iPhone to your computer, click "Device to PC" at the bottom of the interface.
You should be taken to a new window, in which all your media data are selected by default. You can deselect the data that you don't want to back up. Select a location folder by clicking on the three dots in the "Destination" box. Then click the "Start" button.
It won't take you too long to back up all the selected files to your computer.
Back up your iPhone with iCloud
In case you're lacking a USB cable when it comes to taking backups of your iPhone on Windows 10, iCloud is a great way to go.
To let iCloud backs up your iPhone in its secure cloud servers, you'll need a stable internet connection.
Every iPhone user with an Apple ID only gets 5 GB of free storage. For those who have more than 5GB of data on their iPhone, you can upgrade to get more storage space, or you can pick other methods.
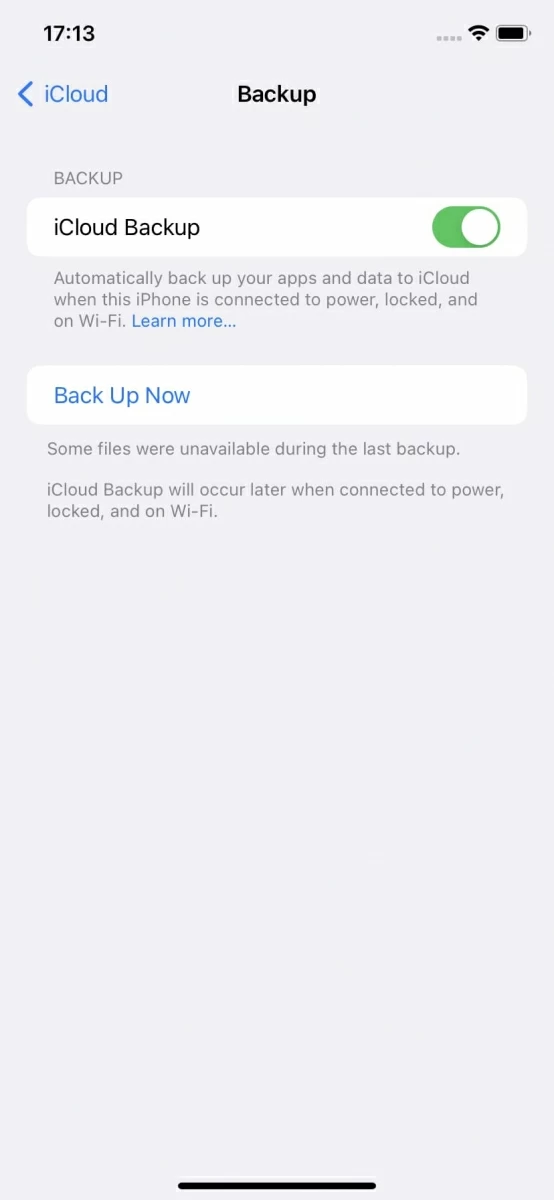
1. Open Settings app on your iPhone. Tap your name and then go to "iCloud" > "iCloud Backup."
2. Toggle the "iCloud Backup" option to on and tap "Back Up Now." Then iCloud will back up your iPhone to cloud.
3. Move to your computer, visit iCloud in your browser. Sign in with the same Apple ID as your iPhone. You can see various data on the main screen. To view the data, simply click on the name of the data type.
4. Of course, iCloud offers a feature to download photos on your computer: select the photos that you want to save n your computer and then click the "Download" icon that looks like a cloud with an arrow from the top of the site. After waiting for a while, you can check these photo files in the local folder on your Windows PC.
Summary
Regular data backups are important for data protection. But it can be difficult to back up an iPhone to a Windows computer since they're not quite compatible. No need to worry, in this post, we bring you three proven methods to back up your iPhone with Windows 10 PC. You can pick a wired or wireless method depending on your preference. With the backup on your computer, you can still transfer the files backed up on your computer to your iPhone when you lose your iPhone data unfortunately.