Move Photos from PC to iPhone without iTunes

It's easier than ever to export entire contact list from an iPhone, giving you great options to saving a copy of your contacts onto the computer. Here're the 4 best ways.

As an entirely closed ecosystem, Apple has always had ways of using iTunes to transfer iPhone contacts. But if you're worried about losing your contacts from your iPhone and want your contacts to go to PC, you might be searching how to export contacts from iPhone to computer and store them all together locally in one place.
Contacts are one of the most important data on your phone. Losing such a type of valuable data would be a nightmare if you don't have any back up. The good news is that you can easily export iPhone contacts to your computer. It doesn't matter whether you're using a PC or a Mac to which you export contacts on iPhone.

You can opt for transferring your iPhone contacts in bulk and individually onto a computer.
We have enlisted four of the most effective and workable ways to transfer contacts from your iPhone to your computer.
The first one uses the feature of iCloud Contacts Sync to share your contacts to the cloud storage which you can access from your computer to download a copy of the saved iPhone contacts.
The second method is to use a third-party Appgeeker iPhone Data Transfer Tool. With just a few clicks, you can export the contacts from your iPhone to CSV, or into Outlook, Gmail and other supported file types, and store them on your PC or Mac securely for future restore.
The third method involves the use of AirDrop to transfer files between iPhone and Mac, and it makes the whole process quite smooth and user-friendly. Last but not least, email can send contacts to yourself, allowing you to access them from your computer. Jump to:
iCloud is probably the first mind that comes to mind. iCloud is a cloud storage service that not only offers the option to sync iPhone contacts across all your devices, but it also keeps all synced data up-to-date. If your iPhone has a Wi-Fi network and have the iCloud Contacts turned on, you can access the existing info from your computer and export contacts from iPhone to your Mac or PC.
Transferring contacts from iPhone to computer becomes quire convenient with the 5 GB of free iCloud storage. It's just a two-step process. All you need is an active internet connection and a device to log into your account. See how to transfer contacts from iPhone to computer via iCloud:
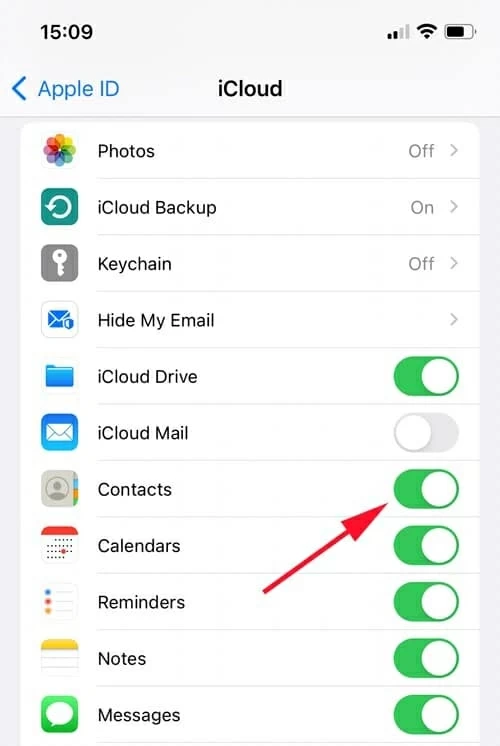
To use iCloud for iPhone contact transfer, you need to enable the Contacts entry from your iCloud settings on the device:
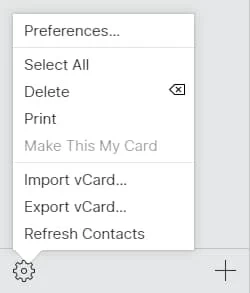
When Contacts is enabled for it to sync with iCloud, it's now time to save contacts to your computer through icloud.com.
The selected contacts will be downloaded and saved to your computer as .vcf file, allowing you to open it for later viewing. That's all set. Contacts on your iPhone are synced to your computer now. There are also tips for photo transfer from iPhone to iPhone without iCloud if your storage is full.
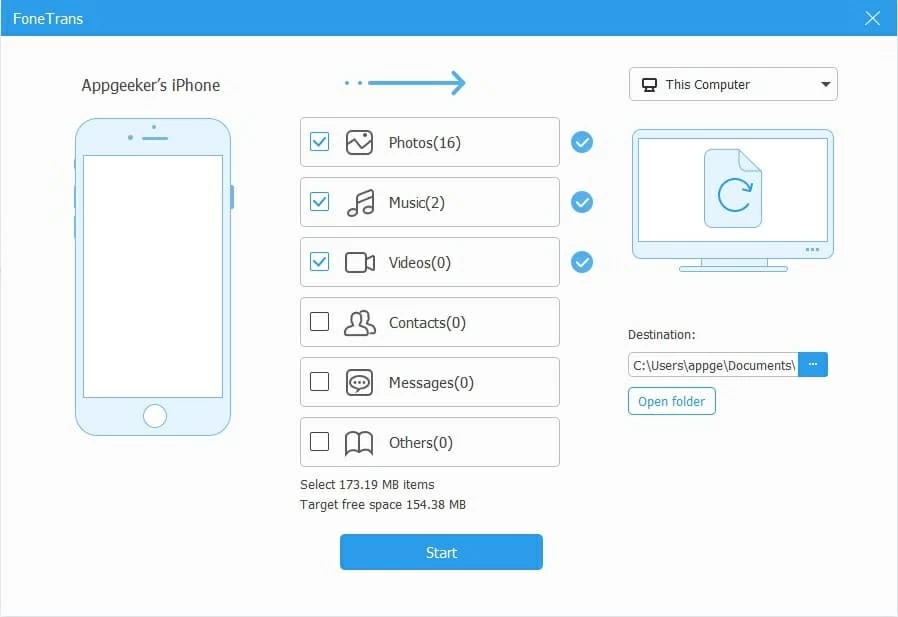
When your free 5 GB iCloud storage is full, the new contacts you add on your iPhone won't be synced automatically. To bypass this storage limitation, employing a third-party iOS data transfer tool would be a better option. Appgeeker iPhone Data Transfer is an all-purpose application that helps you transfer your data like music, photos, videos, messages, notes and more from your iPhone to computer and vice versa, without losing data - which happens while syncing with iTunes.
Salient Features of iPhone Data Transfer
This iPhone Contact Transfer Tool not only transfers iPhone contacts and other files to PC or Mac, but also provides a great flexibility in managing all iPhone data in one place with your computer.
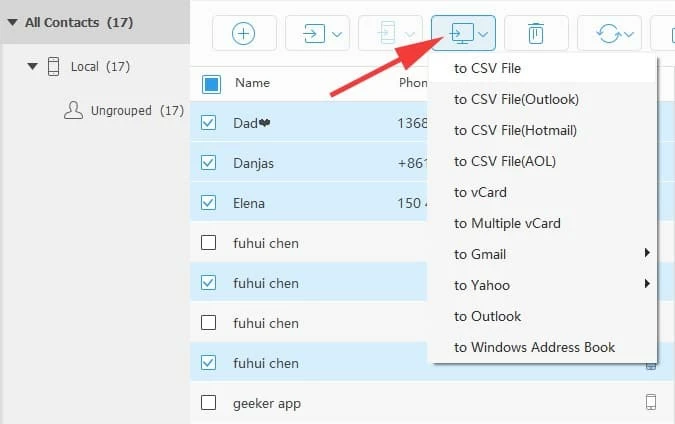
The software will eventually export the iPhone contacts and give you options to save the contacts along with all info as CSV, vCard contact file to a local folder on your PC or Mac, or directly to Windows Address Book, Outlook, Gmail, and Yahoo.
Here's the step-by-step guide on how to export contacts from iPhone to PC / Mac:
1. To begin, you'll need to download iPhone Data Transfer and install it.
2. Open it, and connect your iPhone to your computer.
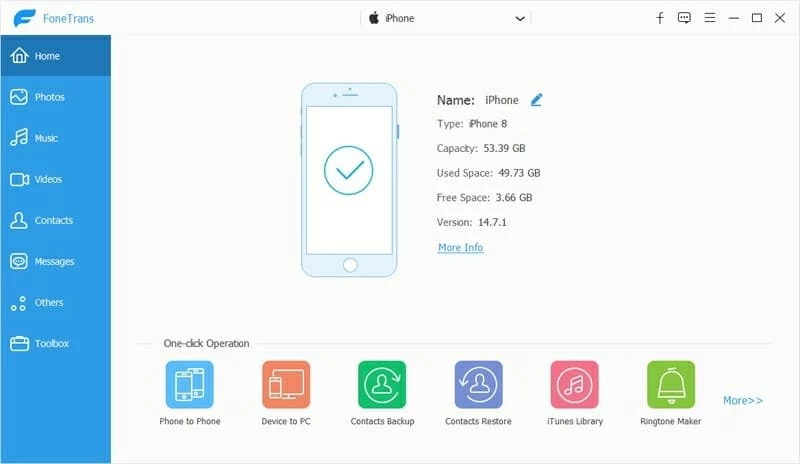
3. Click on the Contacts tab from the left side of the window. Wait for a while to let the contacts load and you'll see all items displaying on the screen.
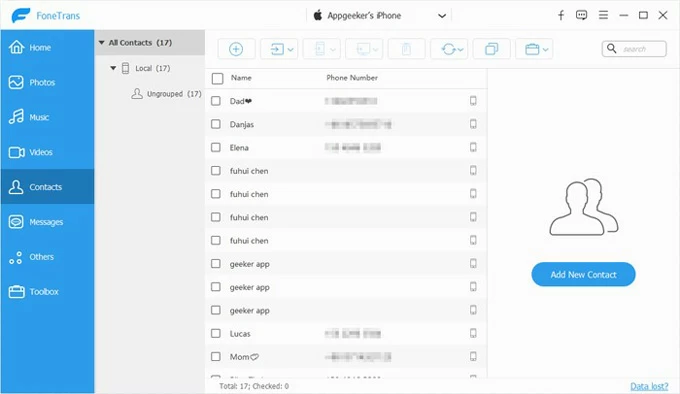
4. View your iPhone contacts and check each contact you want to transfer to the computer.
5. Then hit Export to PC icon from the toolbar, and choose to CSV File or any other option you desire. You have the option to transfer contacts into Outlook, Gmail, and Yahoo directly.
Congrats, the contacts are exported from your iPhone to your computer successfully now.
In addition to exporting the contacts individually, you can also transfer your iPhone contacts all at once with a one-click solution. This straightforward process also enables you to perform video transfer from iPhone to computer as well as other media data such as photos and music.
AirDrop is an awesome way to wirelessly share your media files, documents, contacts, or other data types between Apple devices. AirDrop is an excellent choice for transferring a single contact from iPhone to Mac. However, it may not be the best choice if you want to share a bunch of contacts.
To make use of AirDrop to sync iPhone contacts to Mac, you'll need to turn it on:
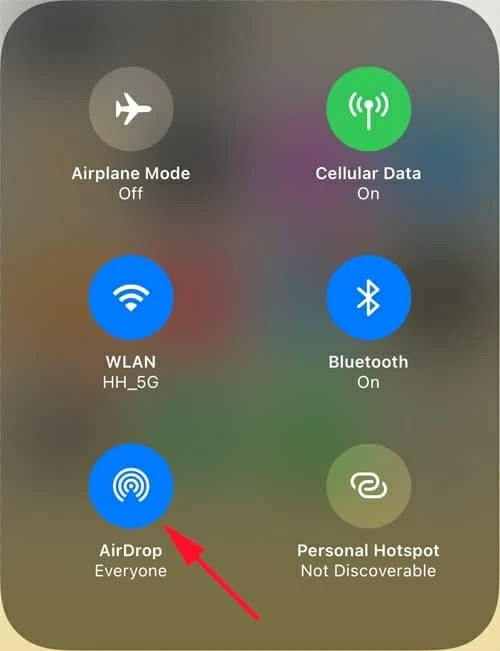
1. From the Control Center, long press the Wi-Fi option to open another window.
2. You'll be able to see the AirDrop icon, tap it.
3. Select your preference whether you want to set it on Contacts Only or Everyone.
4. It's recommended to set it on Everyone to conveniently share your contacts on PC.
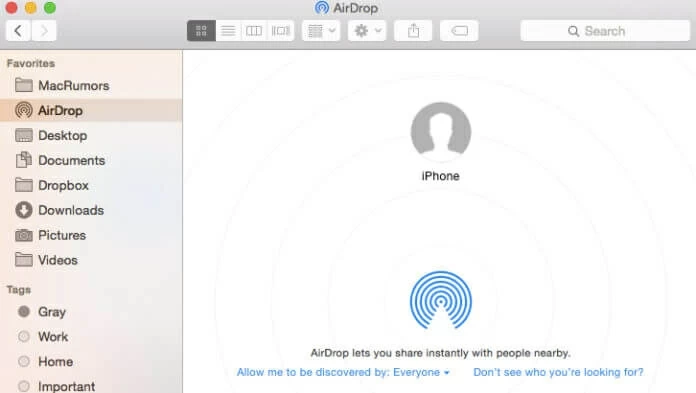
This method only works with Mac since the AirDrop feature is exclusively available on the iDevices. Now, you need to turn on the AirDrop option from your Mac.
1. On your Mac, open Finder and click Go.
2. Tap on AirDrop and you'll be able to see the "Allow me to be discovered by" link at the bottom of the window.
3. Choose your preference, but it's recommended to set it on Everyone to make the process smooth. You can also set it to Contacts Only if you want to keep others from sharing anything to your Mac.
Once AirDrop feature is toggled-on on both the devices, it's quite easy to import contacts to your Mac from your iPhone. Before that, make sure both the devices are connected to the same Wi-Fi connection and close to each other:
Once everything is set, here's how to export contacts from iPhone to Mac using AirDrop.
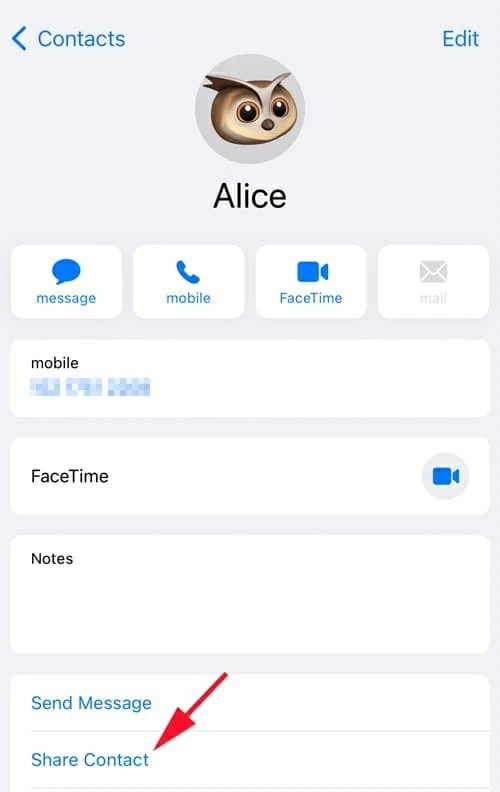
1. From your iPhone, open the Contacts app, and select contacts you want to export.
2. Tap on Share Contact and select the AirDrop option from the pop-up window.
3. You'll get a notification on the Mac about the progress.

Another way to transfer your contacts from iPhone to your computer is by using Email.
All above-mentioned methods are able to export iPhone contacts in bulk or individually. If you only want to copy one or a few contacts, well, email can be an easier way to share contacts with your computer. Do the following and you'll know how to transfer contacts on iPhone quickly:
It's also a great approach for contact transfer from iPhone to iPad when your iCloud storage is used up.
With the four methods in Part 1, it's not challenging to transfer iPhone contacts to computer. Chances are you might want to import contacts to your iPhone from your computer. This will need:
The following steps will help you sync contacts to your iPhone from a computer:
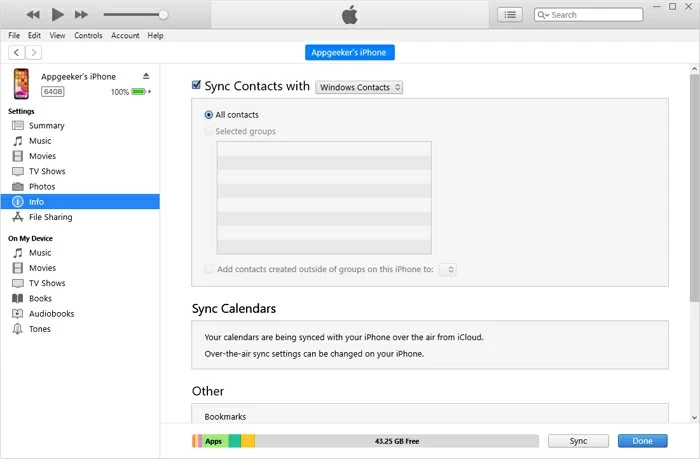
1. Start iTunes, and plug your iPhone into computer.
2. When it's successfully connected, you'll see a tiny Device icon on the top left corner of iTunes window, click on it.
3. Click Info from the sidebar on the left, then check Sync Contact with to enable syncing for contacts.
4. Hit Apply (or Sync). The contacts will be synced to your iPhone afterwards.