How to Sync Playlist from iTunes to iPhone

This guide explores 5 easiest ways to transfer photos from an iPhone to a Windows PC, either using a cable or cloud-based services.

Transferring photos from iPhone to PC is a common task that many of us do regularly, whether it's to free up space on your device, create a backup, or simple transfer pictures for editing and sharing. While Apple's ecosystem offers cloud-based solutions like iCloud, there are also many other ways to transfer photos from iPhone to PC quickly and easily.
There are several simple ways to help you transfer your photos from iPhone to PC quickly.
The photo transfer from iPhone to PC usually involves two common methods: using a cable connection or cloud services. In this guide, we'll cover all the ways on how to transfer photos from iPhone to computer on a Windows PC, whether using a cable or wirelessly.
If you have iTunes installed, you can easily import photos from iPhone using the built-in Windows Photos app. Alternatively, you can manually copy photos from iPhone to PC via File Explorer. For a wireless option, iCloud and Google Photos lets you download iPhone photos to PC without a cable. Each method is simple and effective, so you can choose the one that works best for you.
Table of contents:
The all-in-one Appgeeker iPhone Data Transfer enables you to transfer photos selectively or in bulk from your iPhone to a Windows PC and vice versa, all with just a few clicks.
Photos and videos captured with iPhone camera are typically saved in HEIF/HEVC format. To ensure the photos from your iPhone have the best compatibility with your Windows computer, try changing the iOS picture format to common JPEG before you transfer iPhone photos to PC:
Your iPhone will now save photos and videos in the more compatible JPEG and H.264 formats. Alternatively, you can use third-party tools like iPhone Data Transfer, which features a built-in HEIC converter to ensure smooth photo transfer from iPhone to PC without quality loss.
When you connect your iPhone to your Windows PC via a USB cable, your PC recognizes the iPhone as an external device containing photos and videos. This allows you to directly transfer your iPhone photos to Windows 11 or Windows 10 PC with ease.
The Photos app on Windows 11/110/8 provides the easiest way for transferring photos from iPhone to PC by using a cable connection. When the iOS device is connected, the Windows Photos app lets you preview the pictures and select which iPhone photos to import to your PC.
To make iPhone photo transfer to PC, ensure you have the latest version of iTunes installed so that your computer can recognizes your iOS device successfully. When you're ready, follow these steps to transfer photos from iPhone to Windows PC using Photos app:
Step 1. Connect your iPhone to PC with a suitable USB cable.
Step 2. If asked, follow the onscreen instructions to unlock your iPhone and tap Trust to proceed.
This allows your iPhone to be recognized and the photos to be accessible. See what to do if you forgot your phone passcode.
Step 3. Click the Windows Start button on your PC desktop and select the Photos app to open it.
Step 4. From the top-right corner of the Photos app, select Import and choose From a connected device (or From a USB device).
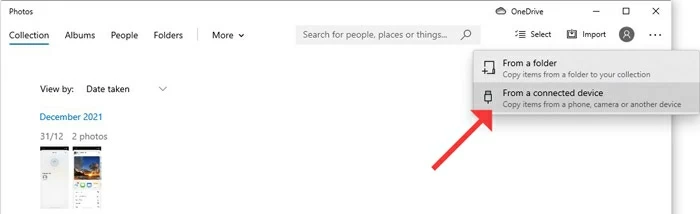
It may a while for Windows Photos to detect and load all pictures and videos on your iPhone.
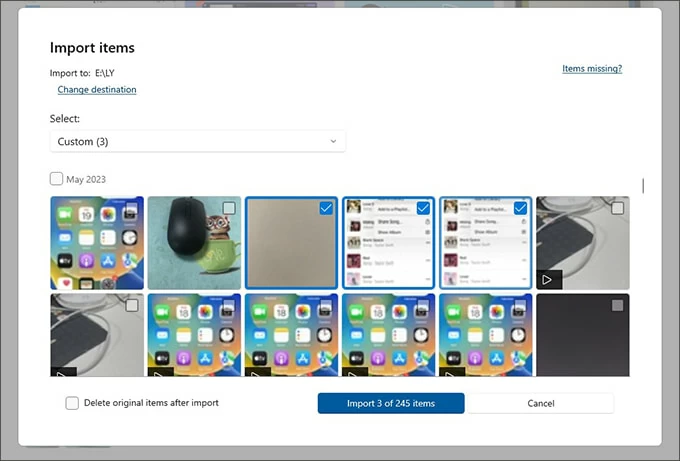
Step 5. Preview and select which iPhone photos you want to import to your PC. You may simply check Select All to choose all pictures and videos for transfer.
Step 6. Hit Change destination and specify a local computer folder where you want to save the imported iPhone photos.
Step 7. Hit the Import button to transfer photos from your iPhone to your PC immediately.
Connect iPhone and import photos to Windows PC using the Photos app.
Do not unplug your device until all chosen iPhone photos get to your PC. If you'd like to free up your iPhone storage, check Delete original items after import option to remove all transferred photos.
Another easiest way to transfer pictures from iPhone to PC is using the File Explorer, a cable-based option enabling you to manually copy photos from iPhone's DCIM storage to a local computer folder on Windows PC.
Additionally, this copy-n-paste option also allows you to review, organize, and group items to import certain photos and videos from your iPhone to PC's Pictures folder. Here's how to import photos from iPhone to PC via a cable by using File Explorer:
Step 1. Connect your iPhone to PC with a USB cable. When prompted, enter your iPhone passcode and allow Trust this computer to grant access to iPhone photos from PC.
Step 2. Open a File Explorer window on PC desktop. Open a random folder and navigate to This PC on the left side.
Step 3. Locate and select your iPhone under Devices and Drives. If your iPhone isn't showing up in File Explorer, try re-connecting your iPhone and allow for photo access.

Step 4. Navigate to iPhone DCIM folder through Apple iPhone > Internal Storage > DCIM. It will display multiple subfolders, organized in chronology.
Step 5. Choose which iPhone photos to transfer and right-click on them to select Copy. You can press Ctrl + A on your keyboard to select all.

Step 6. Paste the copied iPhone photos to a desired location on your PC. Or, you may create a new picture folder on desktop to save all transferred photos.
Alternatively, you may right-click the Apple iPhone in the File Explorer, and then opt for Import pictures and videos and choose Import all new items now to transfer all new photos from your iPhone to PC.
The Windows Photos and File Explorer can only move photos from iPhone to PC. If you're looking to transfer photos from PC to iPhone as well, check out the next cross-platform option for seamless iPhone photo transfer.
Whether you're transferring photos from iPhone to PC, or vice versa, Appgeeker iPhone Data Transfer offers a seamless solution, enabling you to transfer all or a selection of your iPhone photos without losing quality in simple clicks.
This easy-to-use tool allows you to preview and manage all your pictures and videos in one place, making it simple to transfer thousands of iPhone photos to a PC or Mac. In addition to photos, it also supports the transfer of videos, music, contacts, and other files directly between your iOS devices and computer, quickly and efficiently.
Moreover, this iPhone photo transfer tool features a built-in HEIC Converter, letting you convert iPhone photos into more common formats like JPEG, enhancing compatibility for various apps.
Here are the steps on how to transfer photos from iPhone to PC on Windows 11/10/8, supporting all iOS and iPadOS devices, including the latest models:
Step 1. Install and open iPhone Data Transfer on your Windows PC.
Step 2. Use a USB cable to connect your iPhone with computer. If needed, allow your device to trust this computer by entering your passcode.

Step 3. Move to the Photos tab on the left sidebar. It will automatically load all current pictures and videos in your iPhone's Photos Library, including Camera Roll, albums, and more.

Step 4. Select the photos you prefer to transfer from iPhone to PC. You can select certain photos or the entire album; to move all pictures, simply pick Check All at the top.
Step 5. Click on Export to PC button at the top toolbar and select a local folder on your PC. This way, the iPhone photos will get to your computer in full quality without data loss.

Make sure not to disconnect your iPhone until the photo transfer completes. By following these steps, you'll be able to transfer photos from iPhone to PC without iTunes easily.
Besides the cable-based options above, there are also cloud-based solutions available that allow you to upload photos from iPhone and download them to your Windows PC wirelessly. Whether to import iPhone photos to a Windows 11 PC, a Windows 10 computer or laptop, these cloud services can be helpful:
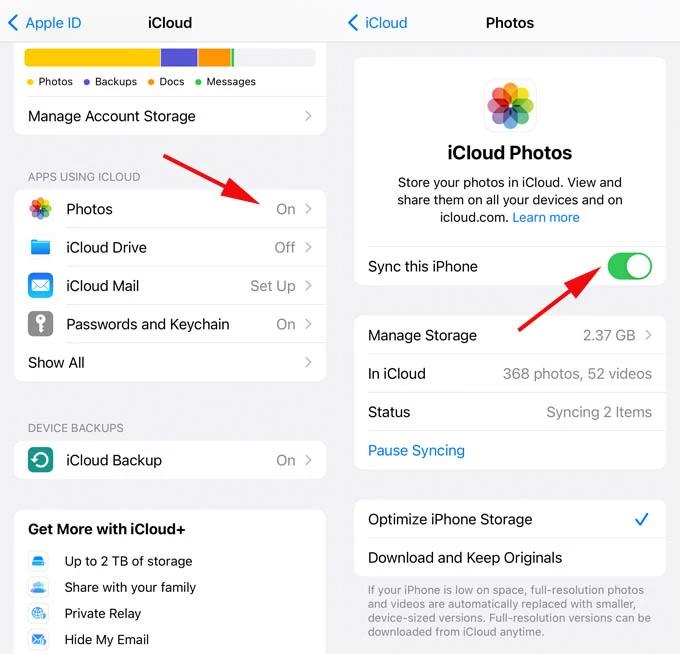
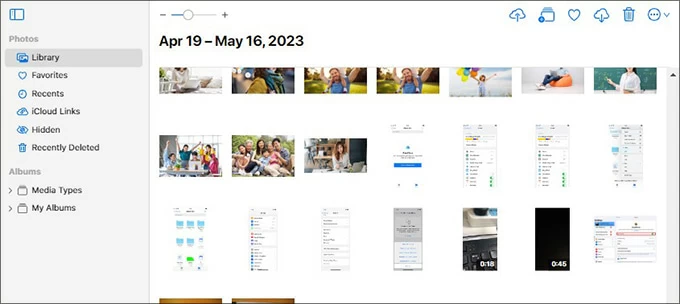
Providing 5 GB of free cloud storage, iCloud is probably the most convenient way to sync iPhone photos across devices and keep them up to date. With an active internet connection, you're allowed to upload photos from iPhone to iCloud storage and then download the pictures to your Windows PC for local use.
For iPhone-to-PC photo transfer, keep your device connected to a Wi-Fi or cellular network, and explore how to download photos from iPhone to PC wirelessly using iCloud:
Step 1. Upload photos from iPhone to iCloud.
It may take a while to sync and upload all your iPhone photos and videos to iCloud Photos Library.
Step 2. Download iPhone photos to Windows PC from iCloud.

The photos will be downloaded to your PC. Conversely, you may transfer photos from your laptop to your iPhone or iPad by using the Upload feature within the iCloud Photo Library window.
Tip: Ensure there's enough iCloud storage for your iPhone photos, or the pictures will be inaccessible. You may upgrade to iCloud + for extra cloud storage space.
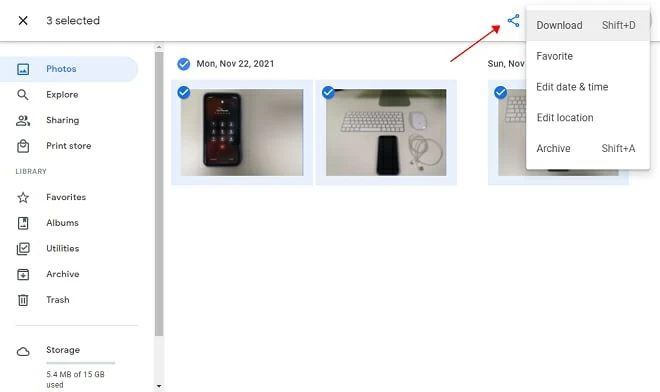
With more cloud storage space, starting with 15 GB, Google Drive offers alternative cloud services to upload photos from iPhone to PC wirelessly. Similarly, the process requires your Google account and all relies on an active internet connection. Before manually importing iPhone photos to your PC, install Google Drive on your device. These steps will guide you how to transfer photos from iPhone to computer without cable or iCloud:

Storing and updating photos with cloud services like Google Drive or iCloud Photos lets you get to your iPhone photos anytime, even if your device is lost.
In general, cross-platform photo transfer from iOS to Windows PC can be easily achieved either using a USB cable or wireless cloud services. If you encounter difficulties in moving iPhone photos to your PC, several potential reasons could be at play:
If you still cannot get photos from your iPhone to PC, try using the iPhone Data Transfer software above to move your photos across iOS and Windows platforms seamlessly.
Q1 - What is the easiest way to transfer photos from iPhone to computer for Windows?
This guide has outlined several ways to move photos from an iPhone to a Windows PC. Each way is straightforward and easy. You can import your iPhone photos to PC by using Photos app, File Explorer, and iPhone Data Transfer. Also, using iCloud or Google Drive helps you upload photos from iPhone to PC wirelessly.
Q2 - Why aren't my iPhone photos showing up on PC?
If you're using a USB cable connection to transfer your iPhone pictures, make sure to unlock your iPhone and grant the permission to trust your computer, and ensure that the USB cable is iOS-compatible.
If you're transferring iPhone photos with cloud services, check the internet connection and ensure there's enough cloud storage space for all the iPhone pictures you wish to move to PC.
Q3 - Can I transfer photos from my iPhone to my PC without a cable?
Yes. Many cloud storage services, such as iCloud, Google Drive and OneDrive, allow you to make photo transfer from iPhone to PC wirelessly, without no need for a USB cable.
Q4 - I have thousands of pictures. Is there any way to import the entire photo library from my iPhone to PC?
Yes. As mentioned above, the iPhone Data Transfer tool is a powerful tool that enables bulk transfer of photos between iOS and Windows with simple clicks. It's very easy to use: