iPhone Is Unavailable. How to Unlock It

Looking to import photos from your iPhone to a Windows 10 PC? Here are 5 easy ways to transfer your iPhone pictures instantly, whether using a USB cable or wirelessly.

With Appgeeker iPhone Data Transfer, you can transfer all your photos from iPhone to Windows 10 PC at once, without worrying about compatibility issues or quality loss.
It's extremely easy to get photos off iPhone to a Windows 10 PC or laptop, either wired or wirelessly.
Many users need to transfer photos from their iPhone to a Windows 10 computer for various reasons—whether it's to save space, archive memories, or edit professional shots. While it sounds like a simple task, it often becomes a headache when transferring large photo libraries or dealing with HEIC photos from iPhone to Windows 10.
This guide lists several effective methods on how to transfer photos from iPhone to Windows 10 PC, letting you choose the best approach for your specific situation. You can import photos from iPhone to a Windows 10 using a data cable, or transfer your photos from your iPhone to Windows 10 PC wirelessly—either way, you'll free up storage on your phone while building a powerful, searchable local photo backup on your Windows 10 computer.
Table of Contents
For most users, the built-in Microsoft Photos app on Windows is the preferred and usually the most convenient tool for transferring photos from an iPhone to a Windows 10 PC. Instead of manually digging through folders, the app automatically categorizes your iPhone images by date once connected, allowing for a structured and seamless import process.
The Microsoft Photos app primarily handles photos taken with the camera as well as those stored in the iPhone's Photos app. If your photos are saved in the iCloud, make sure they are fully downloaded to your iPhone in full resolution before initiating the transfer.
1. Plug your iPhone to your Windows 10 PC using a compatible USB cable. If asked, tap Trust or Allow to grant access, and then enter your lock screen passcode.
2. If the Photos app doesn't open automatically, click the Start button, type Photos, and select the Photos app to open it.
3. Click Import in the upper-left corner and select From a connected device.
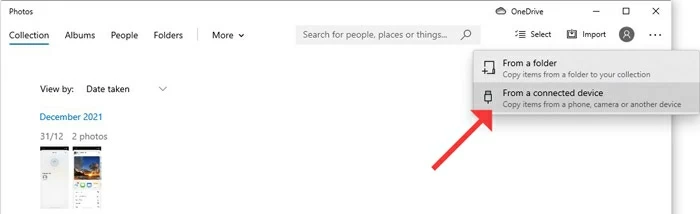
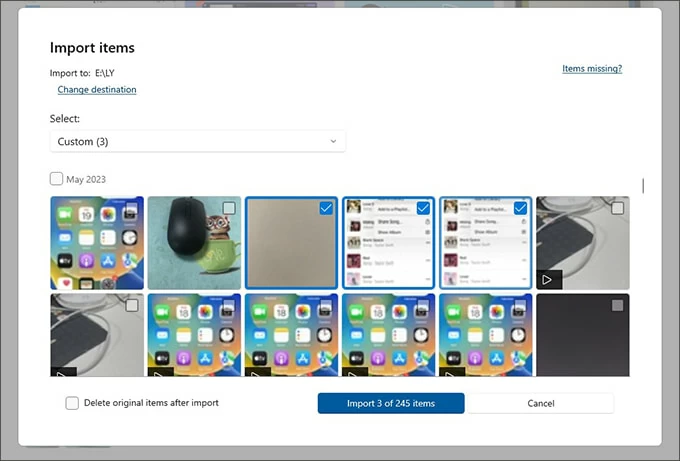
4. Wait for the system to detect the connected iPhone and start loading its photos and videos, then select the photos you want to transfer.
5. Choose your destination folder under Import to in the top-left corner, and then click Import items to transfer and save these iPhone photos to your Windows 10 PC for local access.
Keep your iPhone unlocked while the transfer is in progress to avoid any interruptions. You may choose to keep or delete the original items on your iPhone after import. If you accidentally delete some pictures, check this to recover permanently deleted photos on iPhone.
Note:
For users with massive photo libraries, Appgeeker iPhone Data Transfer software offers a high-speed alternative, allowing you to transfer the entire photo library from iPhone to a Windows 10 PC in a single click without any quality compression.
Most importantly, you won't have to worry about format compatibility; the software supports various image formats, including Live Photos, and can automatically convert HEIC images to high-quality JPG or PNG during the transfer to ensure full compatibility with your Windows 10 system.
Whether your photos were captured on your iPhone or saved from apps and websites, its ability to handle large-scale libraries means you can batch transfer photos from your iPhone to a Windows 10 PC or laptop, saving you a lot of time and effort, and vice-versa.
Step 1. Open iPhone Data Transfer on Windows 10 and connect your iPhone.
Launch the program and link your iPhone using a proper USB cable. If your iOS device prompts with Trust This Computer message, tap Trust and follow the instructions to verify your passcode.

Step 2. Access iPhone Photos for preview and selection.
From the left menu, navigate to Photos where you'll view all current photos and videos in your iPhone Photos Library; select the desired photos, or simply click Check All at the top.

Step 3. Import photos from iPhone to Windows 10.
Click the computer icon for Export to PC option; in the pop-up window, select a location to save the transferred iPhone photos on your Windows 10 PC.

For those looking to go the other way, see how to transfer photos from PC to iPhone.
If you prefer a manual approach, File Explorer provides a direct way to access your iPhone's internal storage, letting you copy and paste photos from your iPhone to any folder on your Windows 10 PC.
Your iPhone's photos are located within the DCIM folder, generally organized by date. While you can find the photos you need by browsing the DCIM directory through File Explorer, this process can be quite time-consuming, as you have to check the contents of each individual subfolder one by one.
1. Connect your iPhone to Windows 10 PC using a USB cable.
2. Open a File Explorer folder (Windows + E shortcut works quickly) and navigate to This PC from the left side.
3. Under Devices and drives, select Apple iPhone to access your iPhone pictures.
4. Double-click to open Internal Storage > DCIM folder, where your iPhone photos will be stored separately in different folders from month to month.
5. Locate the images or picture folder you want, press Ctrl key and click to select them.
6. Right-click on the selected photos and choose Copy from the expanded menu.
7. Open a local folder on Windows 10 to paste (Ctrl + V) the iPhone photos you just copied.

Alternatively, you can simply drag and drop the target photos directly into your destination folder. If you want to move all new photos from your iPhone to Windows 10 in one go, you can:
This will transfer the new photos and videos from your iPhone to your Windows 10 computer without the hassle of opening and checking every single subfolder.
Also read: How to transfer photos from iPhone to external hard drive
Besides wired transfers, you can also use iCloud to transfer the photos from an iPhone to a Windows 10 PC without the need for a USB cable. iCloud enables cross-device access to your photo library as long as you are signed in with the same Apple account. Simply upload your photos from your iPhone to iCloud, and you can then download them on your Windows 10 PC.
Note:
If you want a set-and-forget system where your iPhone photos are always accessible on your Windows 10 PC, iCloud for Windows is an ideal choice. Once you set up iCloud for Windows on your Windows 10 PC, your iPhone photos will automatically sync to your computer.
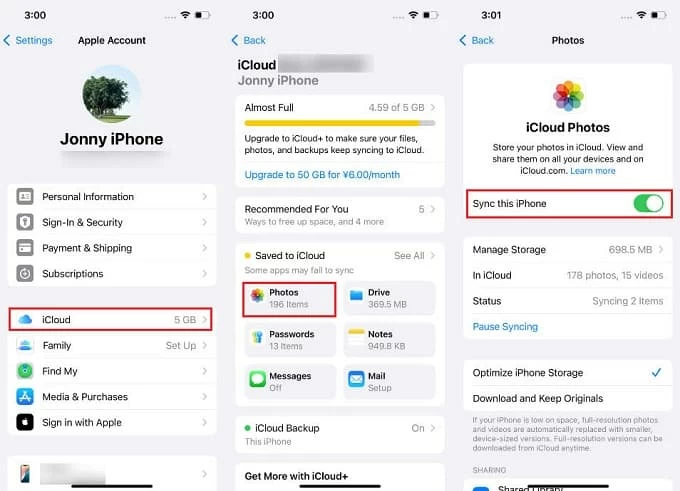
1. Ensure iCloud Photos is enabled on your iPhone. Go to Settings > your Apple ID > iCloud, tap Photos and toggle on Sync this iPhone option.
2. Download and install the latest iCloud for Windows on your Windows 10 PC.
3. Open iCloud for Windows and sign in to your iCloud account with the same Apple ID and password used on your iPhone.
4. If required, accept the verification code on another Apple device, then enter that code on your Windows 10 computer to complete two-factor authentication.
5. Follow the on-screen prompts to reach the "Sync iCloud Photos to Microsoft Photos" step, then click Sync Photos in the bottom-right corner.

6. You can click Advanced settings to change the save location for photos, the download format for photos and videos, and other configurations.
7. Once everything is set up, you will see that iCloud Photos is toggled "On" under the "Apps using iCloud" section and has begun syncing your photos.
After the synchronization is complete, you can navigate to the iCloud Photos folder in File Explorer to view and download photos from your iPhone for local storage. If Microsoft Photos is linked with iCloud Photos, you will also be able to browse these images directly within the Microsoft Photos app.
Related: How to access iPhone photos on PC
Besides the automatic syncing with iCloud for Windows app, it's also possible to manually get photos off iPhone to Windows 10 using iCloud.com.
1. Open a browser on your Windows 10 and visit iCloud.com.
2. Log in to your iCloud with your iPhone's Apple account.
3. When you're in, select Photos to access your iCloud Photos Library.

4. Click to select the pictures you wish to get onto your Windows 10 PC.
5. Hit the Download button from the upper-right corner.

Your photos will be downloaded as a ZIP archive. Simply extract the file to view your images on Windows 10.
With these wired and wireless options, you now have the ability to transfer your photos from iPhone to Windows 10 computer easily and quickly. If your iPhone photos cannot transfer to your Windows PC successfully, check these potential causes and fixes:
Connection issues
Network connection issues
Wireless photo transfers from iPhone to Windows 10 rely on a stable Wi-Fi connection. Ensure your network signal is strong and consistent.
Storage space issues
If you're moving a large number of pictures and videos, ensure your Windows 10 computer has enough storage space to save them all.
If you're using cloud services like iCloud Photos or Google Photos to transfer your iPhone photos across platforms, sufficient cloud space is also required to ensure seamless syncing.
Photo format compatibility