
QuickTime Screen Recording with Audio

As the most recommended audio recording tool, Audacity troubles many users. This article gives a detailed guide to recording desktop audio with Audacity.

Audacity offers professional assistance to capture audio from computers, but the recording process is complex.
Do you want to save your online lecture audio or important meetings to use later on? You might like to keep your favorite podcasts, YouTube videos, meeting audio, or other media content for future reference. We know that computers of different operating systems come with a built-in audio recorder, like Voice Memos for macOS, and Voice Recorder for Windows, to capture external voices. But Audacity is the perfect alternative if you want to record desktop audio.
Many users then will ask, how to record desktop audio with Audacity. The detailed answer lies in this article. Let's find ways to record desktop audio with Audacity on Mac and Windows.
Table of Contents
Audacity is one of the best sound recording and editing apps which is free and open-source and is available on macOS, Windows, and Linux. Being a top-rated recorder and editor, Audacity supports recording desktop audio and outputting audio in different formats.
Recording desktop audio with Audacity allows you to enjoy the advanced editing options and Audio effects. However, these advanced settings are complex and unsuitable for beginners. Certain drawbacks of Audacity concerning its difficult operation limit its use. But don't worry. Whether you are a Windows pc user or a Mac user, we'll guide you to recording desktop audio with Audacity.
1. Run the Audacity App on your Computer
Navigate to Audacity's official website and download the app. Then, follow the provided steps to install the software on your computer to get started.
2. Customize the App Settings
Open audacity and customize the recording settings. Select Windows WASAPI in the Host panel from the Audio Setup drop-down menu.
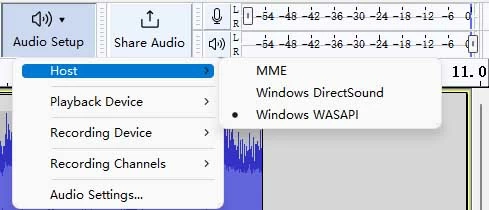
Enables Audacity to manage the flow of desktop audio data.
Further, if there's a speaker on or connected to your computer, you can choose the Speaker as the Recording Device. If you don't have a speaker, you can connect the headphone to the computer and set the Headphone as the Recording Device.
3. Record the audio
After you're done with the settings, click the red Record button to capture all the desktop audio, including system pings, playing music, or sound effects of gameplay with Audacity.

4. Save the recorded track
Finally, save your recording at a suitable location. Hit the File menu and Export the file as MP3.
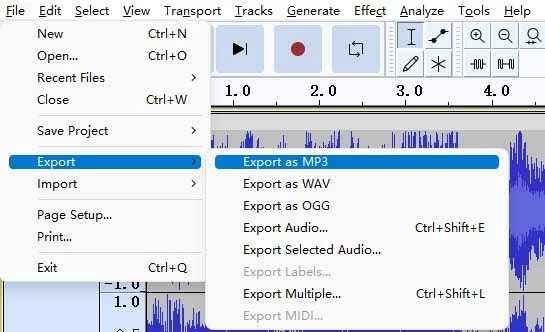
Choosing Save Project will save it for an Audacity project rather than an audio file that can be opened in other apps.
The native audio recorder for Mac, Voice Memos, can't record desktop audio by default, hence users need the Audacity to record their internal sound as well. Unlike Windows, capturing desktop audio with Audacity on Mac is a bit complicated. Mac users need to download a plug-in called SoundFlower before proceeding with desktop audio recording.
Note:
After installing the plug-in Soundflower, follow these simple steps to record desktop voice using Audacity on Mac.
1. Select the appropriate recording source
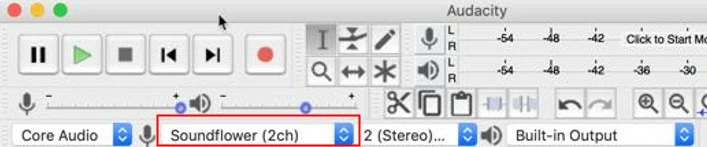
Download and install Audacity from the official site, open it and navigate to the System Preferences option by clicking the apple icon in the top left corner.
Choose Sound > Output and set Soundflower (2ch) as the audio source. Then go to Audacity Preferences and choose Soundflower (2ch) as the recording device.
Choosing Save Project will save it for an Audacity project rather than an audio file that can be opened in other apps.
2. Start Recording
After all the settings, navigate to the top bar and press the Record option. It will immediately start the recording process. Furthermore, can also see the recording progress in the form of a bar.
3. Stop Recording
Click the Stop button located in the top bar when you have recorded the required media.
Note:
Users may seem pointless to invest time and effort in learning to use an open-source package such as Audacity which, at first glance, appears complex and far from user-friendly. Therefore, an excellent way to get high-quality recorded media on Mac and Windows pc is to find a more convenient and professional desktop screen recorder alternative.
Appgeeker Screen Recorder can perfectly capture desktop audio on Windows PCs and Macs without any hassle. Unlike recording desktop audio with Audacity, Mac users don't need to download a plug-in on their device, and silicon-chip-based Mac models are supported as well.
In contrast to Audacity, desktop Screen Recorder has a user-friendly interface, convenient for novices and experts alike. Also, as the name implies, Appgeeker Screen Recorder can capture the entire screen on the desktop with system and microphone voices and offers advanced settings and editing features to enhance the recording experience for professional users.
Quick steps for recording desktop audio with audacity
Here are the specific steps to recording desktop audio using the AppGeeker screen recorder.
1. Launch the AppGeeker Screen Recorder
Download and install the recorder on your device.
2. Set the recording source
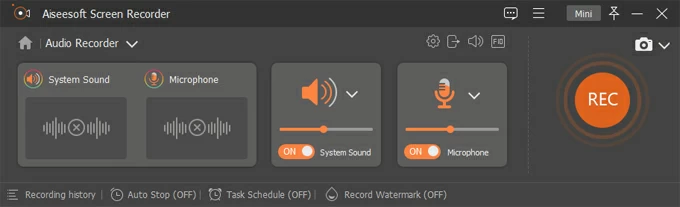
Select the Audio Recorder from the available options.

3. Mark the Recording Area and Settings
Turn on the System Sound for recording. If necessary, you can also toggle on the Microphone Sound button.
Note:
4. Start Recording
Finally, hit the red REC button at the right to start recording the voice on the computer. You can also change some settings simultaneously in the toolbox during the recording process.
![]()
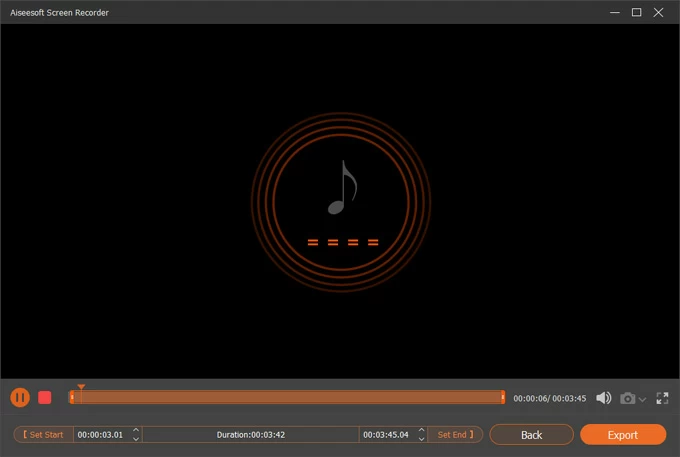
5. Save Recording
At last, preview your recorded track and mark its start and end. Save the recorded file to your device.
Wrapping up
To summarize, capturing desktop audio with Audacity offers you a free way of voice recording on Mac and Windows. However, it's not always easy to do due to its difficult operation. Therefore, a reliable desktop tool like AppGeeker Screen Recorder is highly recommended.
Don't wait and hurry up to avail the free trial of this incredible tool now!


