
How to Screen Record on Windows 10

Mac has built-in audio recording tools like QuickTime and Voice Memos to help you record MP3 files. There are also some 3rd-party apps that can record MP3 on Mac with clicks.

What to know for MP3 record on Mac:

The QuickTime, Voice Memos, and other efficient audio recorders can make MP3 recordings on Mac easily.
Mp3 is one of the most popular audio formats with wide compatibility. Recording MP3 file on Mac can facilitate the playback or editing of your audio files on other software and devices.
Whether you want to record your voice in MP3 on Mac, or to record audio from Mac as an MP3 file, knowing how to record MP3 on Mac is what you need. You can use the built-in apps and microphone on macOS, or apply some efficient audio recorders to record MP3 on Mac from input and output sources.
Built into all macOS computer, QuickTime Player is not just a media player, but also a recording application that allows you to make basic video and audio recordings on your Mac. It enables you to record an MP3 audio on Mac through a microphone and lets you make simple editing. You can trim the MP3 audio file, split it into clips, merge and rearrange the sound clips, and share the MP3 recording file whenever you need.
Now, follow the simple steps below to create a new MP3 recording on your Mac with clicks:
Step 1. Open the QuickTime Player app on your Mac, and go to File > New Audio Recording at the top. You can run the QuickTime Player from the Application folder or the Launchpad.
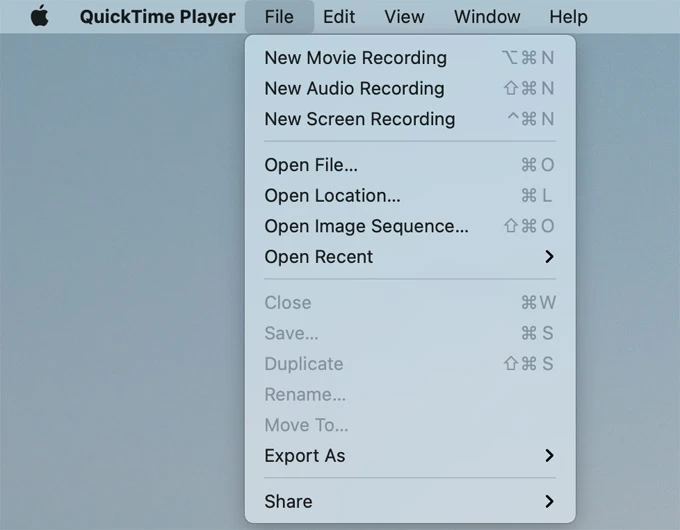
Use QuickTime Player to create new MP3 audio recordings on Mac.
Step 2. Click the drop-down arrow to access the Options menu, and select the available microphone and choose the recording quality for the MP3 audio file.
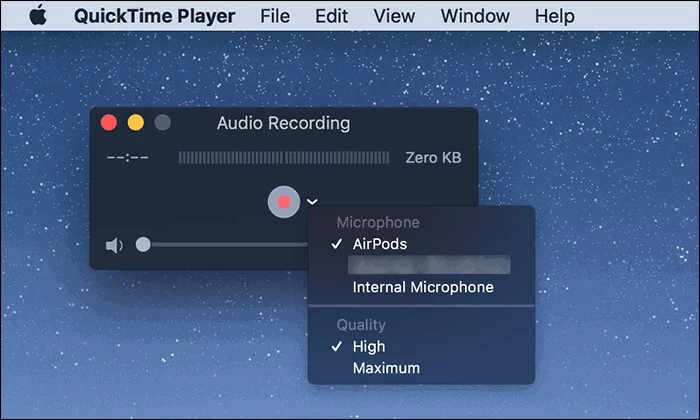
Select an available microphone on Mac to record audio files.
Step 3. Drag the speaker slider to control the recording volume.
Step 4. Hit the red Record button in the middle to start audio recording. The QuickTime Player will capture all sounds coming through the selected microphone.
Step 5. When you're done, click the Stop square button to end recording.
Step 6. On the upper-left corner, select File > Save to save the new audio recording.

Play and save the new audio recording on Mac.
By default, the file will be saved in M4A format. You can play and convert the audio recording into MP3 format using the Music app on macOS.
Also see: How to Record Screen and Audio with QuickTime Player
This way, you can save all your audio recordings as MP3 files on your Mac.
The audio recording tools that come with Mac can only record external sounds by default. But if you want to record the internal audio on your Mac as MP3 file without background noise, you can't go wrong with the AppGeeker Screen Recorder.
This feature-rich tool can record MP3 file on Mac from computer sound and microphone separately or simultaneously. Even better, you can customize the audio recording configuration, including audio source, format, quality, volume and recording length.
Not only for MP3 files, it also supports many other popular audio and video formats. Here's how to record MP3 audio on Mac with AppGeeker Screen Recorder:
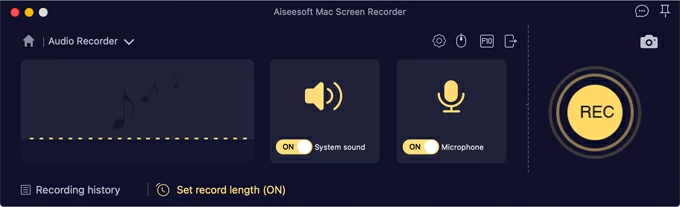
Step 1: Open the Screen Recorder on Mac and enter Audio Recorder mode.

Choose Audio Recorder mode to create new MP3 audio files on Mac.
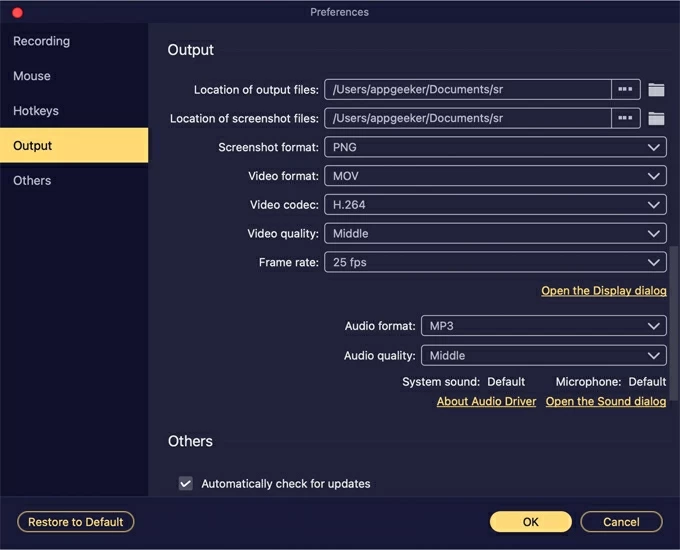
Step 2: Select audio sources to record and configure the audio settings.
Enable source sound(s) and adjust the output format and audio quality in Recording Settings.
Click on the gear icon at the top left to access the Preferences window. To record MP3 on a Mac, head to the Output tab and select MP3 from Audio format. You can also adjust audio quality, save destination, and other settings related to MP3 audio recording.
Manage the format and quality for the new audio recording.
Step 3: Click the REC button to begin MP3 recording on Mac.
The recording status bar will let you know the recording length and file size. You can pause and resume the MP3 recording anytime you want.
![]()
View the recording status on the floating bar on the screen.
Step 4: Hit the red Stop square and save the MP3 audio file.
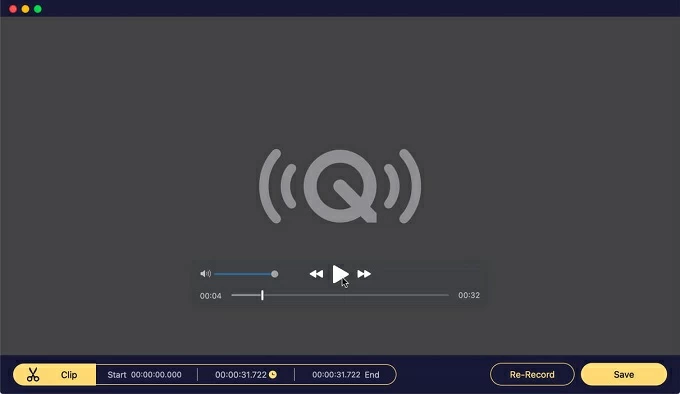
Listen to the MP3 recording and save it on your Mac computer.
As soon as you stop recording, the preview window pops up automatically, allowing you to play the MP3 file and make edits. To save the recorded MP3 audio on your Mac, check the Save button in the lower-right corner.
Another quick and easy way to record MP3 files on Mac is to use the pre-installed Voice Memos application. With this MP3 audio recorder, you can capture your voice or other background sounds through the built-in microphone or a connected microphone. Additionally, MP3 recordings from Voice Memos can be synced to other Apple devices with the same Apple ID.
1. Launch the Voice Memos app on macOS.
2. Click the red Record button when you're ready, and speak into your microphone. To produce a clear MP3 audio file, don't get too close to your mic.
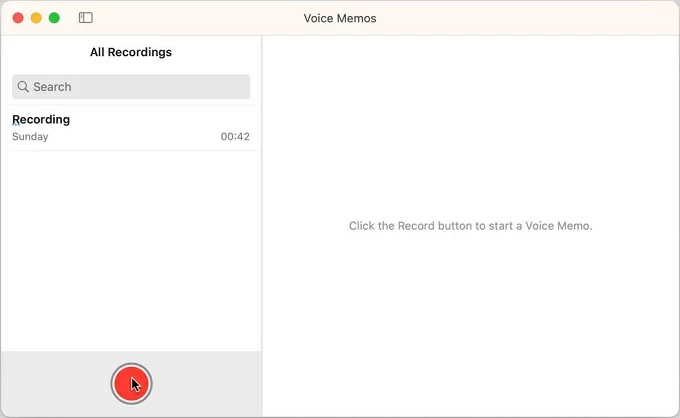
Click the Record button to start an audio recording in Voice Memos.
3. Hit the Pause / Resume option button to pause and continue the recording when you want.
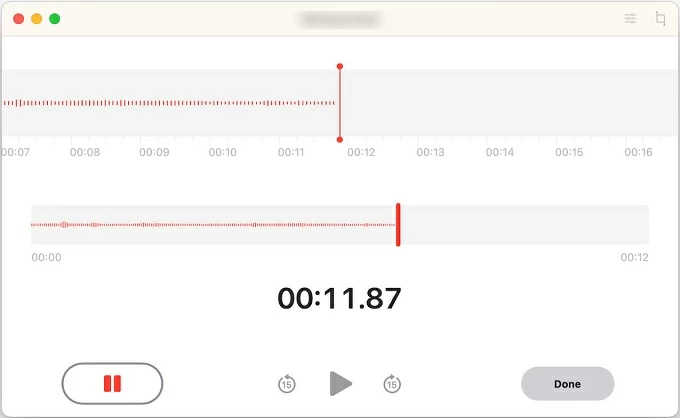
You can pause and resume recording when you need, or click on Done to stop MP3 capture.
4. When you need to end recording, check the Done option on the bottom right corner.
Note:
Being a fully equipped music creation software, GarageBand let you record an MP3 on your Mac without effort. It can record, mix, and edit multiple sound tracks, and release and share your music worldwide.
With a host of helpful audio mastering features, GarageBand makes it easy to add MP3 tracks or start MP3 recordings on your Mac anytime. Simply use the microphone to capture your voice, instrument playing, and anything else you wish to record as an MP3 audio file.
1. Run GarageBand on your Mac. You can search and open it from the Launchpad.
2. Click Empty Project to add a new recording project, and expand Details below to handle other professional recording settings.
![]()
Create an empty project to record an MP3 on Mac.
3. Click the Choose button to create a new MP3 recording project.
4. Click the add + icon from the top left, you'll be asked to choose a track type for the recording.
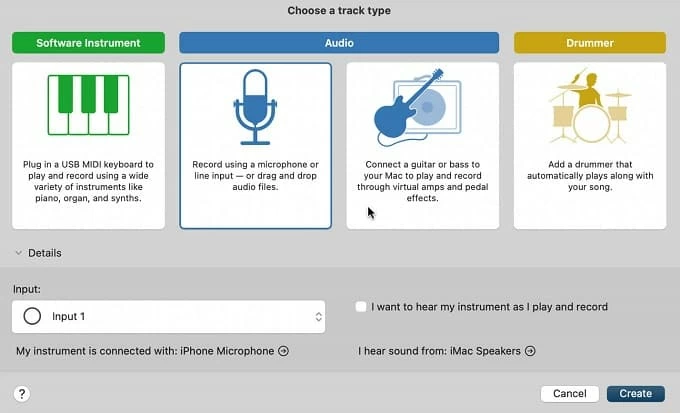
Choose a track type and select an input device before recording.
5. Check the Input option to select an input microphone from the list, and hit the Create button.
6. Hit the top Record button in red circle or press R key to start MP3 audio recording. You can now start talking, singing, or playing your instrument.
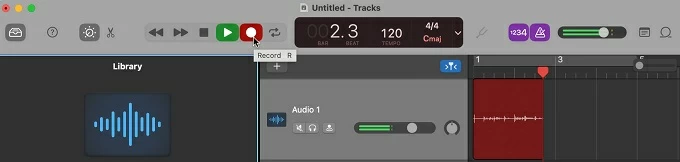
Hit the Record circle button to start recording MP3 audio.
7. When everything is done, hit the square Stop button to end the MP3 file.
8. To save the track as an MP3 file on Mac, go to Share > Export Song to Disk at the top menu.
Make sure you check the MP3 option in the pop-up box. Then rename the file and hit Export to save the MP3 audio recording on Mac.
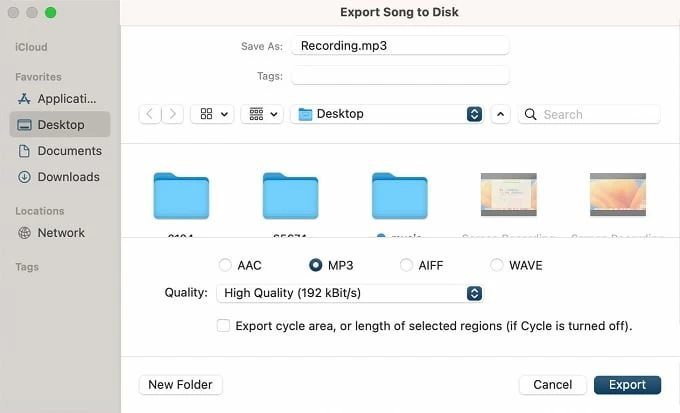
Export the recording result in MP3 format and save it on Mac.
The only downside to GarageBand on Mac is the complicated recording interface, which can be a bit confusing for beginners.
The last audio recording software available for recording MP3 on macOS is the open-source application Audacity. This program enables you to record an MP3 on Mac for free using an internal or external microphone, and allows for multi-track editing. It's pretty easy to use. You can simply use your Mac as an MP3 recorder and make new sound tracks.
Related: How to Use Audacity to Record Audio on Mac
First, install and open Audacity app on your Mac.
In the middle of the top, check Audio Setup and select a microphone from Recording Devices.
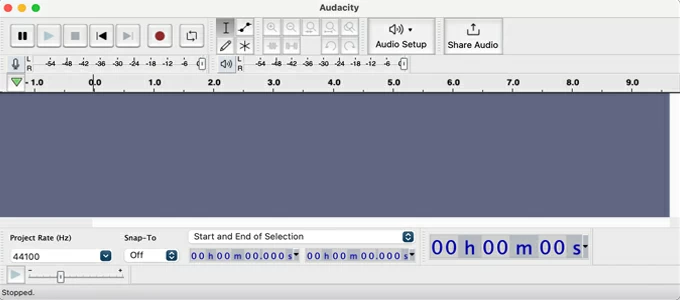
You can view Audio Setup option and the recording control panel at the top of the screen.
Click Tracks at the top menu bar, and choose Add New to create a new empty track.
To start recording, simply click the Record button with red circle.

Use the control panel while recording the MP3 in Audacity.
Talk to your microphone or make any sounds you want to record as MP3. You will see the sound waves moving on the screen.
When you're done with recording, hit the Stop button with a black square.
The last step is to export the audio recording as an MP3 file. Access File > Export > Export as MP3 from the menu bar at the top, and you will get a new MP3 recording on your Mac.
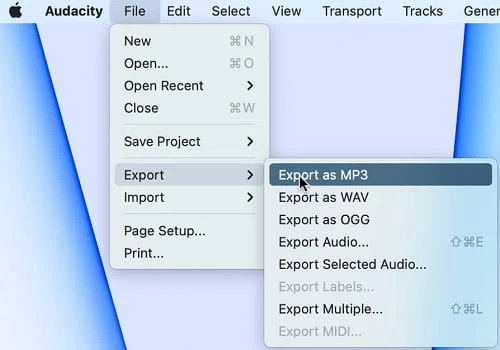
Export the recording file as MP3 on Mac.
How to create an MP3 audio file on Mac?
Both QuickTime Player and Voice Memos allow you to record audio files on Mac. They usually save the audio recordings in M4A format. Luckily, you can easily turn the audio into MP3 files with the help of the Music app.
Can QuickTime Player record MP3 audio?
Unfortunately, the QuickTime Player usually records audio as an M4A file. If you want to record MP3 on your Mac without converting, the recording apps like AppGeeker Screen Recorder and Audacity can help you get the job done with simple steps.
How to record audio on Mac?
1. Open the QuickTime Player on Mac, and choose File > New Audio Recording at the top menu.
2. Click on the arrow, and select a source microphone from Options drop-down menu.
3. Hit the red circle Record button to start audio recording.
4. When you want to stop, click the Stop button to exit recording mode.
5. Save the new audio file on your Mac by navigating to File > Save.


