5 YouTube to MP4 Converters for Mac [Tested-and-tried]

This article introduces 5 different ways for Windows and Mac users to record videos on computers. Choose the most suitable way among them to capture your screen.


Microsoft PowerPoint not only works for presentation but assists Windows users to record video from a computer.
Recording video from a computer is an effective way to save your on-screen activity. You might like to capture the online classes for watching again, record your gaming progress, or design a video tutorial. Whether you want to show off on your computer screen, you should find the proper way to record the screen video from your computer.
You can record videos using built-in screen recording tools like Xbox Game Bar (Win10 and Win11 only) and Microsoft PowerPoint on Windows or macOS Screenshot Toolbar on Mac. Also, many third-party tools and desktop software like Appgeeker and OBS Studio are available to help you through the way. This article elaborates on these easy ways to capture video from your computer.
Table of Contents
When it comes to the search for a free and reliable tool to record videos on Windows PC, the internet has a lot to offer. Among these tools, Xbox Game Bar is recommended the most as the built-in screen recorder on Windows 10 and Windows 11 PC and Xbox. Initially developed by Microsoft for recording game clips easily, the tool is widely used nowadays to record non-gaming activities like meetings, tutorial videos, presentations, etc., and output the captured video in MP4.
The drawback is that you can only use the built-in Game Bar program on Win10 and Win11 computers to record only one app at a time, and full-screen recording is unavailable. In addition, File Manager, Windows desktop, and some other apps can't be captured either. If you want to record multiple programs on screen or present the specific steps to do the task, you have to resort to other tools we'll show you later.
Navigate to the Start menu and choose Settings. After that, select Gaming. Turn on Game Mode to achieve a stable performance during recording. Now let's figure out how to record a video from Windows PC via Xbox Game Bar after activating the Game Mode.
Note:
Open the Game Bar
Open the app you want to record. Press the Windows + G at the same time on your keyboard. There would be a dialog that says, "Do you want to open Game Bar?". Check the "Yes, this is a game" checkbox to open it. Multiple options display on the screen. These options provide numerous settings for capturing video, audio, screenshot, or video.

Set up Screen Recording
By default, Xbox Game Bar turns both internal and external audio when recording. If you record gameplay on the screen or capture a tutorial, hit on the Record option to start recording your screen task. Or use the combination Win + Alt + R to capture the activity on the screen. Then Game Bar widgets will shrink and appear as floating bars in the corner. You can manage your record either from that bar or from the Settings button.
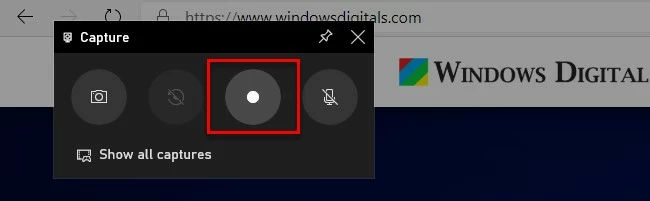
End Recording
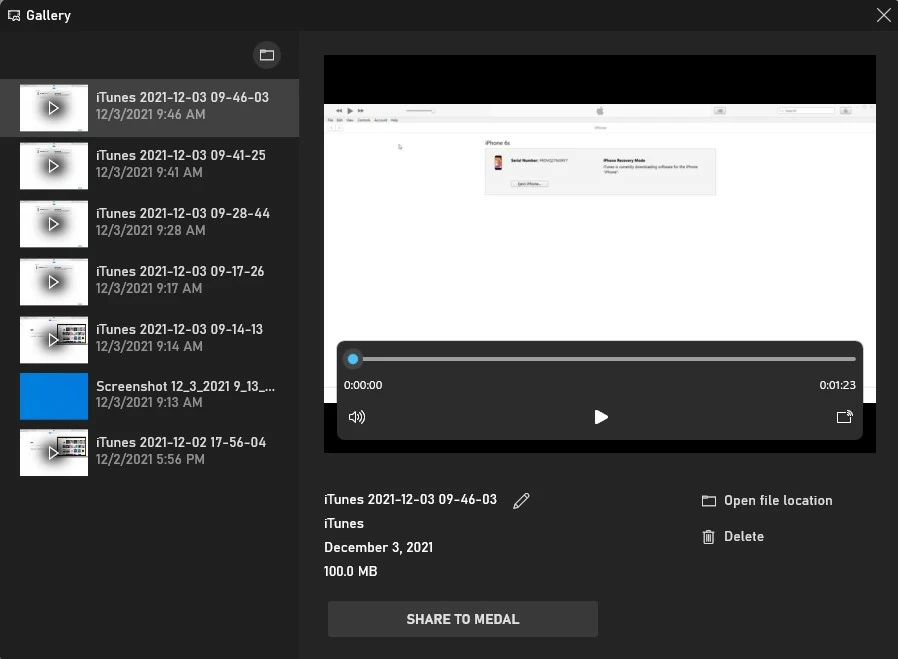
Click the same Recording button in the floating bar to stop the screen recording when you are done with it. If the floating bar disappears, press the Win + G shortcut to bring it back and stop recording. A pop-up window confirms your recorded video, and you can check your MP4 record directly in the Game Bar. You can also check it in the default output path:
C:\Users\[username]\Videos\Captures.
Also see: Windows 10 screen recording
The default settings of the Xbox Game Bar are suitable for most Windows users to record video; however, you can still go to Settings > Gaming > Captures to tweak some advanced settings.
Adjust Location Preferences
You can select a preferred location for your captured clips. Go to the Captures location section at the top of the Captures menu. Press the Open folder option to access the location where screen recordings are saved. You can also change the output location of the recorded file.

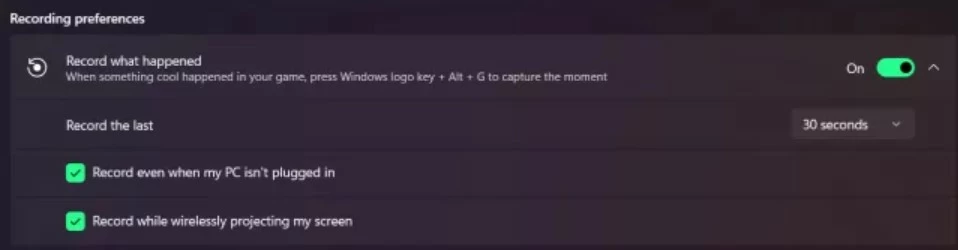
Background Recording
You can find this feature in Windows 11 from Record what happened and Background Recording in Windows 10 in Recording preferences panel. This option is off by default. You can turn it on to capture the thrilling moves in the gameplay, so you don't lose any moment.
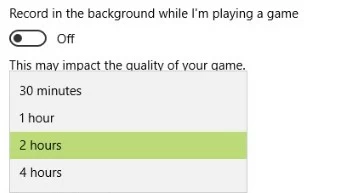
Max Recording Length of Video Clip
Maximum recording length is the time limit after which your screen recording ends automatically. It is usually set at two hours by default. Also, you can select the time limit from the dropdown list for your recording clip from 30 minutes to 4 hours.
Frame Rate and Video Quality
You can try and customize different video quality and frame rate settings for your video clips. Video quality determines bitrate and resolution. You can select among the two options, i.e., standard or high. The default frame rate is set at 30 fps but can be changed to 60 fps. Higher frame rates bring higher video quality, but it can be heavy on your system.

Capture Mouse Cursor while Recording
It's your own choice to capture your mouse pointer when recording gameplay. However, it is recommended to enable this option if you are capturing any app screen other than games.

As aforementioned, Xbox Game Bar cannot record multiple apps at the same time nor capture the whole screen on Windows PC. Therefore, a professional and all-in-one desktop application Appgeeker Screen Recorder comes to capture video on computers. This screen recorder works with Windows and macOS. It can accomplish multiple video-capturing activities in just a few clicks and covers all activities on your computer, whether you need to record an online meeting, capture gameplay, or design attractive tutorials with both internal and external audio with webcams.
In addition, it offers not only MP4 but other output formats for users to choose from. Users can optimize the recording experience by adjusting some settings like adding mouse cursors, setting hotkeys, adding watermarks, etc.
Here is how to record video from a computer using the AppGeeker Screen Recorder.
Step 1: Launch the Screen Recorder
First, download, and install the AppGeeker Screen recorder on your computer. The recording process using Screen Recorder is almost the same on Mac and Windows PC, hence we'll take Windows PC as an example to guide you.
Run the software and select Video Recorder from the given menu.

Step 2: Set up recording presets
Adjust the desired recording area and turn on or off the audio from the computer and microphone. You can simply record the whole screen or a selected area with custom width & height.

Step 3: Record video from your computer screen
After the settings, press the REC button at the right to screen record on the computer.
Users can change the range of the screen recording in a fixed proportion. The screen recorder gives you complete control to record with desired customizations. You can either lock and record the window or exclude the window and record.
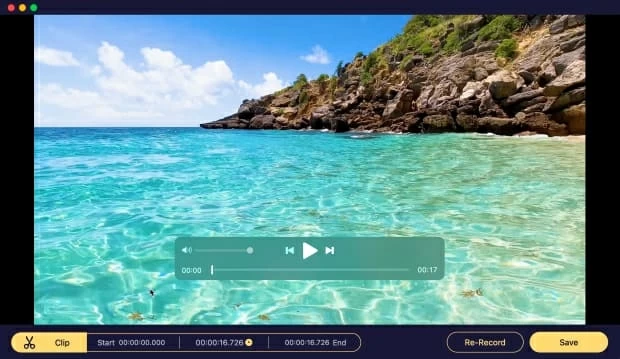
Step 4: Refine and export your recording
Once you have done this, preview and save the recorded file to your computer, you can trim or edit your recording footage before exporting. Finally, export and save your file and share it with others if you like.
Advantages of AppGeeker Screen Recorder
macOS Screenshot is the shortcut for screen recording using QuickTime Player. It is the in-built screen recording feature available on macOS Mojave and higher. A keyboard shortcut will take you to the tools panel, where you can quickly proceed to screen recordings with multiple control options. Also, you have a chance to include the pointer, select timer delays, and much more.
This section elaborates on how to video capture on a PC using the macOS screenshot tool.
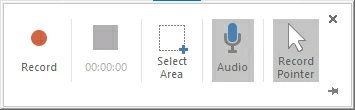
1. First, tap Shift + Command + 5 shortcut to open the tool menu on your Mac.

2. Click the desired tool to decide the operation you want to proceed with.
3. You can go to Options to adjust parameters if you like to customize any settings.
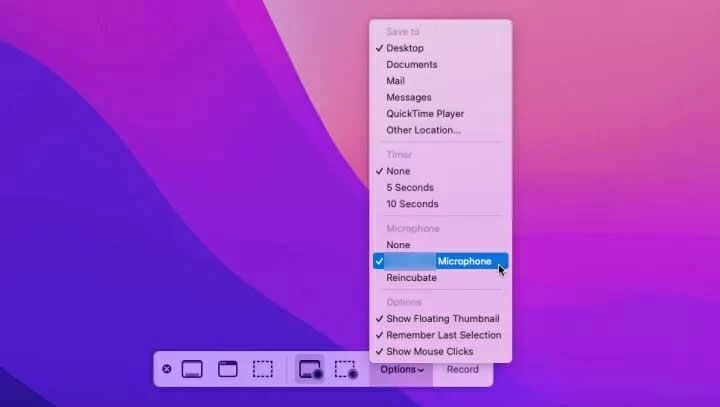
4. Get started with the screen recording function.
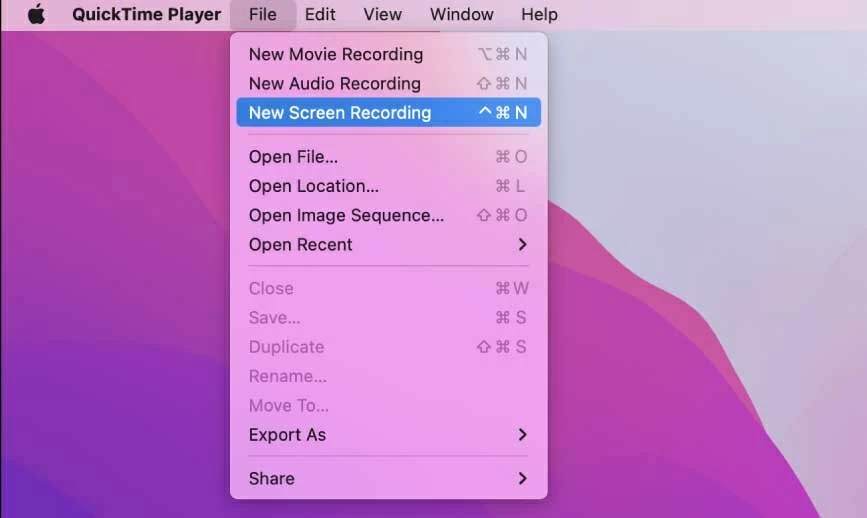
Using the Screenshot toolbar on Mac is simple and convenient. Users don't need to download extra applications on the computer, but it doesn't offer many advanced functionalities, and users can't adjust the output quality as using Appgeeker Screen Recorder. In addition, users can't capture the system audio using this tool. If the Mac you use hasn't updated to macOS Mojave, then you can't use this shortcut to record video from your computer. But don't worry, you can still open the QuickTime Player, and go to File > New Screen Recording to open the screenshot toolbar.
Open Broadcaster Software is a free third-party tool to record a screen video on computers. It is compatible with macOS, Windows, and Linux. Unlike Xbox Game Bar or Screenshot Toolbar, OBS Studio records everything on the entire screen and captures the internal and external audio at the same time. The downside is that OBS Studio is not that user-friendly. It is a professional tool and many live-streaming platforms works based on it, therefore, novices may consider it complex.
1. Launch OBS Studio
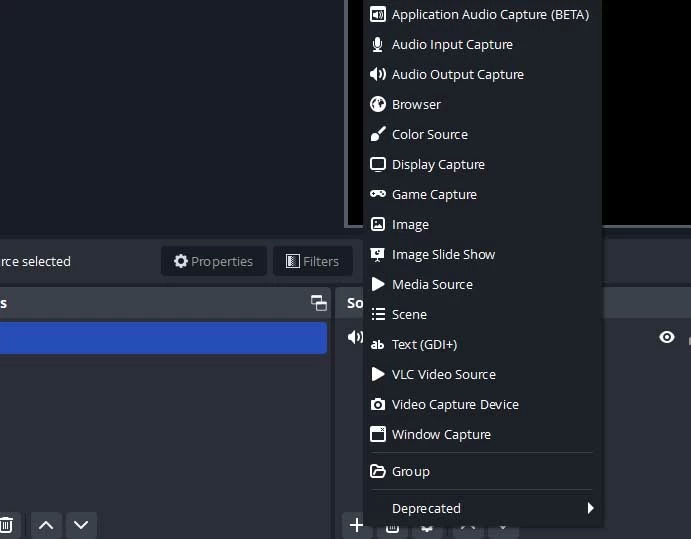
After downloading and installing OBS Studio on your computer, press the + icon at the bottom left in the Scene area.
2. Adjust the Settings
Secondly, navigate to the Sources box, and click the + icon down in the panel. Afterward, continue to the Display Capture option to proceed with the video recording settings. Select your desired display and tap OK.
3. Audio Settings
In the Audio Mixer module, both internal and external voices are optional. You can turn up or down the volume or even mute them if necessary.
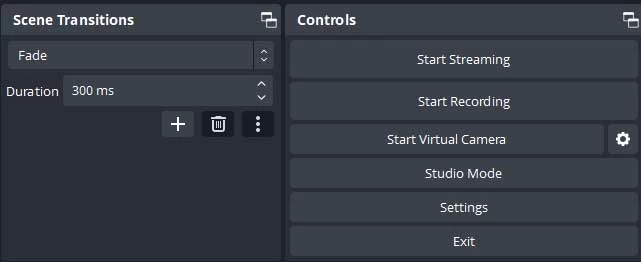
1. Record video on your computer
Finally, find the Start Recording key at the bottom right and tap it after you've done with the settings. Once done, click Stop Recording, and OBS will automatically save this recorded video on your computer.
Microsoft PowerPoint is not a stranger to you, but you can't imagine that it is also a fantastic tool to record videos from a computer for free. You can use it to keep a video record of your computer. This tool also features some basic video edit functions. Keep reading to learn the specific recording steps.
Run MS PowerPoint and click on the Insert tab in the menu bar. Choose Screen Recording from the given options, which opens up different choices.

Click the Select Area option and click and pull your mouse over the slides you want to record. You can press the Windows + Shift + A keys as a shortcut instead.
Start recording your screen by clicking on the Record option in the toolbar. Manage your screen record using options like Stop, Pause, and Record. Alternatively, use some shortcut keys for this command: Windows + Shift + R to start a new or paused recording, and to pause a started recording, press Windows + Shift + Q to stop recording.
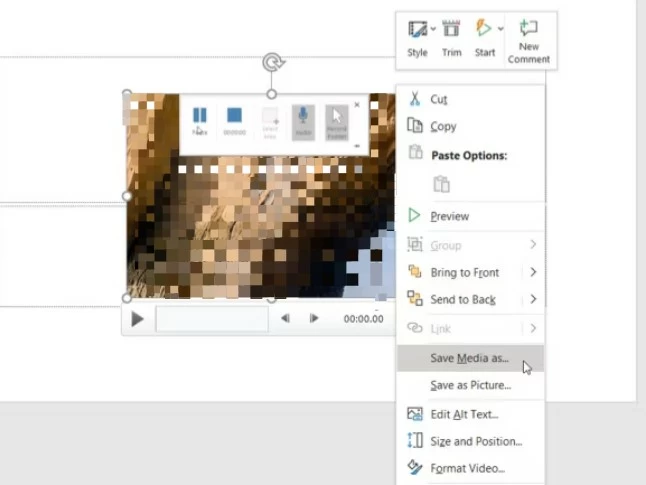
The recorded video is shown as a slide in the presentation. Right-click on it, select Save Media as and save the video on your desired destination.
After then, you can go to the output folder to check your recorded video on your computer. But if you want to trim the recording before saving it, you need to click on Trim after right-clicking the video clip. Here you can determine where you want to cut. Just select the start point and end point to specify the precise timing of the video. Select OK if you're done.
The bottom line
Now you must be familiar with how to screen-record on a computer. Each recording tool we've reviewed has its perks and limitations. You can use free in-built tools like Xbox App on Windows and QuickTime on Mac for simple operations. But the major problem with the default recorders is that they lack editing and voice recording options.
When it comes to comparison, you must choose a recorder with built-in sound recording and video editing options. With multiple customization options, Appgeeker Screen Recorder is the best way to record video on a computer.
Don't delay and get the free download of this wonderful tool now to record everything on your computer screen like never before!