How to Record YouTube Live Stream

Recording videos off YouTube is possible and surprisingly easy. Here are multiple ways to record YouTube video clips on any Mac for playback offline.

Quick tips for recording a video playing on YouTube with Mac:

It only takes a few moments to screen record YouTube videos on Mac computer.
If you browse your favorite videos on YouTube but can't download them, recording YouTube videos on Mac is a good idea, which allows you to keep videos forever and watch them offline.
Fortunately, macOS has its own screen recording software that can record YouTube videos on Mac. But to capture live stream video with audio on YouTube, you can take the help of other YouTube video recorders for Mac. This article will detail how to record a YouTube video on Mac to help you get favorite movies or streaming videos from YouTube channel.
The YouTube recordings are just only for educational purposes or personal use, such as commentary, research, teaching, news reporting or other nonprofit activities.
Table of Contents:
Is it legal to record a YouTube video?
Best free YouTube recording software for Mac
How to record a YouTube video on Mac with sound
While it's possible to capture YouTube videos on Mac's screen, it's not always ethical or legal.
If you record a YouTube resource without the permission of the copyright owner for merely self-use, not for commercial use, there is no violation of any copyright laws involved.
However, if you use the recorded YouTube video that is copywrite-protected to expand your business and profit from it, you'll get into a serious trouble with law. Keep this in mind when you think of recording video from YouTube without permission, and fair use the recordings.
It is also noteworthy that YouTube offers Premium service allowing user to download YouTube videos onto a computer, phone or tablet. The downloaded videos are available for watch offline for 30 days.
While there are a number of free YouTube recorders that record videos in Mac, let's first look at the simplest solutions: QuickTime Player, Screenshot toolbar. No additional apps or extensions!
QuickTime Player application will be the primary app you use and you can find it through LaunchPad. The New Screen Recording option is designed to meets your need when you're attempting to make a YouTube video recording task.
If you're using a Mac with macOS Mojave or later, you can press Shift + Command + 5 to open Screenshot toolbar, then use the tools to record YouTube videos on Mac for free.
Quick tip:
This technique may be useful for Macs running macOS versions earlier than macOS Mojave 10.14.
Step 1: Launch QuickTime on your Mac
You can either search QuickTime in Spotlight, or find it in Applications folder.
Step 2: Choose New Screen Recording
With QuickTime open, select "File" in the menu bar at the top of your screen, then choose "New Screen Recording."
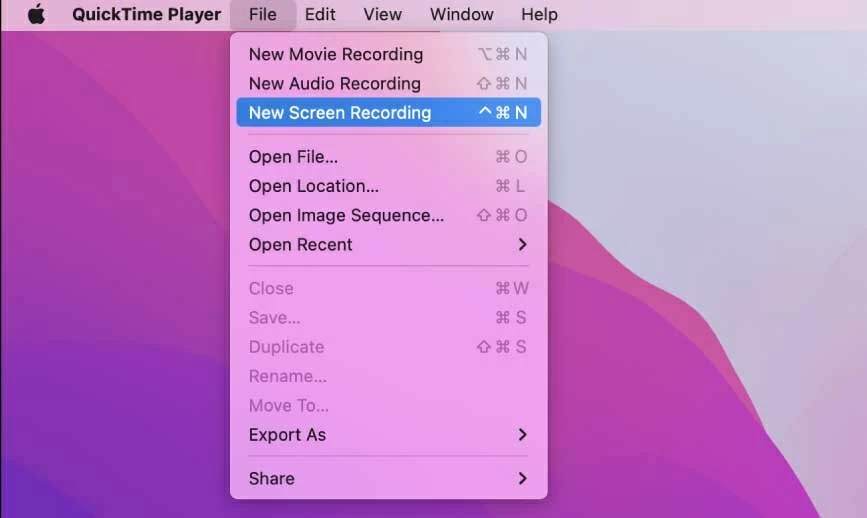
New Screen Recording in QuickTime allows you to record the YouTube screen and actions.
Step 3: Turn on Internal Microphone
If you wish to record your voice or other background sound with screen recording for YouTube, click the arrow next to the Record button and tick "Internal Microphone" option.
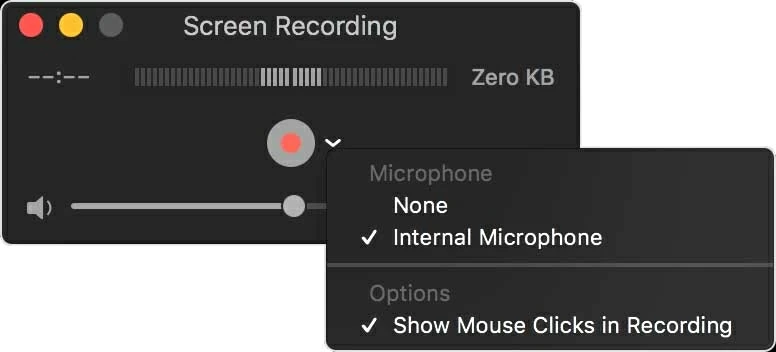
Enable your Mac's in-built microphone will get the external voice captured.
Step 4: Start recording a YouTube video playing on your browser
Click the "Record" button, then open your streaming YouTube video, and click anywhere on the screen to kick off the recording. If you just want to capture specific area where the video is playing on, simply drag to select the player portion to record.
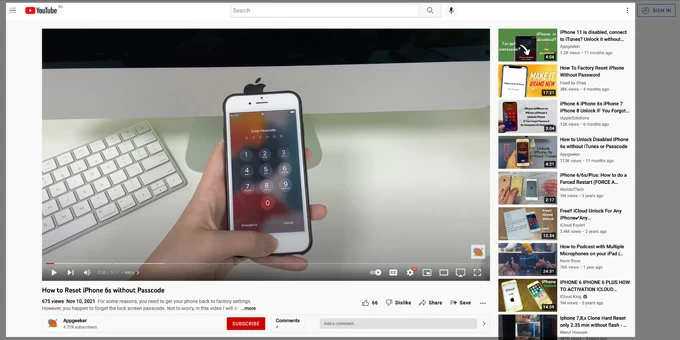
Entire YouTube page has been recorded. Preview the new video on your Mac.
Step 5: Stop screen record and save as MOV video file to Mac
When you're ready to stop screen recoding of YouTube video on Mac, click the "Stop" button in the menu bar. The recorded video from YouTube will open immediately. Select File > Save to specify a name for the recording and choose a desired location to save video in MOV format.
That's it! Your favorite video in YouTube has been recorded on Mac computer. Enjoy it offline anytime anywhere.
Also see: How to use QuickTime to record screen and audio
Beginning with macOS Catalina, Apple lets you creating a video recording of your Mac's screen in Screenshot toolbar, including capturing any YouTube videos on Mac or MacBook. Once you open the Screenshot toolbar, recording a video off YouTube is as easy as highlighting the full screen on YouTube web page or just the player.
Open a video you want to record from YouTube. Hit "Shift + Command + 5" hotkeys to invoke the Screenshot toolbar along with the controls for screen capture and record. For the recording purpose, you need to choose "Record Entire Screen" or "Record Selected Portion."

In macOS Catalina or later, you can use the Screenshot Toolbar for YouTube capturing.
From the Options menu, you can enable your Mac's microphone to capture your audio & surrounding noise, as well as set to turn on Show Mouse Clicks while recording.
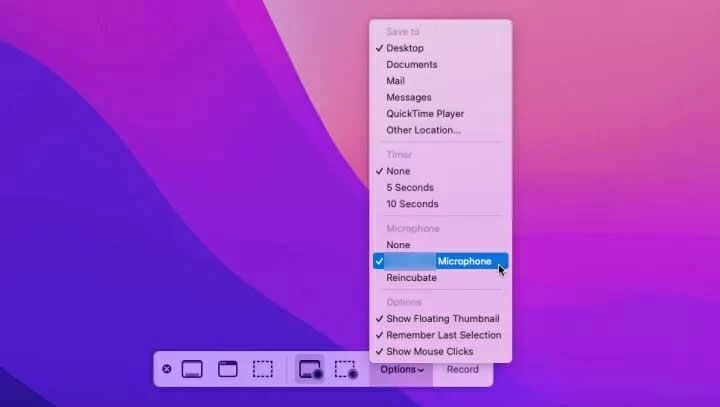
Click Option > [your Mac] Microphone to capture a YouTube video with your own sound.
Now, start playing the YouTube movie, and click "Record" to start YouTube recording on your Mac. To stop the process, click the "Stop" button in the menu bar.
If you love YouTube live videos but find that the native Mac YouTube video recorders can't capture sound from YouTube videos, then YouTube video streaming recording software is aimed at you. The best YouTube video recording software for Mac can capture YouTube live streaming videos on Mac with sound.
AppGeeker Screen Recorder is an excellent desktop application for macOS and Windows that allows users to record screen and anything you do in apps, websites, video streaming platforms like YouTube, Facebook, etc. It can record YouTube content in HD quality, including video and audio, and even webcam.
You can customize the area for recording YouTube videos on a Mac. Besides, turning on System Sound and Microphone lets you capture audio from YouTube or your voice-over. It also supports outputting recorded YouTube clips to multiple formats such as MOV, MP4, M4V and GIF.
Here's how to record YouTube video on Mac for offline viewing or editing later:
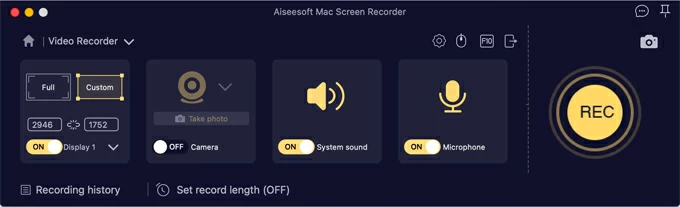
1. After installing Mac Screen Recorder, launch it. On the window that opens, choose "Video Recorder" tab.

2. By default, the program will capture the entire screen, system sound and microphone audio. If you want to record only the area on the YouTube page where the video is playing on, simply click on "Custom" and then use your mouse to drag to select that portion.
Make sure "System Sound" is enabled to capture the sound of audible YouTube videos.
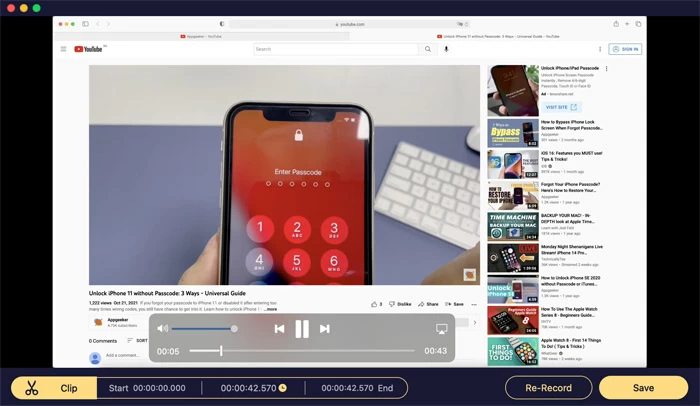
3. Open the YouTube video page and click the "REC" button. The software will start capturing YouTube videos with audio that are playing on your Mac.
4. The final step is to end the YT recording. Click the red "Stop" icon. A preview window of the new video will open, allowing you to view the recording, clip it, and save it on Mac.
With this all-in-one software, you're free to record streaming videos on your Mac, including live YouTube clips!
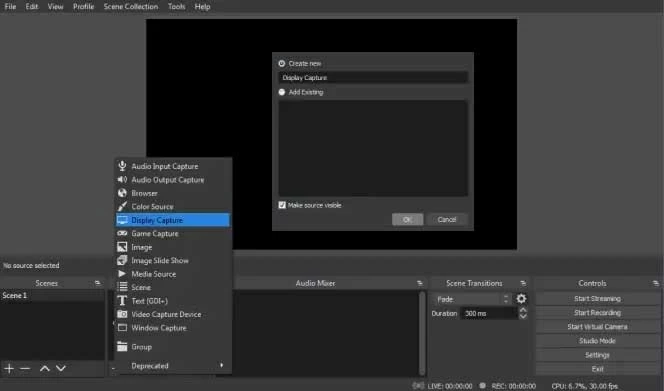
Yet another effective free YouTube video recorder for Mac is OBS! It is also helpful for people who want to record HD YouTube videos while doing YouTube live streaming on macOS, but before you make a video recording on YouTube platform, you need to learn how to do it.
First, set up with OBS.
Second, start recording a YouTube video.
Now, you are ready to make the Mac's screen recording on YouTube. Hide the OBS app.
Happy Mac video recording in YouTube!
Now that you know how to record a YouTube video on Mac, you'll find recording and grabbing audio and video much more effortless. AppGeeker Screen Recorder and OBS are cool recorders that that make recording YouTube videos on Mac a snap.
You can also use Mac QuickTime Player and Screenshot toolbar to record video off YouTube and external audio from microphone. This can be useful if you just want to extracting the footages from the video.
1. How do I record a YouTube video with sound on Mac?
An easy and free way to screen record on Mac for YouTube is to use Mac QuickTime Player. But it can record the video and microphone audio (if it's turned on) with no system sound track.
Here's how to use QuickTime to record YouTube video on the Mac, iMac, MacBook Pro, MacBook Air:
2. How to record audio from a YouTube video on Mac?
Although the built-in QuickTime Player can't capture the internal sound coming out of computer, you can use AppGeeker Screen recorder to record audio from YouTube video on a Mac.
After you launch the software, choose Audio Recorder. You'll have options to capture your system sound or microphone audio. Make sure to switch ON the toggle for System sound. If you need to record your voice on Mac over a YouTube video, turn on Microphone. Then, hit Rec icon.
3. How to screen record YouTube on MacBook Air, Pro?
The best way to record YouTube videos for free on a MacBook Pro or MacBook Air is to use QuickTime's New Screen Recording feature.
For MacBook running on macOS version higher than macOS Mojave, use the Screenshot toolbar utility instead. It can be invoked the Mac screen record & capture tool by pressing three keys together: Shift, Command, 5.