
How to Screen Record on Windows 10

You can FaceTime chat with your friends on iPhone, iPad or Mac. And with some helpful tools, you can record your FaceTime with sound and save the video captures.


Record FaceTime with sound on iPhone, iPad and Mac in different ways.
Pre-installed on iPhone, iPad and Mac, FaceTime is a videotelephony application that lets Apple users have video and audio chats with one another. Sometimes you'll want to record a FaceTime call with sound to keep memorable moments while having a personal communication with your loved one, or screen record FaceTime with audio to catch up an important business meeting.
Whatever the reason for recording FaceTime with sound, it can be done easily with the built-in iOS and Mac screen recorder, or other efficient FaceTime call recording tools. This guide will walk you through everything about how to record FaceTime with audio on an iPhone, iPad and Mac.
Note: It is generally considered impolite and possibly illegal to record FaceTime audio without the consent of others. So be sure to get the permission before recording FaceTime calls.
Although Apple has not enabled the recording option in FaceTime due to privacy concerns, it is possible to record FaceTime with audio using the built-in iOS screen recorder.
So, if you want to screen record FaceTime with sound to capture important details for business or other purposes, you will be surprised to know that recording FaceTime calls on iPhone or iPad is pretty simple and you don't have to use any extra application.
The only thing you need to do is to enable the native Screen Recording feature on iOS 11 or later to record FaceTime call on your iPhone or iPad screen. It will automatically record your FaceTime with audio if you turn on its Microphone option for audio capture.
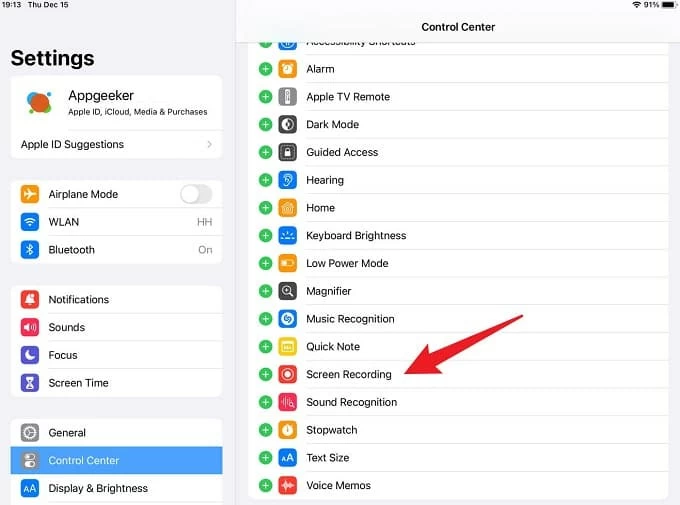
Enable the Screen Recording option to record FaceTime call with sound on iPhone or iPad.
After that, swipe down from the top right corner of your screen, and the Screen Recording option in grey dot is on the Control Center penal. So now, you can screen record with audio on iPad and iPhone to capture FaceTime calls with sound.
1. Start a FaceTime call on your iOS device.
2. Swipe down from the upper-right of screen to open Control Center.
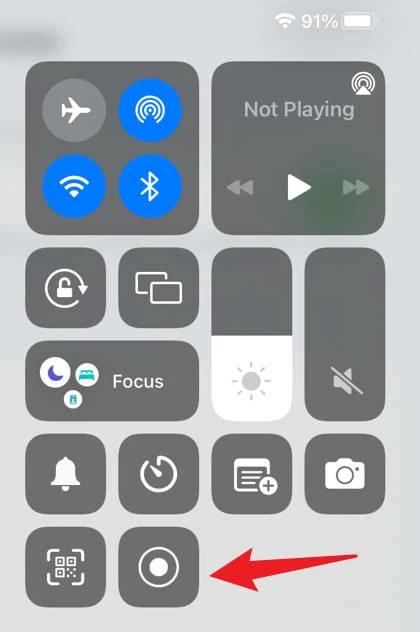
Access the Screen Recording option in Control Center.
3. Long-press the Screen Recording button and turn on the Microphone option. The onscreen FaceTime will be recorded with audio when the microphone is enabled.
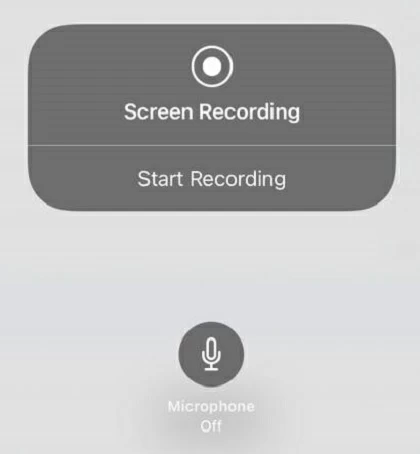
Tip: If you just need to record FaceTime screen with no audio, simply tap the Screen Recording dot button and the recording will start after a three-second countdown. But, to screen record on FaceTime with sound, make sure to press and hold the Screen Recording circle so the Microphone option on the next screen can capture FaceTime with audio.
4. Tap on the Start Recording tab to begin FaceTime recording on iPhone, or iPad. A red status bar will appear at the upper left corner, showing the recording process.
5. When you finish the recording, press the red status button at the top and select Stop box.
You can also return to the Control Center and touch the Screen Recording button again to end recording on FaceTime. Once done, the captured FaceTime call recording will be saved in Photos app, which should include both screen and sound from your FaceTime call.
It's easy to record FaceTime with sound on an iPhone or iPad. Additionally, Apple users can also record a FaceTime call on Mac with QuickTime Player, the built-in screen and audio recording solution on macOS. Just like the iOS Screen Recording tool, this default Mac screen recorder allows you to capture a FaceTime call with audio in just a few clicks, without any installation.
However, QuickTime Player lacks the ability to record computer audio on Mac while creating a FaceTime record. If you wish to record FaceTime calls with audio on Mac machines, check out the next FaceTime call recorder for macOS.
1. Start a video call in your FaceTime app on Mac desktop.
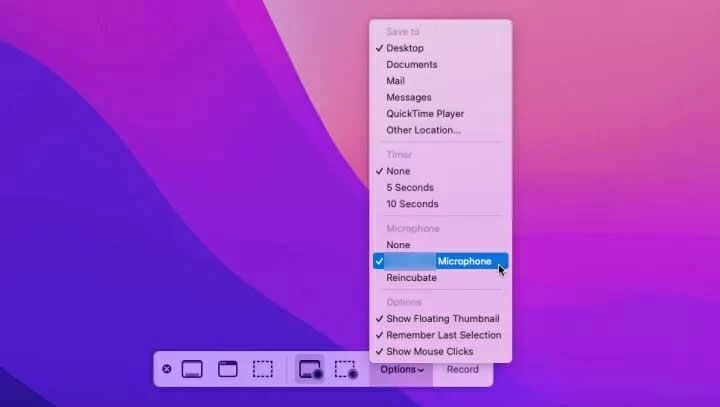
2. Launch QuickTime Player, and select File > New Screen Recording at the top. If your Mac is running macOS 14 Mojave or later, you may press keyboard shortcut CMD + Shift + 5 to bring up the Screenshot Toolbar to capture FaceTime chats on Mac.

3. Select a recording area on your Mac screen. You're given the options to record the entire Mac screen or drag the corners to select your FaceTime window.
4. Click the drop-down arrow and select an audio source from Options list. It allows you to record FaceTime audio through an internal or external microphone, but not including the app audio.
Choose to record FaceTime screen with audio from an available microphone.
5. When you want to start, click on Record button to capture a FaceTime call.
6. To end screen recording on FaceTime, click the Stop button at the top floating bar.
The QuickTime Player can record screen and audio on Mac computer and automatically save the recorded FaceTime video as an MOV file by default. It also offers basic editing tools that can trim and clip the FaceTime recording for easy sharing.
While QuickTime is unable to capture FaceTime with internal audio, you may need an alternative Mac screen recorder to record FaceTime with audio efficiently.
The full-featured AppGeeker Screen Recorder offers a wide variety of screen and audio recording options and extra editing features, letting you easily screen record FaceTime calls with sound in up to 4K resolution. Its straightforward interface helps you to capture the FaceTime audio while recording FaceTime calls on your Mac screen, including both app and microphone audio.
Moreover, you can also highlight your mouse, show clicks, add onscreen annotations, and even schedule a recording task to capture FaceTime video call with audio automatically. After that, feel free to save the FaceTime recording in your desired formats for future references or sharing.
Before you learn how to record FaceTime call on Mac, it's important to respect the privacy of your FaceTime friends and get their consent to record the conversations:
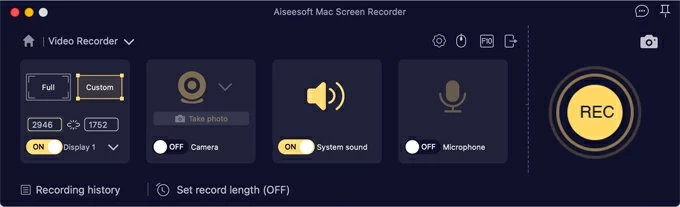
Step 1: Launch Screen Recorder and select Video Recorder mode.
Choose Video Recorder option to capture a FaceTime video call with sound included. Alternatively, you may select Audio Recorder to record FaceTime audio separately.

Step 2: Select a recording region on FaceTime and configure the settings.
You can select full Mac screen, or a particular FaceTime window. Make sure to enable both System sound and Microphone options so you can record call audio on FaceTime.
Record FaceTime video with call audio at the same time.
Step 3: Start a FaceTime call and click on the REC button.
Once set up, you can now call anyone on FaceTime and start the capture process. You may pause and resume the recording, or add onscreen annotations as you need.

Step 4: Stop FaceTime recording and save the video call.
To end recording, hit the Stop button at the control toolbar. You can preview the FaceTime video and add instant editing. When you are satisfied, save the recorded FaceTime call to your Mac.
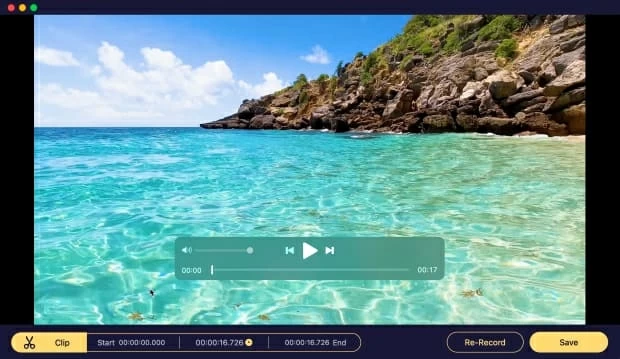
Preview, trim, and save the FaceTime video on your Mac.
Here's a helpful video guide for how to record FaceTime call step by step:
1. Can I screen record FaceTime with audio on iPhone?
Yes, you can easily capture FaceTime calls on your iPhone by using the built-in Screen Recording tool built into iOS 11 or later. When you have a FaceTime call with others, simply turn on the iOS screen recorder to record the FaceTime video call with sound:
you can swipe down from the top of your screen, and tap on the Screen Recording feature to record the FaceTime video call with sound:
2. Why is there no sound in my FaceTime screen recording?
If you're recording the FaceTime on Mac, note that macOS doesn't allow users to record internal audio on Mac, whether using the native screen recorder QuickTime Player or Screenshot Toolbar. Both of them can only capture the microphone sound while recording a FaceTime call. To fix it, try another powerful Mac screen recorder with internal audio recording features built in to capture both video and audio during a call.


