
How to Record Audio from YouTube Video on Windows, Mac & Phone

Want to capture the screen content with audio on your iPad? Here are some helpful tips and tricks you need to know about how to screen record on your iPad with sound.

What to do for screen recording on iPad with sound:

A couple of screen capturing tools have the ability to screen record on iPad with sound.
Quite a few people now use iPad for their daily tasks. And sometimes there is need to record the activities on your iPad, such as meetings, movies or facetime calls. Whether you want to record your favored online videos for later playback or share exactly what happened on your iPad for tutorial purpose, screen recording is always the best way to capture everything you need.
Can't miss: How to Record Computer Audio on Mac
Apple has introduced a native screen recorder on the iPad, through which you can easily record your iPad screen and sound with just a few taps. Also, there are some efficient screen recorders that enable you to capture the screen and speaker outputs from your iPad and save recordings to your device. They are versatile with a wide range of custom features to suit your needs.
In this guide, we're going to tell you the quickest ways to screen record iPad with all sounds:
Recording what's going on your iPad can be very helpful, especially when you need to capture something important for future use. Your iPad has a handy Screen Recording feature available, which makes it easy to make recordings of your iPad's screen movement and sound output.
Before you can capture the screen and audio output on your iPad, you will need to add the Screen Recording option into the Control Center first.
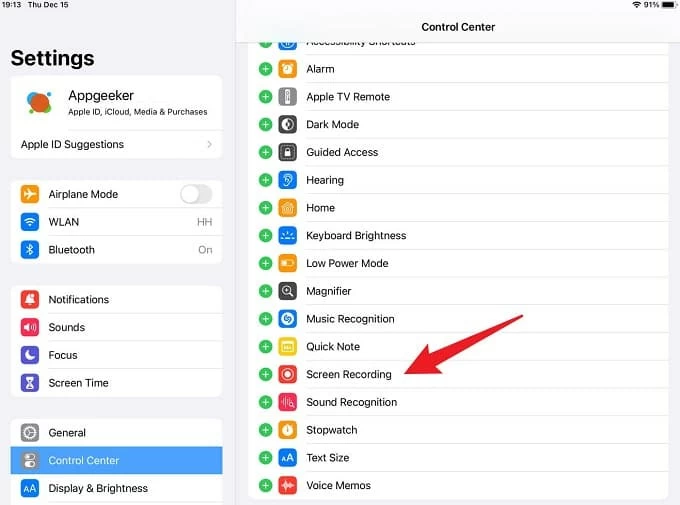
Add the Screen Recording option to the Control Center on iPad.
Swipe down from the upper right corner of your screen, you will find the Screen Recording feature is added to the Control Center successfully.
By adding the Screen Recording option to the Control Center, you can now start the screen capturing with sound.
1. Access the iPad screen that you want to record. You can open your apps, videos, or play other media content as desired.
2. Swipe down from the top right corner to open the Control Center.
3. Tap the Screen Recording button in double grey circle to start capturing.
A three-second countdown will start after which the recording will begin. It will capture your screen as well as the sound coming from your iPad. A red icon will show up at the top showing you how long the recording is.
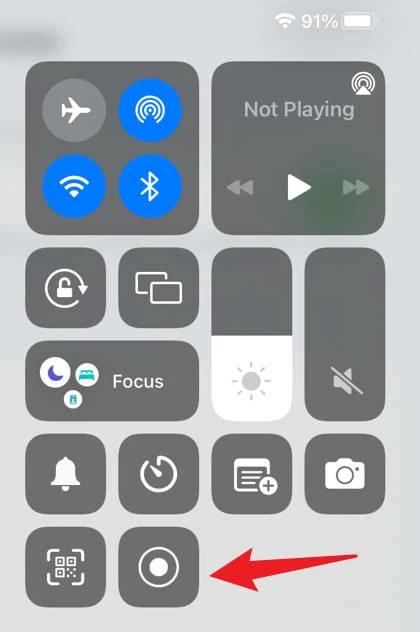
Press the Screen Recording button to start capturing iPad screen.
If you also want to record your voice for narration while screen recording your iPad, press and hold the Screen Recording button for a short while and you will find a Microphone button on the screen which you can tap to enable or disable the microphone recording. Then press on Start Recording.
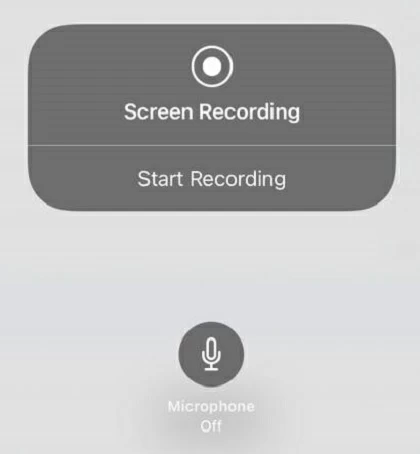
Turn on the Microphone record option if necessary.
4. Once completed, tap the red icon at the top and press Stop option to end recording. You can also return to the Control Center and press the red circle icon to end it.
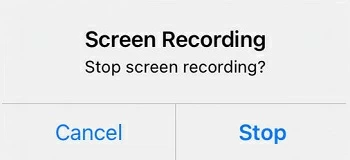
Stop screen recording on iPad.
When the screen recording stops, a notification will pop up at the top automatically telling you that the Screen Recording video is saved on your iPad.
Once you press the Stop button, the auto reminder will let you know where the screen recording is saved on your device. By default, the video will be located to the Photos app where you can play, edit, share or delete the iPad screen recording.

However, if your iPad is running an older OS version that offers no Screen Recording option, or you want to record and save the recording onto your Mac directly, then you can use the QuickTime Player as an iPad screen recorder instead.
Also read: How to Record Screen and Audio Using QuickTime
Get an appropriate USB cable and you'll find that QuickTime Player is more than enough for simultaneous screen recording and audio capture from your iPad.
So first, connect your iPad to your Mac with a USB-Lightning cable. Tap Trust and input your screen passcode if required.
Open the QuickTime Player from the Dock or Application folder.
Go to the top menu bar, select File > New Movie Recording. The built-in camera on your Mac will turn on by default.
Click on the down arrow next to red button. All the recording sources will be on the list.
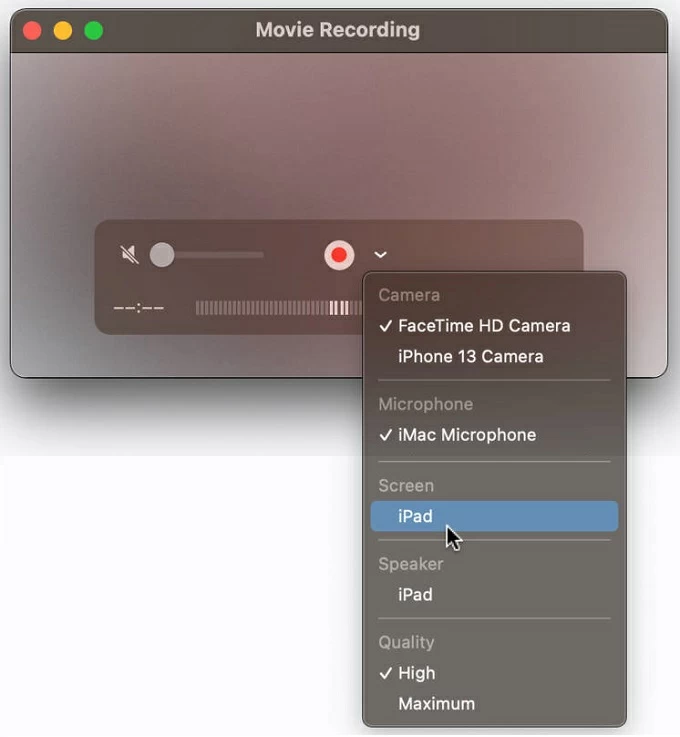
Select your iPad from the Screen option, and select a source sound. You can either use your iMac microphone inputs or choose your iPad's speaker outputs.
When your iPad screen shows up on Mac, click on the Record button to start recording.
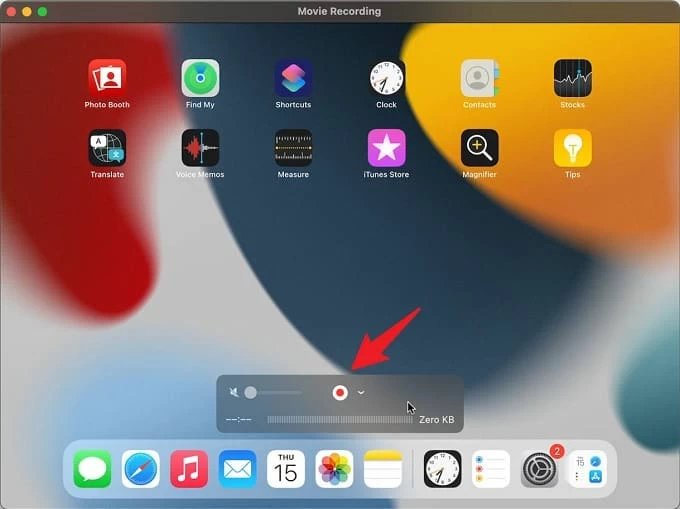
Screen record your iPad with sound using the QuickTime Player on Mac.
Click on the same button to stop recording. The QuickTime Player will allow you to play and export the screen capture to your Mac directly.
Simply click on File > Save to save the iPad screen recording.
Once done, the captured video will be saved as MOV file on your Mac so you can watch, use or share it at any time.
Although the screen recording tools designed by Apple are good enough for standard screen recording, some apps won't allow you to record the video or audio on your Mac or iPad. That's why you will need an alternative iPad screen recorder that is capable of capturing anything, any sound from your iPad.
So, when the built-in screen recorder tool fails to record some specific activities or applications on your iPad, you can use a professional tool like AppGeeker Screen Recorder, which is capable of recording any screen and audio on different platforms like iOS, macOS, Windows, and Android.
Whether you're playing a game, making a phone call, or presenting on a meeting, Screen Recorder is coupled with various recording options for capturing the screen content along with active sound from your iPad simultaneously or separately. It works perfectly on computer as well as portable devices and always delivers awesome recording results.
Step 1: Run Screen Recorder and select the Phone Recorder on the right.

Access the Phone Recorder mode on the right side.
Step 2: Choose iOS Recorder and connect your iPad with computer.
Tap Trust and enter the passcode on your iPad if asked.
Step 3: Enable iPad screen mirroring and configure the Settings.
Once your iPad gets connected, follow the on-screen instructions to display your iPad screen onto computer. When you enter the iPad screen recording window, check Show Settings, and adjust the recording and output resolution.
From the drop-down menu on Recording Content, select your iPad screen and source audio. You can include both your iPad Speaker and computer audio. Drag the Volume slider to control the sound volume.
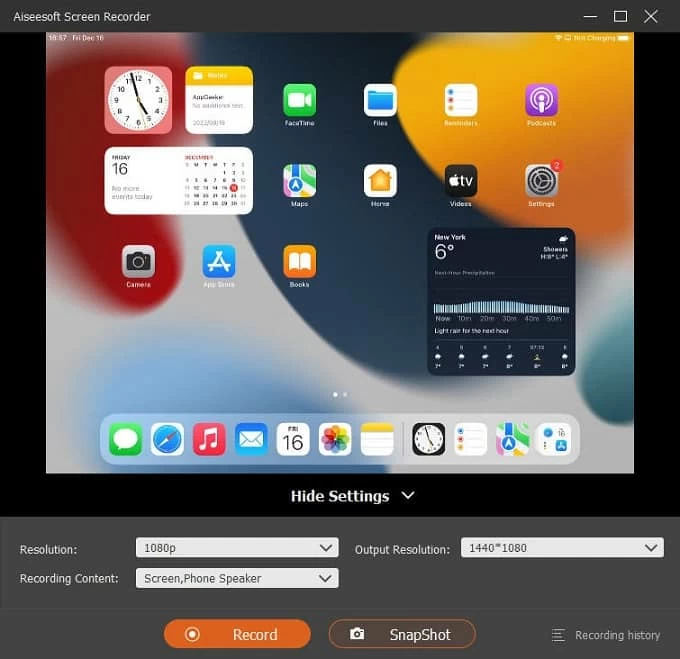
Select the recording content from your iPad, and click on Record button to start.
Step 4: Click on Record button to capture iPad screen and sound.
Step 5. Stop recording on iPad by hitting the Stop button.

Pause or stop the iPad screen capturing, or take screenshots while recording.
You can pause or stop recording whenever you need. Once done, you can preview, edit and save the iPad screen recording.
1. How to make iPad screen recording with microphone?
This way, the iPad screen recording will include the microphone sound and be saved in the Photos.
2. Why is there no sound on the iPad screen recording?
There are a few applications that don't allow users to record video or audio content from them. In that case, you'll want a more powerful screen recorder to help you. And the AppGeeker Screen Recorder is exactly the one that can capture all the content and sounds coming from your iPad.
Once done, you can edit the recording result and export it on your computer.
3. Can I record my iPhone screen with sound?
Yes. You can use the Screen Recording feature on your iOS to perform a local screen capture with sound on your iPhone. It also provides a Microphone option that allows you to add your own voice while recording.
Alternatively, you can get an advanced iPhone screen recorder program like AppGeeker Screen Recorder, which enables you to record screen, sound, microphone, and webcam on iOS, macOS, and Windows.


