How to Record Keynote Presentation

Recording Zoom meetings is just a breeze whether you are a host or a participant. Check out this guide to see how to record a Zoom session with or without permission.

Tip: If you're hosting a Zoom meeting or participating in the meeting and want to record the session with ease and controls, you may go with Appgeeker Screen Recorder.

It's possible and easy for recording a zoom meeting as a participant without permission from host.
Zoom is one of top video conferencing apps that let both business and personal to set up virtual face-to-face conferencing, webinars, live chats, and screen-sharing in an easy way. If, you're a host in an online Zoom meeting and now want to record the meeting, then, the process will be quite simple by clicking the Record button in the app's interface and the Zoom recording begins.
Host can record Zoom meetings easily through the app's native recording feature. But if you're a participant instead, you will have to ask the meeting host for permission before recording a meeting. In Zoom's policy, participants are not allowed to record meeting on Zoom without the host's permission.
But, don't get worried. No matter you don't like the way Zoom offers for recording as a participant, or you just want to record a Zoom meeting without permission on your Windows or Mac, you have ways to bypass the recording restrictions.
Table of Contents
Within the Zoom desktop client, the meeting host can assign recording privileges to a participant for recording Zoom meeting. Once the participant gets privilege to record on Zoom, a notification will be pushed indicating that the recording function is active. And you will get a Record button at the bottom of the screen.
It doesn't matter if the host hasn't granted you recording permissions, as there are many of third-party Zoom meeting recording tools out there available for participants to choose from. We'll show you how to record Zoom meeting video and audio without permission on a computer using those tools later in this article.
Zoom allows for local recording of a meeting on both free (Basic account) and paid subscribers. But before you can record from Zoom as a participant with recording permissions, there are something to be noted.
First, ask the meeting host to enable the "Allow Record" privileges for you.
1. Click Participants in a Zoom meeting as a host.
2. From the participants menu, navigate to your name and click More beside it.
3. Click Allow Record. A Record button should appear in the screen.
Also, ensure that you have Global minimum version or higher of Zoom desktop client installed on your computer. Please keep in mind, if you're using a mobile device and need to record Zoom sessions on iPhone or Android, please upgrade to a paid account to use cloud recording. Local recording is not supported on mobile devices.
Now that you have permission to record, you'll receive a notification and are ready for recording your Zoom meeting.
Step 1: Open the Zoom desktop client on your Windows PC or Mac.
Step 2: In Home tab, click Settings icon located in the upper right corner, then navigate to the Recording tab, and select a directory where you would like the meeting recordings to be saved on your computer.
Step 3: Join in a meeting call as usual.
Step 4: Click Record button. It's located at the bottom center of the app.
![]()
A participant can see Record button in a Zoom meeting only after the host grants recording privileges.
Step 5: A Recording indicator will appear in the upper-left corner of the screen when a Zoom meeting is recording. At the same time, the host can go to Participants menu to see which participant is recording currently.
![]()
During the process, you can Stop or Pause the recording by clicking the indicator or the button in the bottom center.
If you pause your meeting recording and resume it later, Zoom will record to the same video file for the recording segment. If you choose to stop the recording and start it again, you will create a new meeting video for the next recording segment.
Step 6: Click Stop when the meeting is finished. You will get an alert that says "the recording file will be converted to mp4 when the meeting ends." Wait for it to automatically convert your meeting recording and save onto your computer as MP4 file.
Step 7: You can go to Meetings tab and then Recorded tab to view the recorded Zoom video. And upload it to Dropbox, Google Drive or other cloud storage services; or share it on a streaming service such as YouTube, Facebook or Vimeo.
Sometimes, you might not want to ask for privilege and instead have a more straightforward Zoom recording experience. Or, you may need to record a Zoom meeting but the host doesn't give you permission to record.
Luckily, there is a workaround you can use to bypass it. So, here's how you can screen record Zoom meeting without host permission using the Windows built-in Xbox Game bar, which lets you record from screen activity and system sound, and even audio from your microphone.
Also see: How to Transfer Music from Windows 11 to iPhone without iTunes
If you need to use the Xbox Game Bar to screen record a Zoom session with no permission, there are a few steps to take. However, the process is straightforward.
To record Zoom meetings without permission on Windows 10 and 11, do the following:
1. Launch the app from your desktop, and close other running apps and windows in case you have unwanted audio recorded into your meeting video.
2. Press the Windows Key + Alt + R to start recording on Zoom.
3. Alternatively, you can hit Windows key +G to open the Game Bar video recorder, and then click Record button from the opening Capture widget to begin your recording. A small recorder bar appears in the corner telling you how long you've been recording on your Zoom meeting.
4. Start a meeting and stay there until you've screen recorded the video as long as you need.
5. Hit the Windows Key + Alt + R, the Xbox Game Bar will end its Zoom meeting recording. You can also click the Stop button in the small recorder bar to stop the recording.
6. When a notification pops up, click it to get into the Gallery section of the Game Bar where you can view your recorded Zoom video. The video is saved as MP4 file in Video/Capture folder on your Windows 10 and 11.
With Xbox Game Bar, you can record your Zoom meeting whether you have recording permissions or not, but it has its limitation: It lacks support of selecting the area of your recording screen, and it only capture an app or window at a time, nor video editor available for cutting unwanted parts after the recording.
If you want to get more flexibility and controls from a Zoom recorder for your important meeting recording or daily screen capture tasks, you can't miss Appgeeker Screen Recorder.
As a comprehensive video recording solution, the software bypasses the recording privilege problem, letting you record the screen, audio, webcam, and microphone in a meeting easily. No matter you're a Zoom meeting host or a participant, a free or paid account in use, you're able to use it to recording meetings in Zoom with a few simple clicks: Join in a meeting, select your area you want to record, pick which audio to be included, and you're good to go.
It also comes with a schedule recording feature that allows you to record a video or online meeting automatically at a specific time on a daily/weekly schedule.
Main features:
Here's how to record a Zoom meeting, if you haven't been granted permission from the meeting's host, using Screen Recorder from Appgeeker. The entire steps are provided below.
Step 1: Enter the meeting you want to record. Then run Appgeeker Screen recorder on your Windows. For the purpose of recording Zoom video, select "Video Recorder" in the program to proceed.

Step 2: Choose "Full Screen" to record the whole screen of your computer. Or choose "Custom" to select a specific area to record for your Zoom meeting.
Step 3: After that, choose to record the webcam, system sound, or/and microphone. You should close all other windows or apps so that you can exclude noises in your Zoom recordings. You can also set Auto Stop, Task Schedule and Record Watermark options on the bottom of the interface if necessary.

Step 4: When you've all things set, you can click the "REC" button on the right side to start recording. At this point, a small recorder bar displays on the bottom of the recording screen. You can temporarily pause the recording by clicking the double vertical line and resume it again. To end your recording task, simply click the "Stop" button (the red square).
![]()
Step 5: After recording, it will pop up a window where you can view the recorded meeting video and trim the beginning and end of your file to cut unwanted parts with the inbuilt editor.
That's all there is it! You have successfully recorded a Zoom conference. With this versatile recorder, you can also capture any other screen activity on your Windows 10 and 11.
Watch video guide for a Zoom recording:
Even though you're not a host, you can record video and audio from Zoom meeting without permission or knowing through Mac's recording feature built in as part of QuickTime Player.
Note that QuickTime only record audio from your microphone and not the internal audio. Any sound from macOS or a video playing in a browser window won't get picked up.
1. Open your Zoom meeting.
2. Press and hold Command + Shift + 5. This will call QuickTime recording bar.
3. Select if you want to record all your screen, or a portion of your screen (highlighted in red below) in the meeting.

4. Click Options option to select your preferred audio source. Here pick your microphone to get your voice recorded.
5. Your Zoom meeting recording will begin after you click Record on the bar.
6. Click Stop button to stop the QuickTime recording for your meeting.
A thumbnail appears in the lower corner of your Mac. Click that thumbnail to open your recorded Zoom video. You can then save the recording to anywhere your like, or share it to someone.
To kick off a Zoom session recording on your Mac without using the hotkey, open your Mac's application folder, find QuickTime Player app, open it. The QuickTime Player menu bar appears on the screen. Click the File button and then New Screen Recording. Select the recording area, and then click Record button.
See also: How to Record YouTube Video on Mac
As a cross-platform program, Appgeeker Screen Recorder also helps you create recordings of Zoom meetings, even if you aren't the host or a participant without recording permissions.
The program goes far beyond anything Mac's QuickTime Player allows for recording, letting you capture a Zoom meeting with audio from multiple sources. No matter you want to record internal sound from a meeting, or include voice from your microphone, or both, this versatile meeting recorder has you all covered.
Let's take a look at how to record a Zoom session without permission on a Mac.
Step 1: Launch Appgeeker Screen Recorder for Mac and select "Video Recorder" for capturing your Zoom meeting without requesting permission from host.

Step 2: In the next window that opens, choose a suitable meeting recording area, you can choose from "Full Screen," or "Custom" and then select a portion of your screen to record.
Step 3: Next, enable "System sound," and "Microphone" if you've plugged into a microphone and need your audio to be recorded. Be sure the "System Sound" switch is turned on so that you can get sound from Zoom meeting recorded clearly.
"Camera" option is also available if you want to capture a built-in camera or an external webcam while recording Zoom event.
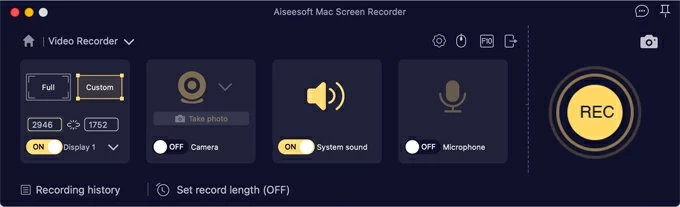
Step 4: Click the "REC" button. Let this Zoom meeting recorder do its work. During the recording, you can get the time of how long it recorded, pause or stop the recording, take screenshots, as well as add annotations.
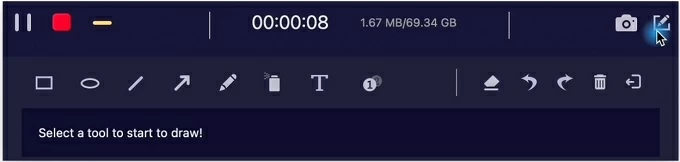
Step 5: Hit the red "Stop" icon in the left corner to stop meeting recording. You then can preview and clip your new recording in the pop-up window, and save it to your local folder.
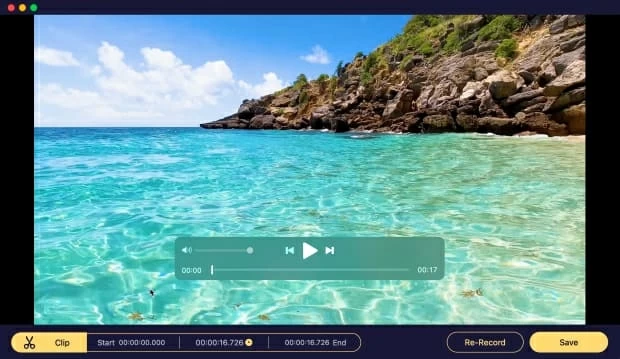
You can start a new recording by clicking "Re-Record" if the existing one is not perfect.
Zoom includes a special folder that is used for saving all recordings created by the App's built-in recording tool. Be default, it's located in your user folder with the path:
You can also find the MP4 files you recorded on Zoom by going to the Meetings tab and then finding Recorded tab. To change the default recordings folder, simply click the Gear icon on the Home tab, then move to Recording tab on the left pane, then hit the folder icon, browse to the desired location and choose Select Folder.


